Installing the Autoloader: Dell™ PowerVault™ 122T LTO Autoloader
- Installation Overview
- Understanding Autoloader Features
- Bar Code Reader
- SCSI Requirements
- Product Overview
- Choosing A Location
- Unpacking the Autoloader
- Identifying Product Components
- Connecting the SCSI and Power Cables
- Preparing the Host and Verifying the Connection
- Installing the Device Drivers
Installation
Overview
Installing the autoloader consists of the following steps, which are explained
in more detail later in this section:
- Choose a location for the autoloader (Choosing a Location).
- Unpack and check the autoloader for shipping damage (Unpacking the Autoloader).
- Identify the accessories that come with the autoloader (Identifying Product Components).
- Install the autoloader in a computer rack or select a table or desktop near the host server (If Installing a Rack Mount Unit, Refer to Your Rack Installation Guide).
- Shut down, turn off, and remove power from the server and all devices attached to the server (Connecting the SCSI and Power Cables).
- Attach the SCSI cable to the autoloader and server's SCSI host adapter (Connecting the SCSI and Power Cables).
- Attach the power cable to the autoloader and plug in the power cable to the nearest power outlet (Connecting the SCSI and Power Cables). Power the autoloader on to ensure it passes the power-on self test.
- Set the SCSI ID for the autoloader and/or tape drive. (If Necessary, see Changing the SCSI IDs).
- Set up the host and verify the connection (Preparing the Host and Verifying the Connection).
Understanding
Autoloader Features
The autoloader is a SCSI-2 low-voltage Differential (LVD) data storage
device that incorporates a Dell PowerVault 122T LTO tape drive and eight
tape slots. The autoloader occupies two SCSI target addresses, one for
the tape drive and the other for the autoloader robotics. The autoloader
uses up to eight LTO Ultirium data cartridges, providing a maximum formatted
capacity of 1.6 Terabytes and a sustained data transfer rate as high as
1.8 GB per minute, assuming a 2:1 compression ratio.
The autoloader is compatible with most operating systems and environments that support the SCSI interface, but requires either direct support from the operating system or a compatible backup application to take full advantage of its many features.
Bar
Code Reader
Your autoloader may have come equipped with an optional bar code reader.
The bar code reader is enclosed in a plastic housing that protrudes out
the rear panel of the autoloader, just above the SCSI connectors. The
bar code reader automatically scans each cartridge in the carousel upon
power up, after a reset, or when a Re-inventory command is issued. (See
Creating an Inventory of Cartridges For Instructions.) Beyond that, there
is no user interface with the bar code reader via the front panel operator
controls or LCD display. The information from each label is stored in
memory and available through SCSI to the computer’s operating system
or backup application upon request.
If utilizing
the bar code reader, you must apply bar code labels to the recessed area
on the front of each cartridge. The labels must conform to ANSI/AIM BC1
-1995, Uniform Symbology Specification Code 39. A set of bar code labels
will be included with the autoloader. Refer to support.dell.com
for information on obtaining additional bar code labels.
SCSI
Requirements
The autoloader incorporates a wide SCSI-2, low-voltage Differential (LVD)
SCSI bus. The autoloader may be attached to a single-ended (SE) SCSI bus,
however this is not recommended as performance will be restricted. Make
sure your SCSI host adapter or controller supports these standards. If
you connect the autoloader to an SE SCSI bus or if there are SE devices
attached to the same SCSI bus, the autoloader's performance is limited
to the maximum data transfer speed and maximum cable lengths of the SE
bus. The autoloader is NOT compatible with a standard differential (Diff)
or high-voltage Differential (HVD) SCSI bus. The autoloader may be attached
to a narrow (50-pin) SCSI bus, however this is not recommended, as performance
will be restricted. Attaching to a narrow (50-pin) bus will require a
customer-supplied 68-pin to 50-pin adapter that terminates the unused
18 pins. a customer-supplied 68-pin to 50-pin adapter that terminates
the unused 18 pins. These adapters are sometimes labeled high-byte termination.
Product
Overview
Front Panel Controls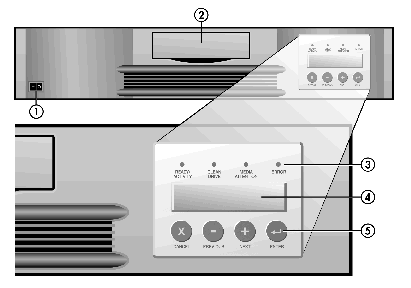
1 Power Switch
2 Media Door
3 Front Panel LEDs
4 Front Panel LCD Screen
5 Control Keys
Rear Panel
Overview
1 68-pin SCSI Connectors
2 Fan Vent
3 Power Connector
![]() NOTE:
The arrows indicate the screws that need to be removed in order to lift
the top cover.
NOTE:
The arrows indicate the screws that need to be removed in order to lift
the top cover.
Choosing
a Location
Choose a location that meets the following criteria (See Technical Specifications
For More Information On Specifications):
Standalone
Requirements
Select a location that is flat, sturdy, level, and close to a host server.
Do not place the autoloader on the floor or other carpeted surfaces.
![]() CAUTION:
Do not place the autoloader on its side or upside down or stack items
that weigh more than 15 KG on top of the autoloader.
CAUTION:
Do not place the autoloader on its side or upside down or stack items
that weigh more than 15 KG on top of the autoloader.
Rack Requirements
Standard 19-inch rack with 2U of clearance.
Room Temperature
10-35º C (50-95º F)
Power Source
AC power voltage: 100-127 VAC; 200-240 VAC
Line frequency: 50-60 Hz
NOTE: Locate
the AC outlet near the autoloader. The AC power cord is the product's
main AC disconnect device and must be easily accessible at all times.
Weight
26 lbs (12 kg)
Air Quality
Minimal sources of particulate contamination. Avoid areas near frequently
used doors and walkways, stacks of supplies that collect dust, printers,
and smoke-filled rooms.
NOTICE: Excessive
dust and debris can damage tapes and tape drives.
Humidity
20-80% RH
Clearance
Back: Minimum of 15.4 cm (6 Inches)
Front: Minimum of 30.8 cm (12 Inches)
Sides: Minimum of 5.08 cm (2 Inches)
Unpacking
the Autoloader
Before you begin, clear a desk or table so that you can unpack the autoloader.
You also need to select an open 2U computer rack location or choose a
desktop location near the server that is to be the host for the autoloader.
NOTICE: If the room in which you are working differs from the temperature in which the autoloader was shipped or stored by 30° F (15° C) or more, let the autoloader acclimate to the surrounding environment for at least 12 hours before opening the shipping carton.
Unpack and inspect the autoloader for shipping damage by doing the following:
Clear a table or desk so that you have room to unpack the autoloader.
Inspect the shipping box for damage. If you notice any damage, report it to the shipping company immediately.
Open the shipping box and remove the accessories package. Set the accessories package aside for now.
Lift the autoloader and padding out of the box and place it on the work surface, top facing up. Do not set the autoloader on either end or sides.
Carefully remove the shipping padding from the left and right sides of the autoloader. Then remove the bag from the autoloader. Save the packing materials in case you need to move or ship the autoloader in the future.
Identifying
Product Components
Accessories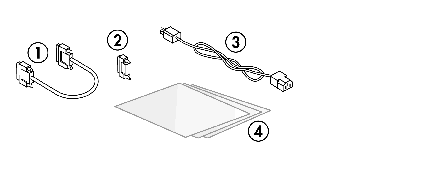
1 SCSI Cable
2 SCSI Terminator
3 Power Cable
4 Marketing and Regulatory Information
Rack Kit
Components (If Rackmount Unit)
Connecting
the SCSI and Power Cables
To connect the SCSI and power cables to the autoloader, follow these steps:
Shut down and turn off the selected server. Turn off all attached accessory devices, such as printers and other SCSI devices. Remove the power cables from the server and all attached accessories.
NOTICE: Failure to remove the power cables from these devices could result in damage to the autoloader.
Attach one end of the SCSI cable (Included In the Accessory Kit) to one of the connectors on the rear panel of the autoloader.
Attach the other end of the SCSI cable to the connector on the SCSI host adapter or to the connector on the previous device on the SCSI bus.
Attaching
SCSI and Power Cables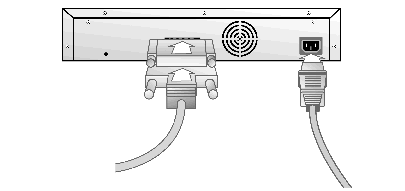
If the supplied SCSI cable does not fit the connector on your SCSI host
adapter, you either have an incompatible SCSI host adapter or you need
to purchase a cable adapter. Contact your service representative or your
SCSI host adapter manufacturer for information.
Attach the terminator to the remaining SCSI connector on the rear panel of the autoloader (If the Autoloader Is the Last or Only Device On the SCSI Bus). Otherwise, attach the cable to the next device on the SCSI bus. Make sure that the last device on the SCSI bus is properly terminated.
Attach the female connector on the power cable to the power connector on the rear panel of the autoloader.
Plug in the power cable to the nearest properly grounded power outlet.
![]() CAUTION:
To disconnect all power from the autoloader, remove the power cord from
the outlet.
CAUTION:
To disconnect all power from the autoloader, remove the power cord from
the outlet.
Plug in the host server or workstation and all attached devices.
Turn on the autoloader by setting the power switch on the front panel to the ON position. Turn on any other devices you turned off earlier. Check the LCD display to make sure the autoloader is receiving power. If it is not, check the power connections and your power source.
During the Power-On Self Test (POST), all four LEDs are illuminated briefly, followed by just the Ready/Activity LED flashing. When the initialization sequence is complete, the LCD screen displays the Home screen.
Turn on the server.
Preparing
the Host and Verifying the Connection
If necessary, install a SCSI host adapter, software, and compatible driver(s).
Refer to the manuals for the host computer and SCSI host adapter for detailed
instructions. In addition, follow these general guidelines:
When the host server is powered on, install software, and/or driver(s) that are compatible with the autoloader. (See Installing the Device Drivers For More Information.) Software compatibility information is available at support.dell.com. Most backup software packages require an additional module to communicate with the autoloader robotics.
If the host server is connected to a network, check with the system administrator before turning off power.
Use proper procedures to prevent electrostatic discharge (ESD). Use wrist-grounding straps and anti-static mats when handling internal components.
Make sure that the host server has an open expansion slot.
Make sure that your backup application supports the SCSI host adapter.
Depending on the server configuration, you may need to change the SCSI ID of the autoloader and/or tape drive. (See Changing the SCSI IDs For More Information.)
Ensure the autoloader is properly terminated. If the autoloader is the only SCSI device - other than the SCSI host adapter - on the selected SCSI bus, it must be terminated. Likewise, if the autoloader is physically the last SCSI device on the SCSI bus, it must be terminated. Only the devices physically at the beginning and end of the SCSI bus should be terminated.
Verify the connection between the autoloader and host by:
Making sure that the host server's operating system recognizes the autoloader by going to: Settings -> Control Panel -> SCSI Adapter in Windows NT or Settings -> Control Panel -> System -> Hardware -> Device Manager -> Tape Drive and/or Media Changer in Windows 2000. For more information on verifying the connection of SCSI devices, consult the operating system documentation.
Installing
the Device Drivers
There are two device drivers associated with the Dell PowerVault 122T
Autoloader. One for the Autoloader itself, and a second for the LTO Tape
Drive within the Autoloader.
![]() NOTE:
The device drivers supplied on the Dell PowerVaul 122T LTO Autoloader
User's Manual and Drivers CD are required if you intend to use Microsoft
Windows® 2000 native backup application. Commercial backup applications
provide all necessary device driver support. Refer to support.dell.com
for a list of compatible backup applications. Please note that Microsoft®
Windows NT® does not include native support for Autoloaders. A backup
application must be used if using the Dell PowerVault 122T Autoloader
under Microsoft® Windows NT®.
NOTE:
The device drivers supplied on the Dell PowerVaul 122T LTO Autoloader
User's Manual and Drivers CD are required if you intend to use Microsoft
Windows® 2000 native backup application. Commercial backup applications
provide all necessary device driver support. Refer to support.dell.com
for a list of compatible backup applications. Please note that Microsoft®
Windows NT® does not include native support for Autoloaders. A backup
application must be used if using the Dell PowerVault 122T Autoloader
under Microsoft® Windows NT®.
Tape Drive
Device Driver
Microsoft Windows® 2000:
Make sure that you are logged on to the host server with Administrator privileges.
Insert the Dell PowerVault 122T Autoloader User's Manual and Drivers CD into the CD drive on the host server.
Right-click the My Computer icon on the Windows desktop, click Manage, then click Device Manager.
The LTO drive should be listed under the "? Other Devices" item as "HP Ultrium-1 SCSI SCSI Sequential Device."
Right-click the HP Ultrium-1 SCSI Sequential Device listing, click Uninstall, and then click the OK button to confirm that you want to remove the device.
Click the Action button in the upper-left corner of the Computer Management dialog box.
Click Scan for Hardware Changes. Windows® 2000 now scans for the PowerVault 122T LTO drive. The LTO drive appears under "? Other Devices" again.
Right-click the HP Ultrium-1 SCSI SCSI Sequential Device listing and click Properties.
Select the Driver tab.
Click the Update Driver button.
When the Upgrade Device Driver Wizard appears, click the Next button.
Click Display a list... and then click the Next button.
Scroll down and click on Tape Drive, then click Next.
Click the Have Disk button, type d:/Drivers/W2K/LTO/LTO Drive, replacing d: with the drive letter for the CD drive into which you inserted the Dell PowerVault 122T Autoloader User's Manual and Drivers CD, and click the OK button.
Click the Hewlett Packard LTO Ultrium Tape Drive entry and click the Next button (NOTE: Depending on the status of your system and the exact path taken to select the device driver, the driver may appear as "hplto.inf").
Click the Next button again to install the driver.
Click the Finish button.
Close the Device Properties dialog box.
The drive now appears in Device Manager under Tape Drives as a Hewlett Packard LTO Ultrium Tape Drive and is ready to use.
Autoloader
Device Driver
Microsoft Windows® 2000:
Make sure that you are logged on to the host server with Administrator privileges.
Insert the Dell PowerVault 122T Autoloader User's Manual and Drivers CD into the CD drive on the host server.
Right-click the My Computer icon on the Windows desktop, click Manage, then click Device Manager.
The Autoloader should be listed under the "Medium Changers" item as "Unknown Medium Changer Device".
Right-click the Unknown Medium Changer Device listing, click Uninstall, and then click the OK button to confirm that you want to remove the device.
Click the Action button in the upper-left corner of the Computer Management dialog box.
Click Scan for Hardware Changes. Windows 2000 now scans for the PowerVault 122T LTO Autoloader. The Autoloader appears under Medium Changers again.
Right-click the "Unknown Medium Changer Device" listing and click Properties.
Select the Driver tab.
Click the Update Driver button.
When the Upgrade Device Driver Wizard appears, click the Next button.
Click Display a list... and then click the Next button.
Click the Have Disk button, type d:/Drivers/W2K/LTO/Autoloader, replacing d: with the drive letter for the CD drive into which you inserted the Dell PowerVault 122T Autoloader User's Manual and Drivers CD, and click the OK button.
Click the Dell PV 122T Autoloader entry and click the Next button. (NOTE: Depending on the status of your system and the exact path taken to select the device driver, the driver may appear as "Ltovsdmc.inf")
Click the Next button again to install the driver.
Click the Finish button.
Close the Device Properties dialog box.
The Autoloader now appears in Device Manager under Medium Changers as a Dell PowerVault 122T Autoloader, and is ready to use.