![]()
![]()
Dell™ PowerVault™ 220S and 221S Systems Service Manual
|
Overview | Components and Indicators | |
| System Features | Technical Specifications | ||
|
Service Features |
Dell™ PowerVault™ 220S and 221S systems are reliable, flexible, external SCSI expansion enclosures designed to support multiple Dell storage environments and RAID configurations. Each system offers maximized drive-spindle count, hot-plug hard drives, optional redundant power supplies, redundant cooling modules, rackmount capability, systems management features, and a modular design for easy upgrades. Most major components, including hard drives and power supply/cooling modules are hot-pluggable and can be removed and replaced easily. The enclosure management module (EMM), split-bus module, and SCSI terminator card are "warm-pluggable." This means they can be removed or inserted while the power is on, but all I/O activity has ceased.
This section provides an overview of system features and components, and technical specifications.
Your system offers the following features:
Your storage system was designed for easy serviceability. All hard drives, power supplies, cooling modules, EMMs/SCSI terminator cards, and split-bus modules can be removed and replaced without having to remove system covers or other components.
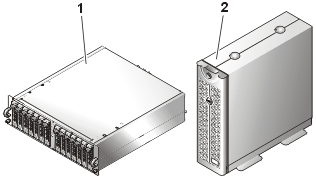
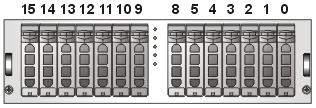
Figure 1 shows the front-view orientation of both systems.
 |
|
Figure 2 illustrates LED indicators and components on the system's front panel. Table 1 lists conditions indicated by each LED.
Figure 2. Front-Panel Features
 |
|
Table 1. Front Panel Indicators
| LED Indicator | LED Icon | Condition |
|---|---|---|
| Power (green) | At least one power supply is supplying power to the system. | |
| Shelf-fault (amber) | One of the following conditions has occurred: power-supply failure, EMM failure, cooling-module failure, over-temperature condition, split-bus module not installed, or firmware currently being downloaded. For more information, see "Basic Troubleshooting." | |
| Cluster (green) | The system is configured for cluster mode. For more information, see "Split-Bus Module." | |
| Split-bus (green) | The system is configured for split-bus mode. For more information, see "Split-Bus Module." | |
| Over-temperature (amber) | An over-temperature condition has occurred (the system will shut down when the temperature inside the box exceeds 50°C [122°F]). For more information, see "Basic Troubleshooting." |
Each of your system's 14 hard-drive carriers has two LED indicators: a busy indicator and a status indicator (see Figure 2 for location). Table 2 shows the hard-drive LED indicators with the associated LED icons. Table 3 lists the flash patterns for the hard-drive status indicator.
Table 2. Hard-Drive Carrier LED Indicators
| LED Indicator | LED Icon | Condition |
|---|---|---|
| Busy (green) | The hard drive is active on the SCSI bus. NOTE: This LED is controlled by the hard drive. |
|
| Status (green and amber) | See Table 3 for flash patterns and conditions. |
Table 3. Hard-Drive Carrier Status Indicator Flash Patterns
| Condition | Status Indicator Pattern |
|---|---|
| Slot empty, ready for insert/remove | Off |
| Drive online, prepare for operation | Steady green |
| Drive identify | Flashes green four times per second |
| Prepare for removal | Flashes green twice per second at equal intervals |
| Drive rebuild | Flashes green twice per second at unequal intervals |
| Drive fail | Flashes amber four times per second |
| Predicted failure | Flashes green, then amber, then off, repeating this sequence every 2 seconds |
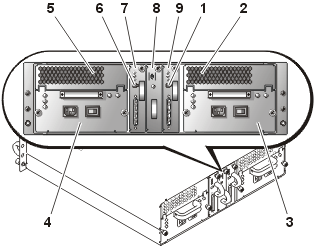
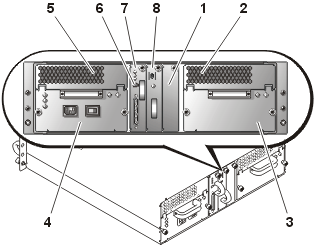
Figure 3 illustrates the back-panel features for systems with redundant EMMs and redundant power supplies. Figure 4 illustrates the back-panel features for nonredundant systems. See Figure 5, Figure 6, and Figure 8 for more detail on the back-panel indicators.
Figure 3. Back-Panel Features (Systems With Redundant EMMs and Redundant Power Supplies)
 |
|
Figure 4. Back-Panel Features (Systems With Nonredundant EMMs and Nonredundant Power Supplies)
 |
|
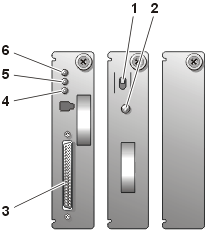
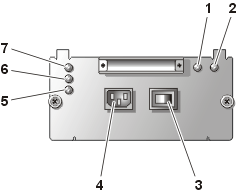
Figure 5 illustrates the features and indicators on the back-panel modules. See Figure 6 for more information about bus configuration switch modes.
Figure 5. Back-Panel Modules Features and Indicators
 |
|
Your system supports three SCSI bus modes controlled by the split-bus module:
These modes are controlled by the position of the bus configuration switch when the system is turned on. Figure 6 illustrates the switch position for each mode. For more information on configuring the SCSI bus modes, see your Installation and Troubleshooting Guide.
Figure 6. Bus Configuration Switch Modes
 |
|
The only difference between cluster mode and joined-bus mode is the SCSI ID assigned to the enclosure services processor on the EMM. When cluster mode is detected, the processor SCSI ID changes from 6 to 15. As a result, SCSI ID 15 is disabled, leaving 13 available hard drives in cluster mode. This allows a second initiator, such as a host bus adapter or RAID controller card on a second host server, to use SCSI ID 6 (see Table 4 for SCSI ID assignments and Figure 7 for associated hard drives).
Figure 7. SCSI ID Numbers and Associated Hard Drives
 |
See Table 5 for a description of split-bus module modes and functions.
| NOTE: To change the SCSI bus mode, you must change the position of the bus configuration switch before turning on the storage system. Changing the position of the bus configuration switch while the system is on will not affect system operation. If you change the configuration, you must first reboot the storage system and then the host server for the changes to take effect. For more information on SCSI bus modes, see your Installation and Troubleshooting Guide. |
Table 5. Split-Bus Module Modes
| Mode | LED Icon | Position of Bus Configuration Switch | Function |
|---|---|---|---|
| Joined-bus mode | Up for rack systems, right for tower systems | LVD termination on the split-bus module is disabled, electrically joining the two SCSI buses to form one contiguous bus. In this mode, neither the split-bus nor the cluster LED indicators on the front of the system (see Figure 2 for locations) are illuminated. | |
| Split-bus mode | Center for all systems | LVD termination on the split-bus module is enabled and the two buses are electrically isolated, resulting in two seven-drive SCSI buses. The split-bus LED indicator on the front of the system (see Figure 2 for location) is illuminated while the system is in split-bus mode. | |
| Cluster mode | Down for rack systems, left for tower systems | LVD termination is disabled and the buses are electrically joined. The cluster LED on the front of the system (see Figure 2 for location) is illuminated while the system is in cluster mode. |
The split-bus module has only one LED indicator (see Figure 5 for LED location), which is illuminated when the module is receiving power.
The EMM serves two primary functions in your storage system:
A system with redundant enclosure management features has two EMMs that are designated as primary and secondary that can be configured in either a cluster or joined-bus mode. A system with nonredundant enclosure management has one EMM and one SCSI terminator card configured in a joined-bus mode or two EMMs configured in a split-bus mode. In redundant EMM systems, only one EMM per SCSI bus is active at one time, so only one EMM per SCSI bus can respond to SCSI commands from an initiator.
In joined-bus and cluster modes, if a secondary EMM receives a message that the primary EMM has failed, the fault LED indicator on the primary EMM is illuminated and the condition is reported back to the host server. The secondary EMM will then become active and hold the failed primary in a state of reset until it is replaced. If the primary EMM detects that the secondary has failed, the secondary's fault LED indicator is illuminated and the failed status is reported back to the host server.
| NOTE: In split-bus mode, although each EMM monitors the entire storage system, it controls only half of the hard-drive slots. If one EMM fails in split-bus mode, the second EMM will report the failure, but will not assume control of the hard-drive slots that were previously controlled by the failed EMM. |
| NOTE: The EMM is "warm-pluggable." This means it can be removed or inserted while the power is on. However, all I/O activity between the host and the storage system must be stopped. |
The primary EMM is always plugged into the slot on the left (viewed from the back of the system). In systems with redundant EMMs configured for joined-bus mode, the primary EMM assumes control of all the system's functionality. In addition, the active EMM is the only module that reports status of the system to the host server through SES and SAFTE protocols. Because the secondary EMM must assume the responsibilities of the primary in the event that the primary fails, both the primary and secondary EMMs are continuously monitoring the status of the system's components.
Table 6 lists the conditions for each EMM LED indicator. See Figure 5 for location of the LED indicators.
| LED Indicator | LED Icon | Condition |
|---|---|---|
| Power (green) | The system is receiving power. | |
| Fault (amber) | An EMM has failed. | |
| Active (green) | The EMM is operating normally and performing all the responsibilities of the primary EMM. |
Your system supports two combined power supply and cooling modules. While the system is designed to operate normally with only one functional power supply, both cooling modules (each with two blowers) must be present for proper cooling. If only one power supply is needed, a blank must be inserted into the other slot to mount the second cooling module. In this nonredundant power-supply configuration, the power-supply blank has the capacity to transfer power and control signals to and from the cooling module.
When a power supply fails, fan speeds increase to provide additional cooling. In addition, when replacing power supplies, fan speeds also increase until the replacement power supply or power supply blank has been installed.
| NOTICE: The maximum amount of time that power supply and cooling modules may be removed from the system while it is operating is 5 minutes. If power supply and cooling modules are not replaced within 5 minutes, the system begins to overheat. When the system reaches a critical temperature, it shuts down to prevent damage to the system. |
The cooling module is securely mounted to the power supply using a hook-and-latch fastener. This simplifies the removal and installation of cooling modules and power supplies.
Figure 8 illustrates the power supply and cooling module features and LED indicators. Table 7 lists the function of each power supply and cooling module indicator.
Figure 8. Power Supply and Cooling Module LED Features and Indicators
 |
|
Table 7. Power Supply and Cooling Module LED Indicators
| Module Icon | LED Indicator | LED Icon | Function |
|---|---|---|---|
| Power supply
|
Power on (green) | DC output voltages are within specifications. | |
| Fault (amber) | One of the DC output voltages is not within specifications. | ||
| AC status (green) | AC input voltage is within specifications regardless of the position of the power switch. | ||
| Cooling module
|
Blower A fault (amber) | Cooling module blower A has failed. | |
| Blower B fault (amber) | Cooling module blower B has failed. |
The primary EMM activates an audible alarm if any of the shelf-fault conditions listed in Table 1 occur. If a critical event occurs, the alarm sounds continuously. If a noncritical event occurs, the alarm sounds every 10 seconds. Table 8 lists critical and noncritical events.
| NOTE: The audible alarm is disabled by default. To enable the alarm, you must change the default setting using your array management software. For more information, see your array management software documentation. |
| NOTE: When the system is on and a split-bus module is not detected, the audible alarm will sound regardless of whether it is enabled or disabled. |
Table 8. Audible Alarm Critical and Noncritical Events
| Critical Events | Noncritical Events |
|---|---|
| Two or more cooling-module blowers have failed or a cooling module is not installed. | One power supply has failed. |
| One or more temperature sensors are in critical range (in excess of 50°C [122°F] inside the box). | One cooling-module blower has failed. |
| The split-bus module is not installed. | One or more temperature sensors are in the warning range. |
| One EMM has failed. |
| NOTE: It is rare for both EMMs to fail simultaneously. However, if this event occurs, the system cannot issue critical or noncritical event alarms for any system component. If both power supplies fail simultaneously, the system can issue critical or noncritical event alarms only if 5-V power is available. |
Drives |
|
|---|---|
| SCSI hard drives | support for up to fourteen 1-inch-by-3.5-inch LVD Ultra 160 and Ultra3 SCSI hot-plug hard drives, at speeds of 10K or 15K rpm and capacities of 18 GB or 36 GB (73 GB for 10K rpm drives) |
SCSI |
|
|---|---|
| Buses | can be configured for a single 14-device SCSI bus, a single clustered 13-device SCSI bus, or two independent 7-device SCSI buses |
Back-Panel Connectors |
|
|---|---|
| SCSI connector | 68-pin shielded P-type SCSI for connection to host |
Backplane Board Connectors |
|
|---|---|
| SCSI connector | 68-pin shielded P-type SCSI for connection to host |
| Hard drives | fourteen 80-pin SCA-2 connectors |
| Power supply/cooling module | 2 high-current connectors |
| Enclosure management modules (EMM) | 210-pin connector |
| Split-bus module | 180-pin connector |
Enclosure Modules |
|
|---|---|
| EMM | 2 warm-pluggable modules with 68-pin shielded P-type SCSI connectors |
| Split-bus module | 1 warm-pluggable module with an external slide switch to change between split-bus, joined-bus, and cluster modes |
| SCSI terminator card | 1 warm-pluggable module to the terminate SCSI bus in nonredundant EMM configurations |
LED Indicators |
|
|---|---|
| Front panel | 5 LED status indicators for power, fault, split bus, cluster mode, and over-temperature |
| Hard-drive carrier | 1 single-color activity LED and 1 two-color LED status indicator per drive |
| EMM | 3 LED status indicators for power, fault, and active status |
| Split-bus module | 1 LED indicator for power |
| Power supply and cooling module | 3 LED status indicators for power supply status, power supply fault, and AC status and 2 for cooling module fault |
Power Supplies |
|
|---|---|
| Wattage | 600 W |
| Heat dissipation | 200 W |
| Voltage | 100–240 V rated (actual 85–264 V) |
| Frequency | 50–60 Hz |
| Amperage | 9.4 A at 100 V, 4.6 A at 200 V |
Physical |
|
|---|---|
| Height | 13.26 cm (5.22 inches) |
| Width | 44.58 cm (17.55 inches) |
| Depth | 50.8 cm (20 inches) |
| Weight PowerVault 220S PowerVault 221S |
32.4 kg (71.5 lb) maximum redundant configuration with all hard drives installed 42.2 kg (93.0 lb) maximum redundant configuration with all hard drives installed |
Environmental |
|
|---|---|
| Temperature: Operating Storage |
10° to 35°C (50° to 95°F) –40° to 65°C (–40° to 149°F) |
| Relative humidity Operating Storage |
8% to 80% (noncondensing) 8% to 95% (noncondensing) |
| Altitude Operating |
–16 to 3048 m (–50 to 10,000 ft) |
| BTU per hour | 2750 |