Overview | Safety Information | Connecting the Equipment
This file provides general instructions on connecting the power and data cables to the equipment in the rack.
When connecting equipment in the rack to a power source, Dell recommends that you follow these guidelines:
| CAUTION: Ensure that the total
power requirements of equipment in the rack (see Table 1,
UPS Power Ratings) are
distributed properly to avoid exceeding the 15-A rated
capacity of each power strip. |
| WARNING: You must plug the power
input cable of the UPS or power strip into a two-pole,
three-wire grounding AC power outlet. Do not use an
extension cable or adapter plug. |
| Table 1. UPS Power Ratings |
Model |
Output |
Output |
Output Amps |
Power |
Plug |
| APC 1400 RM | 950 | 1400 | 7.9-11.6 | 0.7 | NEMA 5-15P |
| APC 2200 RM | 1600 | 2200 | 13.3-18.3 | 0.7 | NEMA 5-20P |
| APC 3000 RM | 2250 | 3000 | 18.7-24.9 | 0.7 | NEMA L5-30P |
| * The power factor of a system determines how much output current is available from the UPS. If the system's power factor is greater than 0.90, use the lower output amp value for the UPS. If the system's power factor is 0.60 to 0.70, use the higher output amp value. | |||||
Refer to the following sections when connecting power and data cables to the equipment in the rack.
If you are setting up a rack that has been preconfigured by Dell, the power and data cables for any servers puchased with the rack have been preinstalled on the cable-management arms in the rack. For identification purposes, each end of a double-ended cable (such as SCSI cables and serial cables leading from a computer to the switch box) is labeled with a matching number.
Follow these steps to connect the switch box to the servers in the rack:
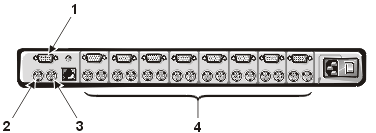
1 |
video connector |
2 |
keyboard connector |
3 |
mouse connector |
4 |
video, keyboard, and mouse
connectors for up to eight systems |
| Table 2. Back-Panel Connections for the Switch Box |
| Video | one 15-pin connector |
| PS/2-style keyboard | nine 6-pin mini-DIN |
| PS/2-compatible mouse | nine 6-pin mini-DIN |
Figure 2. Typical UPS Back-Panel Cable Connections (APC 1400 RM Shown)
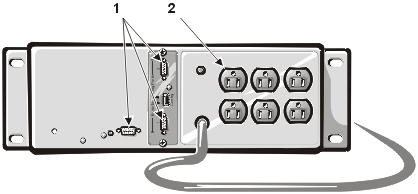
1 |
serial connectors (3) |
2 |
output power receptacles (6) |
| Table 3. UPS Back-Panel Connectors |
| Serial connector(s) | 9-pin connector |
| Output power receptacles | NEMA 5-15R |
Power input connection:
|
NEMA 5-15P NEMA 5-20P NEMA 5-30P |
If you want to use the UPS power management software, connect the serial connector on the UPS back panel to the "master" computer that will control the UPS power management features. If a UPS interface card is installed in the UPS, connect any other protected computers or storage systems to the serial connectors on the UPS interface card.