 |
FECO: | BML # 2 |
| MODIFICATION No: | N/A | |
| PRODUCT: | MOTOROLA 8120 MOTOROLA 8220/8420 | |
| SUB-ASSEMBLY | FIRMWARE UPGRADES | |
| ESTIMATED MAN HOURS | 1 HOUR | |
| CLASS OF CHANGE: | MANDATORY | |
| REASON FOR CHANGE: | UPGRADE OF FIRMWARE |
FECO BML # 2
|
FECO: | BML # 2 |
| MODIFICATION No: | N/A | |
| PRODUCT: | MOTOROLA 8120 MOTOROLA 8220/8420 | |
| SUB-ASSEMBLY | FIRMWARE UPGRADES | |
| ESTIMATED MAN HOURS | 1 HOUR | |
| CLASS OF CHANGE: | MANDATORY | |
| REASON FOR CHANGE: | UPGRADE OF FIRMWARE |
1. Introduction
This must be carried out when installing memory and there is a mixture of ecc memory and non ecc memory in the same machine. Ecc memory has 2 large chips on the board whereas non ecc memory has 3 large chips on the memory board. A mixture of memory types with old firmware may give a problem of the machine not booting.
2. Check.
2.1 check the revision of the firmware, if it is not the required level or later, then it will need to be upgraded.
Motorola 8120 required level:- revision 2.1
Motorola 8220/8420 required level:- revision 1.4
2.2 upgraded firmware to be arranged via technical services.
3. Motorola 8120
3.1 use the env command to display and note all of the operational
parameters, using
3.2 shutdown the computer using the "powerdown" command.
Unplug the mains from the CPU and disc cabinets
and remove the disc cabinets from the CPU.
Remove cover by removing the four screws from underneath
the CPU. Remove the front panel from the CPU
(it is held in place by 2 plastic clips one on each side).
Undo the four screws that hold the memory board in place and lift the board out and place it to one side. Ease the main board out and the firmware chips are visible labeled u1 and u4. Remove the 2 chips and replace them with the new firmware chips, d revision or later.
Reassemble the 8120 in the reverse sequence remembering to add four posts to the first memory board so that the second board will be firmly secured.
3.3 the 8120 then needs to be tested as in para. 5.
(tech serv ref 97/05)
4. Motorola 8220/8420
4.1 use the env command to display and note all of the operational
parameters, using
4.2 shutdown the computer using the powerdown command and disconnect
the a/c power. Remove the front
cover by inserting a screwdriver in the front
panel hole and turning the screw counter-clockwise. If the
chassis has the optional keylock installed, it
must be first unlocked. Pull the top of the front cover forward
and lift it away from the system.
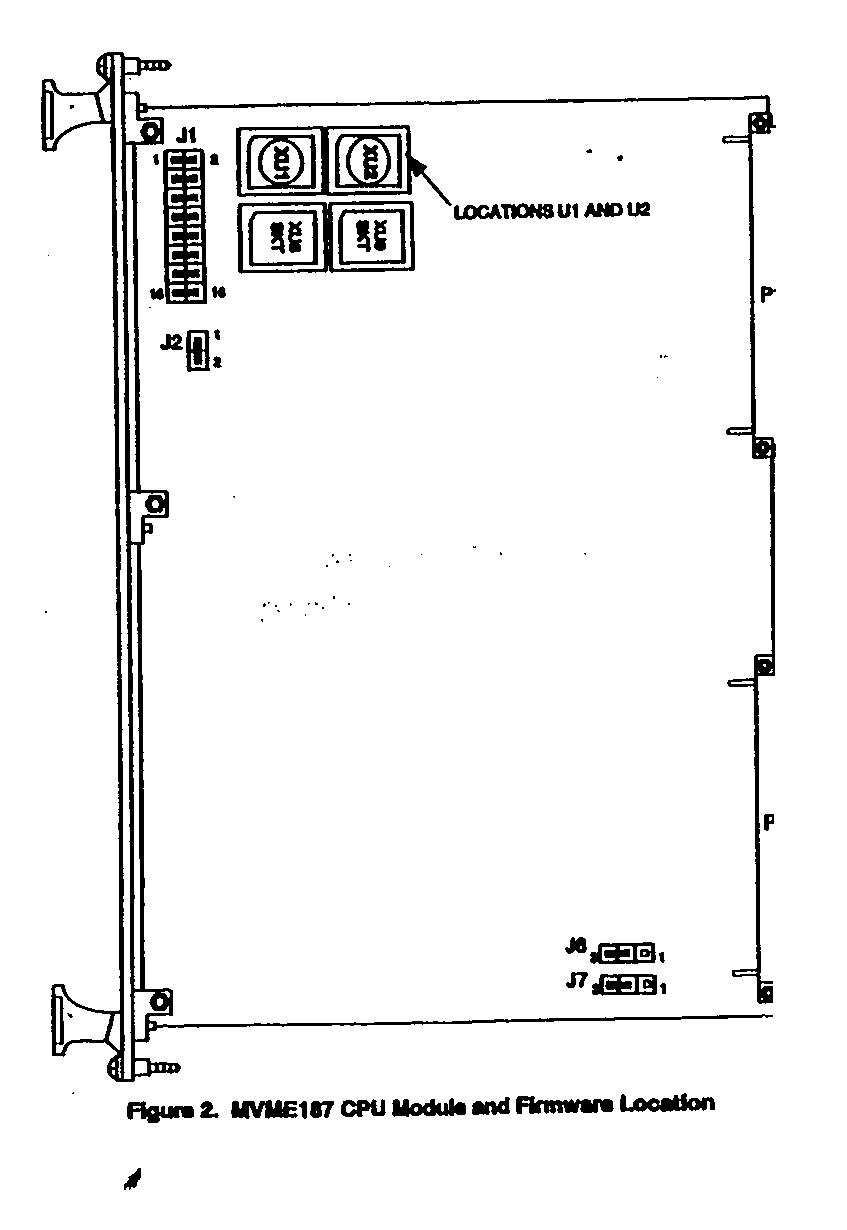
Locate the mvme167/mvme187 board. Lift the top and bottom ejector handles and pull the mvmr167/mvme187 board set evenly forward out of its backplane slots.
The 167bug/187bug eproms are installed at locations xu1 xu2. See enclosed figures for position on the module.
Remove chips.
Re-assemble in reverse sequence using four posts for the extra memory board.
4.3 test using para 5.
5. Testing
5.1 exit the system mode and go to the system debugger (control and break).
5.2 reconfigure the nvram. The env command allows the user to
interactively view/configure all 167/187bug
operational parameters kept in battery backed
up ram(bbram), also called non-volatile ram(nvram). The
operational parameters are saved in nvram and
used whenever power is lost.
Once the env command is invoked and executed without error, the 167/187bug default and/or user parameters are loaded in nvram along with checksum data. If any of the operational parameters have been modified, these new parameters are not in effect until a reset/powerup condition.
5.3 enter, env;d(at "bug" prompt)
The CPU senses the correct available memory and env is set correctly.
5.4 system self test runs successfully; but since env;d disables autoboot, re enter env and set the following:
Auto boot enabled y (default=n)
Auto boot at power-up only n(default=y)
5.5 reset the system.
6. Recording action
Complete all relevant documentation.