NET # 1
 |
FECO:
|
NET # 1 |
|
MODIFICATION NO:
|
N/A |
|
PRODUCT:
|
AXEL 3000-55 PLATINE TERMINAL
|
|
SUB-ASSEMBLY:
|
N/A |
|
ESTIMATED MAN HOURS:
|
N/A |
|
CLASS OF CHANGE:
|
INFORMATIONAL |
|
REASON FOR CHANGE:
|
INTRODUCTION OF NEW PRODUCT |
|
RELATED FECO/AB
|
N/A |
AXEL 3000-55 PLATINE TERMINAL
1 INTRODUCTION
This
is to introduce the Axel 3000-55 Platine Terminal.
2 DESCRIPTION
2.1 When put with a monitor and
keyboard it becomes a very versatile unit with the general
functionality of;
a dumb terminal (VDU)
a networked terminal (PC)
a networked Serial Printer Server.
Whilst it does not have the full functionality of a PC, (no internal OS, Applications,
memory or
games) it would be ideal in a situation where this full functionality is not required.
This would
especially
be suitable for small remote sites.
2.2 The 3000-55, with Monitor and
Keyboard together are know by EDP as a Netterm.
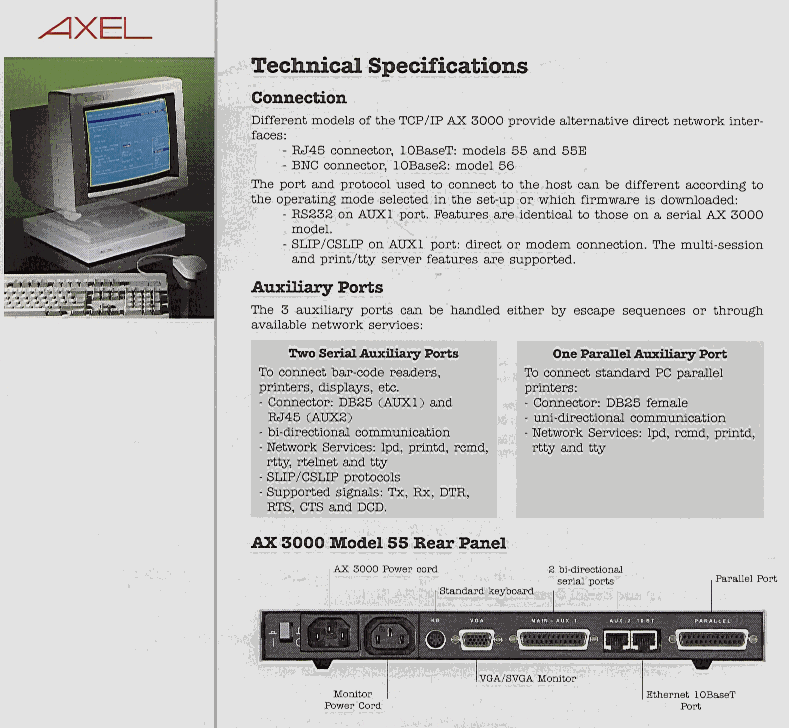
2.3 The 3000-55 can support two other serial
devices and/or a printer. It is possible for it to act as a
small terminal
server, or print server, though device numbers are very limited.
2.4 The appearance is of a small beige box
(pizza box), approx 11.5 inches square and approx 1.25
inches
high. Basically it is a platform for the monitor to sit on.
2.5 A web browser version will be available
at a later date.
3 SPECIFICATIONS
3.1

3.2 The power consumption is 10 watts without
the Monitor and keyboard.
There is a single
green LED lit on the front when the power is on.
4 MEC IDENTITY
AXEL-NET-BASE(AX3000/M55)
5 CABLE SPECS
5.1
Serial Parallel Connections
Network connection to hub
Cable Type JF
Network connection to Ethernet Controller.
Cable Type JP
Parallel Printer connection
Cable Type AS1
Main—Aux1 Serial Connection Input from system; treat as normal VDU/Printer
Main---Aux1 Serial Connection Output to VDU/Printer Cable Type KM
Aux2 Serial
Connection output to VDU/Printer Cable Type KN
5.2 Cable Type KM
Axel
VDU/PTR
Main/Aux1
25pin
25pin
D Type Male
D
Type Male
---------SCREEN----1
2----------------------------3
3----------------------------2
5----------------------------20
7----------------------------7
20--------------------------6
5.3 Cable Type KN
Axel Aux2
VDU/PTR
RJ45
25pin
Male
D Type Male
---------SHIELD------1
2--------------------------6
3--------------------------2
4--------------------------7
5--------------------------20
6--------------------------3
6 CONFIGURATION
There are two basic ways to
configure the Axel 3000-55, as a network device, and as a serial
device. These two ways are detailed
below.
7 INITIAL CONFIGURATION
7.1 The set ups are menu driven.
To enter set-ups, hold down the CTRL-ALT-ESC
keys, together.
7.2 Navigation. Follow the onscreen prompts and use the Up, Down,
Left and Right arrow keys,
Tab, Spacebar, Escape and <CR>
keys to navigate the menu structure and action settings.
7.3 The main menu is:-
Quick Set-up
TCP/IP
Terminal
Aux. Ports
Advanced
Exit
8 NETWORK CONNECTION
8.1 The 3000-55 may be connected to a network as part of a LAN,
or at a remote site as part of a WAN.
If the remote site is small the
3000-55 may be connected directly to the router.
8.2 The following sample settings are for an SVR4 system,
running MERCHANT; and the 3000-55
having a parallel printer
attached. The settings for individual sites may be different.
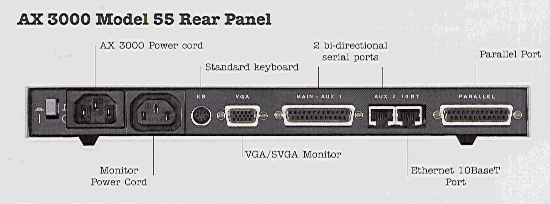
8.3 Connect the network cable to the
Ethernet 10BaseT port marked 10 BT .
8.4. PREREQUISITES
Before an Axel 3000-55
can be configured the following must be available:-
Network diagram of the complete network
.
IP Address and Subnet Mask of
the Axel 3000-55.
IP Address and Subnet Mask of the host(s) and Name(s) to identify them.
9 NETWORK SET-UP
9.1 From the Main Menu select Quick set up and set
the following parameters
AX3000
Keyboard
English
AX3000 IP Address
Host
Host Name
Host IP Address
Multi Session
Number of Sessions
6
Pre defined
Configuration
ANSI
Status Line
No
LPD Printer
Enable
No
Printer name
9.2 At the top level of the setups select ? to
obtain AX3000 Information
A typical response is:-
Hardware
FK5-BV12a
Firmware
TCP.XX.9832f.WYS
Ethernet Address
00:A0:34:00: 79:26
RAM
120Ko
NVRAM
8Ko
VGA
5429
9.3 From the Main Menu select TCP/IP and the
following sub-menus are displayed.
Interface
Hosts
Routers
9.4 From the TCP/IP Menu select Interface and set
the following Interface parameters
AX3000 IP Address as
required see para 8.4.3……………….
Net Mask 255.255.255.0
9.5 From the TCP/IP Menu select Hosts and set the
following Hosts parameters
Host Name IP address
As required as
required
There can be up to
8 listed.
9.6 From the TCP/IP Menu select Routers
and set the following Routers parameters
Default Router
IP address as required……………………..
Gateway IP
addr Target IP addr Target Type
as
required as required
as required
9.7 From the Main Menu select Terminal and the
following sub menus are displayed
General
Multi-session
Session 1
Session 2
Session 3
Session 4
Session 5
Session 6
Copy/Paste
9.8 From the Terminal Menu select General
and set the following General Parameters
Screen
Screen Type
Colour
Enhanced Screen Mode
No
Screen Saver
No
Delay (minutes)
From the Menu select
Keyboard and set the following
Nationality
English
NUM Led
Initialisation
On
CAPS Led
Initialisation
On
Beep
No
Repeat Key Delay
Medium (500 ms)
Repeat Key Speed
Medium
From the Menu select Peripheral and set
the following
Default Port
Parallel
9.9 From the General Parameters Menu select Screen
Type options and enter requirements
Colour
Grey Scale
Monochrome
White Paper
Select Colour
9.10 From the General Parameters Menu select Nationality options and
set the following .
American & {European}
English
Select English
9.11 From the General Parameters Menu select Peripheral
options and the following menu is
displayed.
None
AUX 1 (25 Pts)
AUX 2 (RJ45)
Parallel
Select Parallel and
set it to Parallel
9.12 From the Terminal Menu select Terminal Multi-Session and set
the
following Terminal
Multi-Session parameters
Multi Session
Parameters
Session
Number of Sessions
6
Number of Pages
1
Keys for Switching
Session
Introducer
Alt
Session 1 Key
F1
F2
F3
F4
F5
F6
Multi-Screen Keys
<Space>
Status Line
Enable
Yes
9.13 From the General Menu select Session 1 and set the
following Session 1parameters
Session 1 Profile
Connection
Parameters
Connection Protocol
telnet
Host
svr4 example
TCP Port
23
Auto-Connection
Yes
Auto-Reconnection
Yes
From the Menu select
Terminal Parameters
Terminal Parameters
Pre-defined
Configuration
VT 220
TERM Value
vt220
General Parameters
<Space> *
User-Defined Keys
<Space>
Overscan
No
Colouring Mode
Enhanced
Colouring Mode
Settings
<Space>
Session Label
as required
N.B. the Session
Label is displayed in the Status line at the bottom of the screen [ when the
Status Line is Enabled
( see Multi-session section above )
9.14 From the Session 1 Profile Menu select Terminal
Parameters and set
the following General
Parameters
Emulation VT220
*Display
Keyboard
Character Set
DEC-MC
Coding
ASC11
Columns
80
CAPS key mode
Caps Lock
Rows
24
Composed Characters
Local
Vertical Scrolling
Yes
Wrap
No
Operating Mode
CR=CR+LF
No
Answer Back
……….
Cursor Shape
Underline
Monitor Mode
No
Tabulations
<Space>
Remote
Terminal set-up Yes
Enhanced Screen Mode
Blink Allowed
Yes
Auxiliary Port
End Sequence
\1B[4I
Function keys are
specific to each individual session.
For <CR> use
\0D in VT220 emulation
i.e. LISTU
<CR> is set as LISTU \0D in the function key field. See Platine Terminal AXEL
Programmers Guide
publication for further details.
9.15 From the Main Menu select AUX1 Port (25Pts) and set
the following AUX1 Port
(25 Pts) parameters
Net Service
Associated
Service
None
Net Service
Parameters
Line
Parameters
Operating Mode
Bidirectional
Speed
19200
Format
8/1/No
Test Device Presence
No
Handshake for
Transmission
None
Handshake for
Reception
XON/XOFF (11h/13h)
9.16 From the Main Menu select AUX2 Port(RJ45) and set
the
following AUX 2 Port
(RJ45) parameters
Net service as above
Line Parameters
Operating Mode
Printer
Bidir
Speed
9600
Format
8/1/NO
Test Device Presence
No
Handshake for
Transmission XON/XOFF (11h/13h)
Handshake for
Reception
9.17 From the Main Menu select Parallel Port and
set the
following Parallel Port
parameters
Net Service
Associated Service
rtty
Net Service
Parameters
(rtty Parameters)
TCP port
2050
NL=CR+NL Filter
No
9.18 From the Main Menu select Advanced and set the following
Advanced parameters
Password Enter
Current if required
Operating Mode Confirm
as TCP/IP
9.19 From the Advanced Menu select Tunings and
set the following Tunings parameters
Net Protocol
Window Size
800
MSS Size
512
Time to Live (ttl)
255
TCP Port Assignment
Random
BaseT Interface
Rejection Threshold
High
VGA Monitor
Video Frequency
Tuning
standard
Serial Auxiliary
Ports
AUX1 Frequency
Tuning
standard
AUX2 Frequency
Tuning
standard
2 Stop bits on AUX 1
No
Parallel Auxiliary
Port
Supplemental Signals
to Handle
select
(options= none,
select, paper, select + paper )
10 SERIAL CONNECTION
10.1 The 3000-55 Main Port may be connected to a serial port on
a system, in place of a VDU.
The port needs to
be configured the same as for a VDU, with the emulation set to VT100.
10.2 The following sample settings are for an SVR4 system,
running MERCHANT; and the 3000-55
having a parallel
printer attached. The settings for individual sites may be different.
11 SERIAL SET-UP
11.1 From the Main Menu select Advanced and then Operating
Mode
And select SERIAL
11.2 The Serial parameters are the same as the network parameters in
paras, 9.8, 9.9, 9.10, 9.11,
9.12, and 9.14. The
other unique Serial settings are shown below.
11.3 From the Menu select Peripheral Options and set the
following
Peripheral options
None
AUX 2 (RJ45)
Parallel
Select Parallel
11.4 From the Menu select Session 1 and set the following
Session 1
Session 1 Profile
Connection Parameters
Connection Protocol THESE ARE ALL BLANK
Host
TCP Port
Auto-Connection
Auto-Reconnection
Terminal Parameters set the following
Terminal Parameters
Pre-defined Configuration
VT 220
TERM Value
General Parameters
<Space> *
User-Defined Keys
<Space>
Overscan
No
Colouring Mode
Enhanced
Colouring Mode Settings
<Space>
Session Label
N.B. In the Serial mode the Session Label is not available
12 REAR VIEW over

Return
to Index


