Back to Contents Page
Configuring Quality of Service
Dell™ PowerConnect™ 3324/3348
User's Guide
 Quality of Service (QoS) Overview
Defining QoS Global Parameters
Mapping to Queues
This section provides information for defining and configuring Quality of Service (QoS) parameters.
- Click Quality of Service in the Tree View. The Quality of Service page opens.
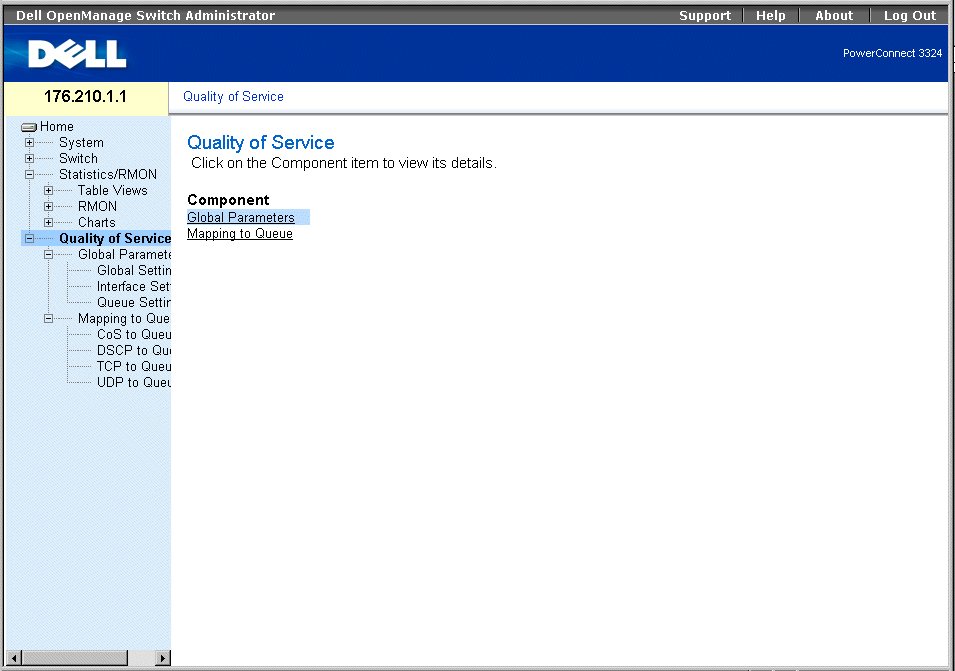
Quality of Service Page
This section includes the following topics:
Quality of Service (QoS) Overview
Quality of Service (QoS) provides the ability to implement QoS and priority queuing within a network. QoS improves network traffic flow based on policies, frame counters, and context.
QoS includes traffic such as voice, video, and real-time traffic that can be assigned a high priority queue, while other traffic can be assigned a lower priority queue. The result is an improved traffic flow for traffic with high demand.
QoS is defined by:
- Classification—Specifies which packet fields are matched to specific values. All packets matching the user-defined specifications are classified together.
- Action—Defines traffic management where packets being forwarded are based on packet information, and packet field values such as VLAN priority (VPT) and DSCP (DiffServ Code Point).
- Prioritization—Traffic is assigned a priority and queued on the appropriate queue for forwarding.
Class of Service (CoS) Information
Eight CoS values can be mapped to one of four forwarding queues (queue 1 to 4). Each queue has a different priority. The first queue has the lowest forwarding priority, while the fourth queue has the highest forwarding priority and is not mapped by default.
 |
NOTE: In a stacking configuration, Queue 4 is used for forwarding stacking traffic. Therefore,
assigning additional traffic to Queue 4 may interfere with stack control.
|
There are three mapping tables:
- CoS to Queue Mapping Table.
- DSCP to Queue Mapping Table.
- TCP/UDP to Queue Mapping Table. The TCP/UDP table is empty by default.
The Cos to Queue Mapping Table has default CoS mapping to forwarding queue values:
|
CoS Value
|
Forwarding Queue Values
|
|---|
0 | q2 |
1 | q1 (Lowest Priority = Best Effort) |
2 | q1 (Lowest Priority = Best Effort) |
3 | q2 |
4 | q2 |
5 | q3 |
6 | q3 |
7 | q3 |
CoS to Queue Mapping Table Default Values
CoS mapping is enabled on a per-system basis. The CoS value order is from zero to seven, where zero is the lowest priority and seven is the highest.
DSCP values can be mapped to priority queues. The DSCP to Queue Mapping Table Default Values Table contains the default DSCP mapping to forwarding queue values:
|
DSCP Value
|
Forwarding Queue Values
|
|---|
0-7 | q1 (Lowest Priority) |
8-15 | q1 |
16-23 | q2 |
24-31 | q2 |
32-39 | q2 |
40-47 | q3 |
48-55 | q3 |
55-63 | q3 (Highest Priority) |
DSCP to Queue Mapping Table Default ValuesDSCP mapping is enabled on a per-system basis.
QoS Services
After packets are assigned to a specific queue, QoS services can be assigned to the queue(s). Output queues are configured with a scheduling scheme by one of the following methods:
- Strict Priority—Ensures that time-sensitive applications are always forwarded via an expedited path. Strict priority allows network administrators to prioritize mission-critical, time-sensitive traffic over less time-sensitive applications. For example, under strict priority, voice-over-IP traffic is forwarded before FTP or e-mail (SMTP) traffic. The strict priority queue is emptied before the traffic in the remaining queues is forwarded.
- Weighted Round Robin—Ensures that a single application does not dominate the forwarding capacity of PowerConnect 3324/3348. Weighted Round Robin (WRR) forwards entire queues in a round robin order. Queue priorities are defined by the queue length. The longer the queue length, the higher the queue's forwarding priority.
For example, if four queues have queue weights of 1, 2, 3 and 4, packets with the highest forwarding priority are assigned to queue 4, and packets with the lowest forwarding priority are assigned to queue 1. By providing highest forwarding priority to queue 4 , weighted round robin processes higher priority traffic and ensures that low-priority traffic is forwarded satisfactorily.
The scheduling scheme is enabled system-wide. Queues assigned to the strict priority policy are automatically assigned to the highest priority queue. By default, all values are set as strict priority. When changing to WRR mode, the default weight value is one. Queue weight values can be assigned in any order using WRR. WRR values can be assigned on a per-system basis. Best effort traffic is always assigned to the first queue. WRR values must be assigned so that Queue 1 remains best effort.
Defining QoS Global Parameters
Quality of Service global parameters are set from the QoS Global Parameter pages. To open the QoS Global Parameters page:
- Select Quality of Service > Global Parameters in the Tree View. The QoS Global Parameters page opens.
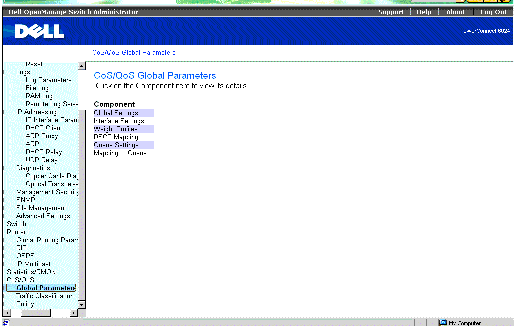
QoS Global Parameters Page
The QoS Global Parameters page contains links for:
Configuring Global QoS Settings
The QoS Global Settings page allows the user to enable or disable QoS. In addition, the user can select the Trust mode. This mode relies on predefined fields within the packet to determine the output queue, thus determining the service for the packet. To open the QoS Global Settings page:
- Select Quality of Service > Global Parameters > Global Settings in the Tree View. The QoS Global Settings page opens.
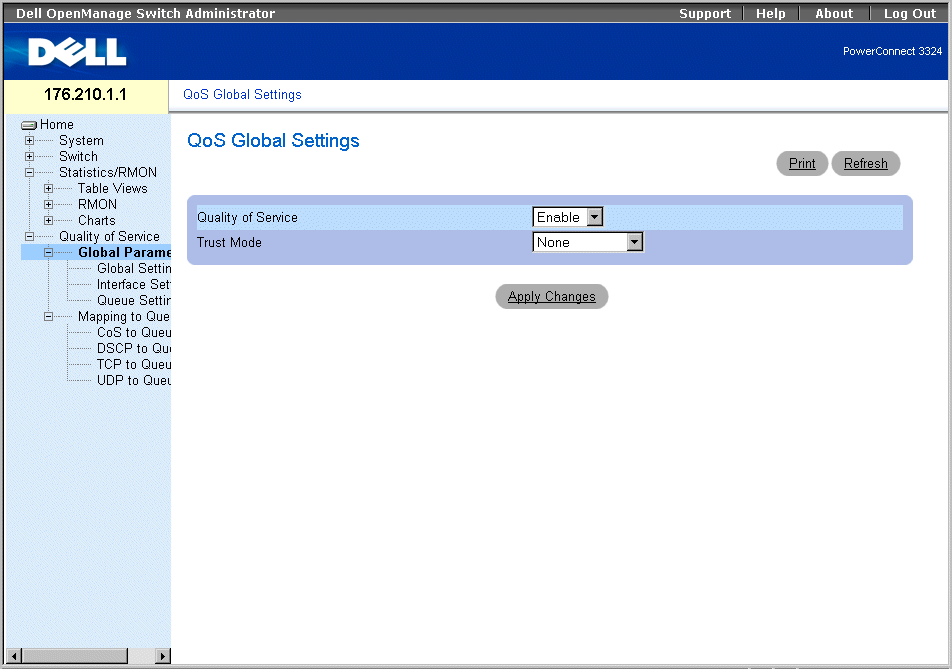
QoS Global Settings Page
The QoS Global Settings page contains the following fields:
- Quality of Service—Enables managing network traffic using QoS. The field value options are:
- Enable—Enable QoS on the device.
- Disable—Disable QoS on the device.
- Trust Mode—Determines which packet fields to use for classifying packets entering the switch. When no rules are defined the traffic containing the predefined packet field (CoS, DSCP or TCP/UDP port) is mapped according to the relevant trust modes table. Traffic not containing a predefined packet field is mapped to best effort. The possible trust mode field values are:
- CoS—Indicates the output queue assignment is determined by the IEEE802.1p VLAN priority tag (VPT) or by the default VPT assigned to a port.
- DSCP—Indicates the output queue assignment is determined by the DSCP field.
- TCP/UDP—Indicates the output queue is determined by the TCP/UDP port.
|
NOTE: The interface Trust setting overrides the global Trust setting.
|
Enabling Quality of Service:
- Open the QoS Global Settings page.
- Select Enable in the Quality of Service field.
- Click Apply Changes. Quality of Service is enabled on the device.
Enabling Trust:
- Open the QoS Global Settings page.
- Select the Trust setting in the Trust Mode field.
- Click Apply Changes. Trust is enabled/disabled on the device.
Enabling Trust Using the CLI Commands
The following table summarizes the equivalent CLI commands for configuring fields in the QoS Global Settings page.
|
CLI Command
|
Description
|
|---|
qos trust [cos | dscp | tcp-udp-port] | Configures the system to basic mode and the trust state.
|
qos | Enables QoS on the device.
|
no qos trust | Returns to the non-trust state.
|
The following is an example of the CLI commands:
Console (config)# qos
Console (config)# qos trust dscp
Defining QoS Interface Settings
The QoS Interface Settings page enables the user to define, per interface, if the selected Trust mode is to be activated. The default priority for incoming untagged packets is also selected in the QoS Interface Settings page. To open the QoS Interface Settings page:
- Click Quality of Service > Global Parameters > Interface Settings in the Tree View. The QoS Interface Settings page opens.
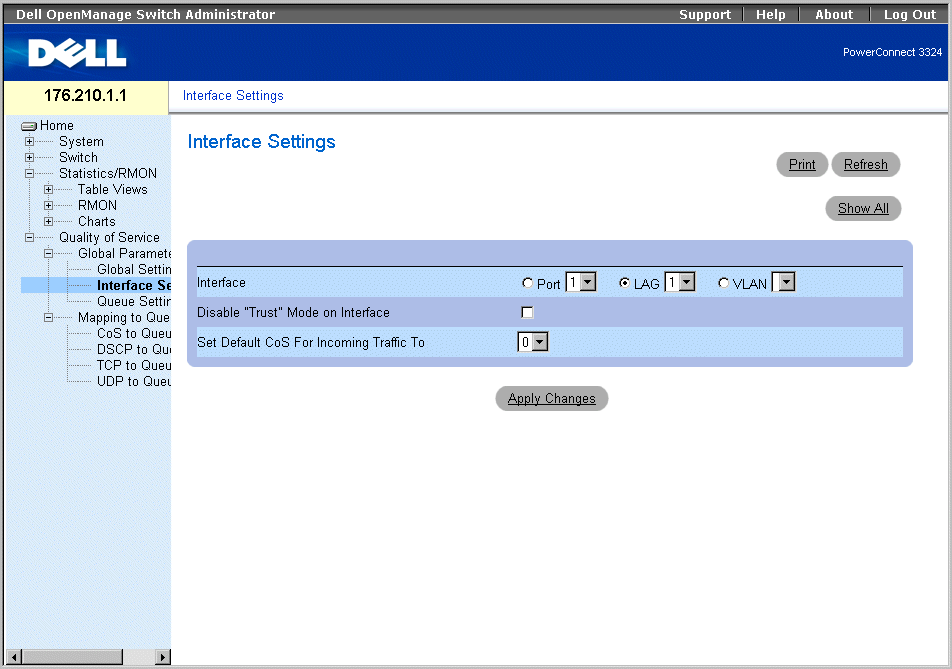
Interface Settings Page
The QoS Interface Settings page contains the following fields:
- Interface—Indicates the specific interface to which the Trust mode is applied. The trust mode is applied to:
- Port—Indicates the port number.
- LAG—Indicates the LAG number.
- VLAN—Indicates the VLAN number.
- Disable "Trust" Mode on Interface—Disables Trust values on the device. For more information about Trust settings, see "Configuring Global QoS Settings".
- Set Default CoS For Incoming Traffic To—Sets the default CoS tag value untagged packets. The CoS tag values are 0-7. The default value is 0.
Assigning QoS/CoS settings for an interface:
- Open the QoS Interface Settings page.
- Select an interface in the Interface field.
- If trust mode is to be disabled on the specific interface, check the Disable "Trust"
Mode on Interface check box.
- Set Default CoS For Incoming Traffic to the required value.
- Click Apply Changes. The QoS/CoS settings are assigned to the interface.
Assigning QoS/CoS Interfaces Using the CLI Commands
The following table summarizes the equivalent CLI commands for configuring fields in the QoS Interface Settings page.
|
CLI Command
|
Description
|
|---|
qos trust | Enables trust state for each. |
qos cos default-cos | Configures the default port CoS value. |
no qos trust | Disables Trust state on each port. |
The following is an example of the CLI commands:
Console (config)# interface ethernet 1/e5
Console (config-if)# qos trust
Console (config-if)# qos cos 3
Defining Queue Settings
The Queue Settings page allows network administrators to configure Weighted Round Robin (WRR), as well as assign bandwidth values for queues. Each queue is configured with different WRR and Weighted Random Early Detection (WRED) values. To open the Queue Settings page:
- Select Quality of Service > Global Parameters > Queue Settings in the Tree View. The Queue Settings page opens.
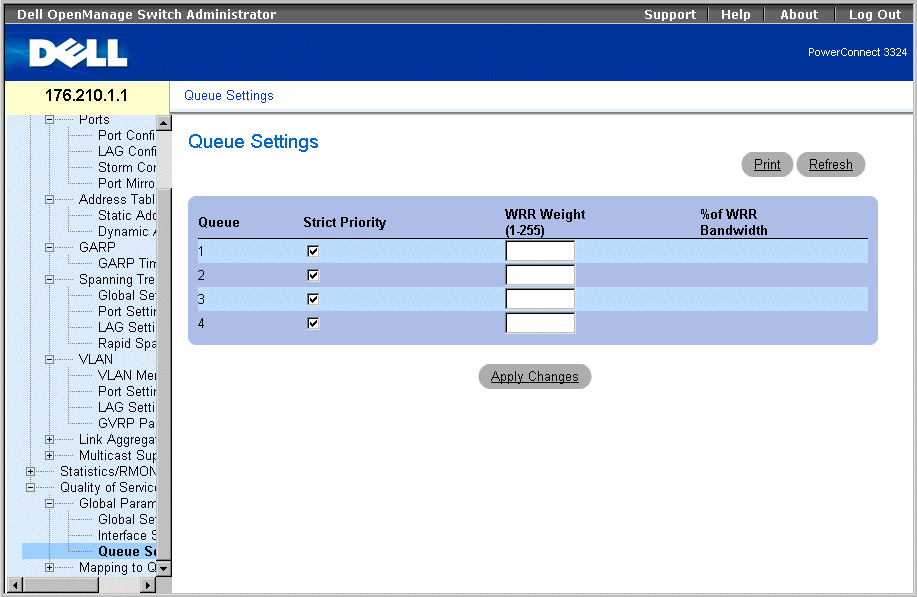
Queue Setting Page
The Queue Settings page contains the following fields:
- Queues—Indicates the queue number.
|
NOTE: Overloading a queue may cause network congestion.
|
- Strict Priority—Specifies if traffic scheduling is based strictly on the queue priority. The default is enabled.
- WRR—Specifies if traffic scheduling for the queue is based on the WRR scheme.
- WRR Weight—Assigns WRR weights to egress queues. The possible field values are 1–255, where 1 is the lowest value and 255 is the highest value.
- % of WRR Bandwidth—Indicates the amount of bandwidth assigned to the WRR.
Defining the Queue Settings:
- Open the Queue Settings page.
- Define Scheduling, WRR Weight, and Bandwidth fields.
- Click Apply Changes. The Queue Settings page and the device are updated.
Assigning Queue Setting Using the CLI Commands
The following table summarizes the equivalent CLI commands for configuring fields in the Queue Settings page.
|
CLI Command
|
Description
|
|---|
wrr-queue bandwidth weight1 weight2 . weight_n | Assigns Weighted Round Robin (WRR) weights to egress queues. |
show qos interface [interface-id] [queuing] | Displays interface QoS data. |
The following is an example of the CLI commands:
Console (config)# wrr-queue bandwidth 10 20 30 40
Console (config)# exit
Console # exit
Console> show qos interface ethernet 1/e3 queueing
Ethernet 1/e3
wrr bandwidth weights and EF priority:
qid-weights Ef - Priority
1 — 10 dis- N/A
2 — 20 dis- N/A
3 — 30 dis- N/A
4 — 1 dis- N/A
Cos-queue map:
cos-qid
0 - 2
1 - 1
2 - 1
3 - 2
4 - 2
5 - 3
6 - 3
7 - 3
Mapping to Queues
The Mapping to Queue page contains links to pages for mapping CoS and DSCP values, as well as TCP and UDP ports to QoS queues. To open the Mapping to Queue page:
- Select Quality of Service > Mapping to Queue. The Mapping to Queue page opens.
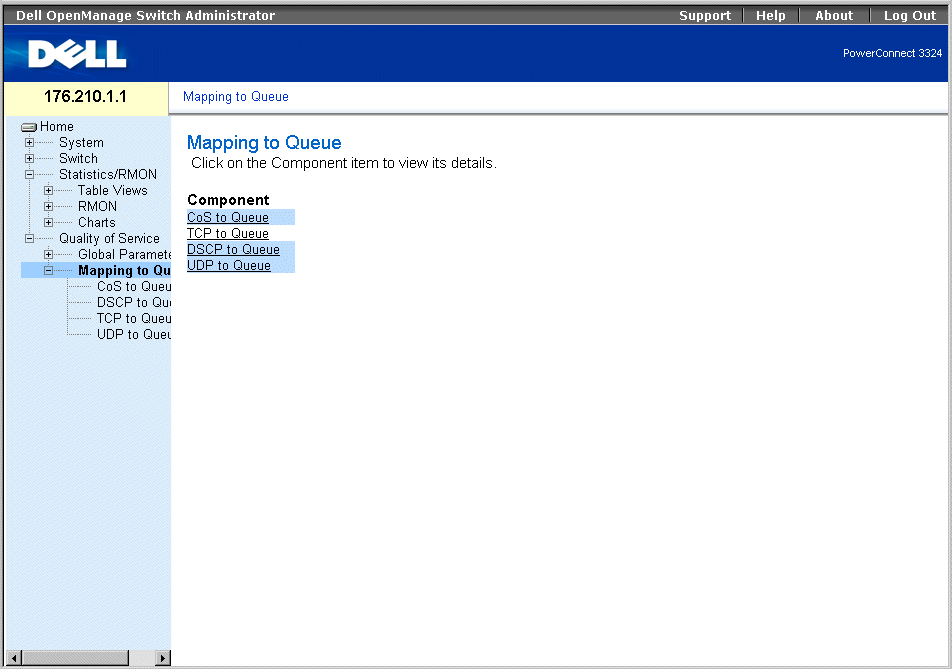
Mapping to Queue Page
The Mapping to Queue page includes links to the following topics:
Mapping CoS Values to Queues
The CoS to Queue page allows network administrators to classify CoS settings to traffic queues. To open the CoS to Queue Mapping Table page:
- Select Quality of Service >Mapping to Queue > CoS to Queue in the Tree View. The CoS to Queue Mapping Table page opens.
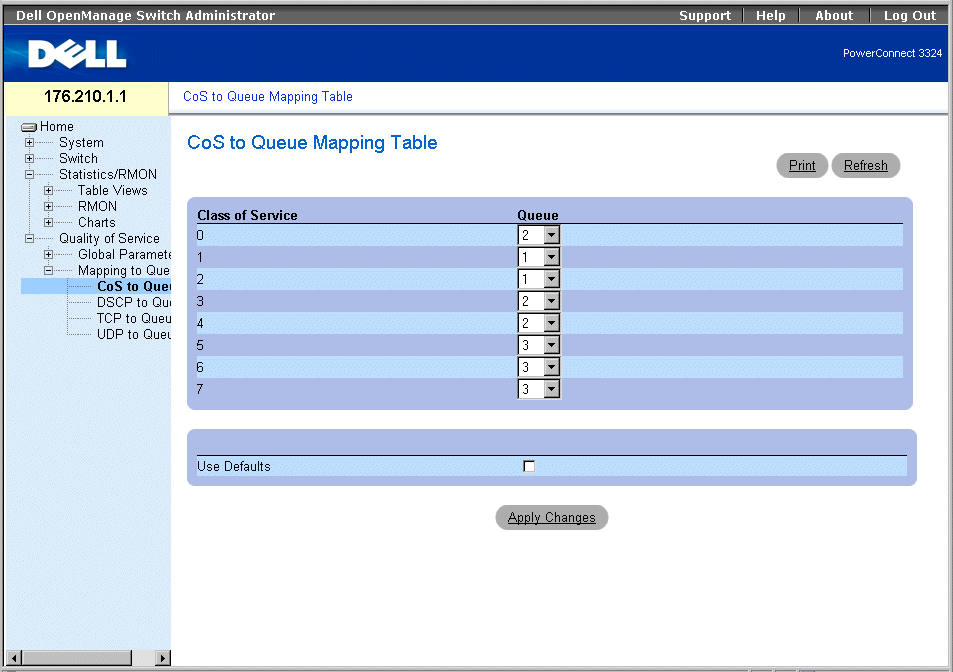
CoS to Queue Mapping Table Page
The CoS to Queue Mapping Table page contains the following fields:
- Class of Service—Specifies the CoS priority tag values, where zero is the lowest and seven is the highest.
- Queue—Indicates the traffic forwarding queue to which the CoS priority is mapped. Four traffic priority queues are supported.
|
NOTE: In a stacking configuration, Queue 4 is used for forwarding stacking traffic. Therefore,
assigning additional traffic to Queue 4 may interfere with stack control.
|
- Use Defaults—Uses the device defaults for mapping CoS values to a forwarding queue.
Mapping a CoS value to a Queue:
- Open the CoS to Queue page.
- Select a CoS entry.
- Define the queue number in the Queue field.
- Click Apply Changes. The CoS value is mapped to a queue, and the device is
updated.
Assigning CoS Values to Queues Using the CLI Commands
The following table summarizes the equivalent CLI commands for configuring fields in the Mapping CoS Values to Queues Table.
|
CLI Command
|
Description
|
|---|
wrr-queue cos-map queue-id cos1.cosn | Maps assigned CoS values to the egress queues. |
The following is an example of the CLI commands:
Console (config)# wrr queue cos-map 4 7
Mapping DSCP Values to Queues
The DSCP Mapping page allows network managers to determine the output queue that is assigned per a specific DSCP field. To open the DSCP Mapping page:
|
NOTE: See DSCP to Queue Mapping Table Default Values for the list of DSCP default queue
settings.
|
- Select Quality of Service > Global Parameters > Global Settings > DSCP Mapping in the Tree View. The DSCP Mapping page opens.
DSCP Mapping Page
The For the list of the DSCP default queue settings, contains the following fields:
|
NOTE: In a stacking configuration, Queue 4 is used for forwarding stacking traffic. Therefore,
assigning additional traffic to Queue 4 may interfere with stack control.
|
- DSCP In—Indicates the values of the DSCP field within the incoming packet.
- Queue—Indicates the queue to which packets with the specific DSCP value are assigned. The values are 1-4, where one is the lowest and four is the highest value.
Mapping a DSCP value and assigning priority queue:
- Open the DSCP Mapping page.
- Select a value in the DSCP In column.
- Define the Queue fields.
- Click Apply Changes. The DSCP is not overwritten, and the value is assigned a
forwarding queue.
Assigning DSCP Values Using the CLI Commands
The following table summarizes the equivalent CLI commands for configuring fields in the DSCP Mapping page.
|
CLI Command
|
Description
|
|---|
qos map dscp-queue dscp-list to queue-id | Modifies the DSCP to queue mapping. |
The following is an example of the CLI commands:
Console (config)# qos map dscp-queue 33 40 41 to 1
Mapping TCP Port Values to Queues
The TCP to Queue page allows network managers to classify specific TCP destination port traffic to queues. To open the TCP to Queue page:
- Select Quality of Service >Mapping to Queue > TCP to Queue in the Tree View. The TCP to Queue page opens.
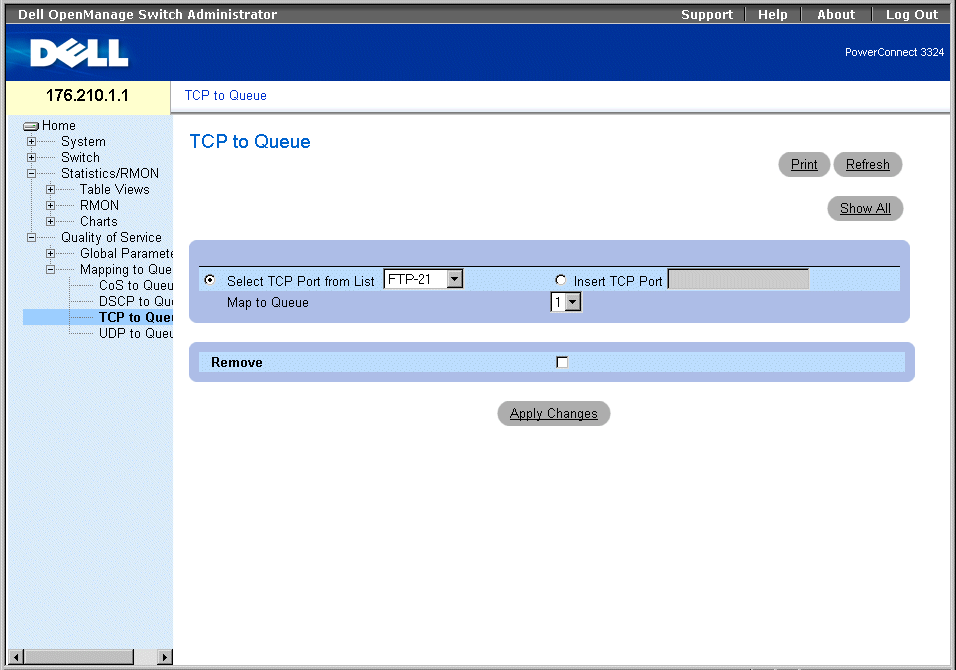
TCP to Queue Page
The TCP to Queue page contains the following information:
- Select TCP Port from List—Provides a drop-down list of predefined commonly used TCP ports.
- Insert TCP Port—Enables defining a new TCP port.
- Map to Queue—Indicates the traffic queue to which the TCP port is assigned.
|
NOTE: In a stacking configuration, Queue 4 is used for forwarding stacking traffic. Therefore,
assigning additional traffic to Queue 4 may interfere with stack control.
|
- Remove—Removes a TCP port mapping.
- Checked—Removes a specific TCP port mapping.
- Unchecked—Maintains a TCP port mapping.
Assigning a TCP port to a Traffic Queue:
- Open the TCP to Queue page.
- Select a port in the TCP Port List.
Or
Check the Insert TCP Port check box. The New TCP Port field is enabled. Define a new TCP port.
- Select a queue number in the Map to Queue drop-down list.
- Click Apply Changes. The TCP port is assigned a forwarding queue.
Modifying a TCP Port to Traffic Queue Setting:
- Open the TCP to Queue page.
- Select a port in the TCP Port List drop-down list. The queue to which the port is
assigned displays in the Map to Queue drop-down list.
- Select a new traffic queue in the Map to Queue drop-down list.
- Click Apply Changes. The TCP port is reassigned to a different traffic queue.
Displaying the TCP to Queue Mapping Table:
- Open the TCP to Queue page.
- Click Show All. The TCP to Queue Mapping Table opens.
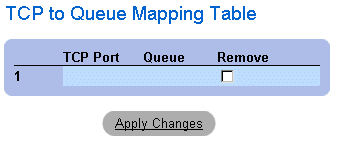
TCP to Queue Mapping Table
Removing a TCP port mapping from the TCP to Queue Mapping Table:
- Open the TCP to Queue page.
- Click Show All. The TCP to Queue Mapping Table opens.
- Select a port in the TCP Port List drop-down list. The queue to which the port is
assigned displays in the Map to Queue drop-down list.
- Check the Remove check box.
- Click Apply Changes. The TCP port is removed from the traffic queue.
Assigning TCP Ports to Queues Using the CLI Commands
The following table summarizes the equivalent CLI commands for configuring fields in the TCP to Queue page.
|
CLI Command
|
Description
|
|---|
qos map tcp-port-queue port1.port8 to queue-id | Modifies the TCP-Port to queue. |
show qos map tcp-port-queue | Displays the TCP-Port to queue. |
no qos map tcp-port-queue | Removes the TCP port from a queue.
|
The following is an example of the CLI commands:
Console (config)# qos map tcp-port-queue 6001 to 2
Console (config)# exit
Console # exit
Console (config)# show qos map tcp-port-queue
Tcp port-queue map:
Port queue
----- ------
6000 1
6001 2
6002 3
Mapping UDP Port Values to Queues
The UDP to Queue page allows network managers to classify specific UDP port traffic to queues. To open the UDP to Queue page:
- Select Quality of Service >Mapping to Queue > UDP to Queue in the Tree View. The UDP to Queue page opens.
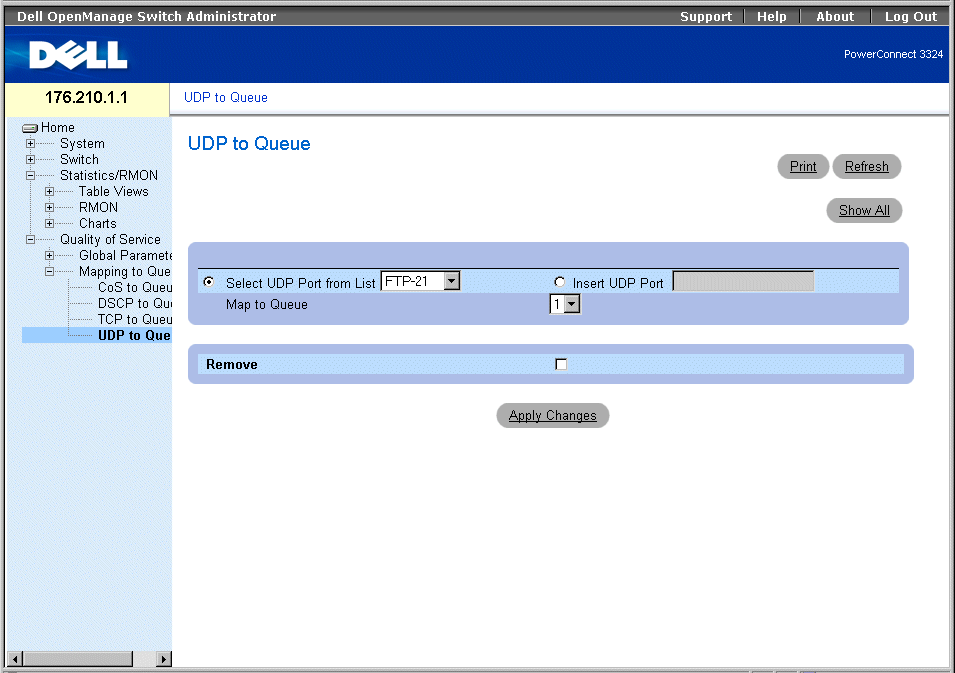
UDP to Queue Page
The UDP to Queue page contains the following fields:
- Select UDP from the List—Provides a drop-down list of predefined commonly used UDP ports.
- Insert UDP Port—A new UDP port may be defined.
- Map to Queue—Indicates the traffic queue to which the UDP port is assigned.
|
NOTE: In a stacking configuration, Queue 4 is used for forwarding stacking traffic. Therefore,
assigning additional traffic to Queue 4 may interfere with stack control.
|
- Remove—Removes UDP port mapping.
- Checked—Removes a UDP port mapping.
- Unchecked—Maintains a UDP port mapping.
Assigning a UDP port to a Traffic Queue:
- Open the UDP to Queue page.
- Select a port in the UDP Port List.
Or
Check the Insert UDP Port check box. The New UDP Port field is enabled.
Define a new UDP port.
- Select a queue number in the Map to Queue drop-down list.
- Click Apply Changes. The UDP port is assigned a forwarding queue.
Modifying a UDP Port to Traffic Queue Setting:
- Open the UDP to Queue page.
- Select a port mapping in the UDP Port List drop-down list. The queue to which the
port is assigned displays in the Map to Queue drop-down list.
- Select a new traffic queue in the Map to Queue drop-down list.
- Click Apply Changes. The UDP mapping is reassigned to a different traffic queue.
Removing a UDP port mapping from a UDP to Traffic Mapping Table:
- Open the UDP to Queue page.
- Select a port mapping in the UDP Port List drop-down list. The queue to which the
port is assigned displays in the Map to Queue drop-down list.
- Check the Remove check box.
- Click Apply Changes. The UDP port mapping is removed from the UDP to the Traffic
Mapping Table.
Assigning UDP Ports to Queues Using the CLI Commands
The following table summarizes the equivalent CLI commands for configuring fields in the UDP to Queue page.
|
CLI Command
|
Description
|
|---|
qos map udp-port-queue port1.port8 to queue-id | Modifies the UDP-Port to queue. |
show qos map udp-port-queue | Displays the UDP-Port to queue. |
no qos map udp-port-queue | Removes the UDP port from a queue.
|
The following is an example of the CLI commands:
Console (config)# qos map udp-port-queue 2000 80 to 2
Console (config)# show qos map udp-port-queue
Back to Contents Page