Back to Contents Page
Dell™ PowerEdge™ 600SC Systems
Service Manual
The procedures in this manual require that you remove the cover and work inside the system. While working inside the system, do not attempt to service the system except as explained in this manual and elsewhere in your system documentation. Always follow the instructions closely. Review all of the procedures in your System Information Guide.

|
CAUTION: See your System Information Guide for complete information about safety precautions, working inside the computer, and protecting against electrostatic discharge. |
This section provides servicing procedures for components inside the system. Before you start any of the procedures in this section, perform the following tasks:
|
|
Read the safety information in the System Information Guide. |
- Perform the procedures described in "External Visual Inspection."
- When there is no replacement procedure provided, use the removal procedure in reverse order to install the replacement part.
You need the following items to perform the procedures in this section:
- Key to the system keylock
- #2 Phillips screwdriver
- Wrist grounding strap
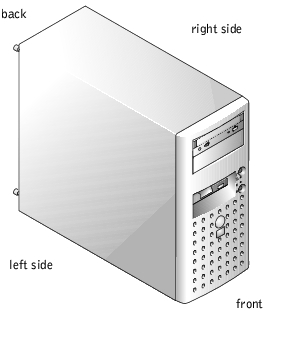
The illustrations in this document are based on the positioning of the system as shown in Figure 4-1.
Figure 4-1. System Orientation
To troubleshoot or service the system, remove the cover to gain access to internal components.
|
|
CAUTION: See your System Information Guide for complete information about safety precautions, working inside the computer, and protecting against electrostatic discharge. |
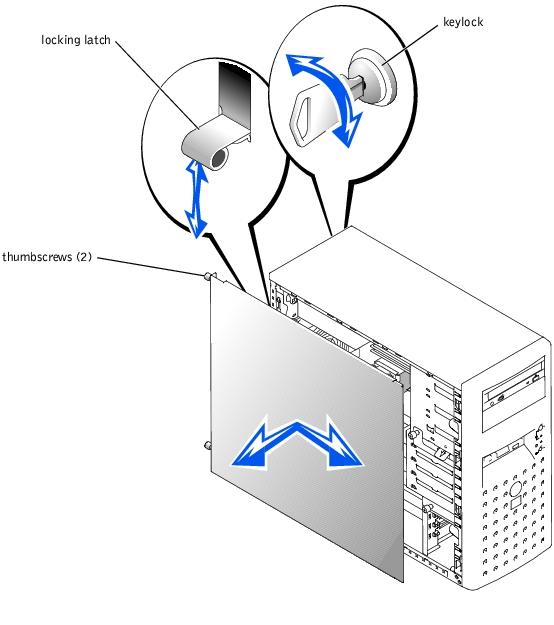
- Insert the system key in the lock on the back panel and turn it counter-clockwise to
unlock the cover (see Figure 4-2).
- Slide the cover locking latch upward to release the cover.
- Loosen the two cover thumbscrews.
- Slide the cover backward and grasp it at both ends.
- Lift the cover away from the system.
Figure 4-2. Removing and Replacing the Cover
 |
NOTICE: Figure 4-2 shows the system standing upright as the cover is being removed.
However, before you service components inside the system, lay the system on its right side.
|
- Ensure that no tools or loose parts are left inside the system.
- Fit the cover on the side of the system, and slide the cover forward.
- Tighten the two cover thumbscrews (see Figure 4-2).
- Slide the cover locking latch downward.
- Using the system key, lock the cover.
The front bezel has status and activity indicators. You must remove the cover to remove the bezel.
|
|
CAUTION: See your System Information Guide for complete information about safety precautions, working inside the computer, and protecting against electrostatic discharge. |
|
NOTICE: To remove the bezel, the system must be standing upright.
|
- Remove the cover (see "Removing the Cover").
- Pull up on the two levers to the left of the bezel (see Figure 4-3).
- Swing the left side of the bezel away from system, disengage the hooks at the right side
of the bezel, and lift the bezel away from the system.
Figure 4-3. Removing the Bezel

|
NOTICE: Figure 4-3 shows the system standing upright as the bezel is being removed.
However, before you service components inside the system, lay the system on its right side.
|
To install the bezel, align the hooks at the right side of the bezel, swing the left side of the bezel toward the system, and press the bezel to the system until it snaps into place.
Figure 4-4 shows an interior view of the system.
Figure 4-4. Inside the System
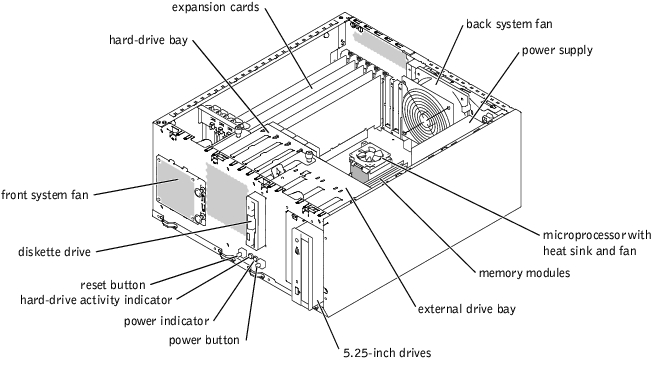
The system board contains the system's control circuitry and other electronic components. Several hardware options, such as the microprocessor and memory, are installed directly on the system board.
The system accommodates up to five full-length PCI expansion cards (one 32-bit, 33-MHz card and up to four 64-bit, 33-MHz cards). System memory is contained in four memory module sockets.
The system supports a 3.5-inch diskette drive and up to two externally accessible 5.25-inch drives, such as CD or tape drives. The removable hard-drive bay supports up to four 1-inch SCSI or IDE hard drives. The hard drives connect to the system board or a controller card.
During an installation or service procedure, you may be required to change a jumper setting. For more information, see "Jumpers and Connectors."
The system includes the following cooling fans:
- Front system fan
- Back system fan
- Microprocessor fan
|
NOTICE: The microprocessor fan and heat sink are constructed together as a single assembly.
Do not attempt to remove the fan from the heat sink.
|
|
|
CAUTION: See your System Information Guide for complete information about safety precautions, working inside the computer, and protecting against electrostatic discharge. |
- Turn off the system, including any attached peripherals, and disconnect the system
from the electrical outlet.
- Remove the cover (see "Removing the Cover").
- Remove the bezel (see "Removing the Bezel").
- Lay the system on its right side.
- Disconnect the fan cable from the fan connector on the system board.
To identify system board connectors, see Figure 5-3.
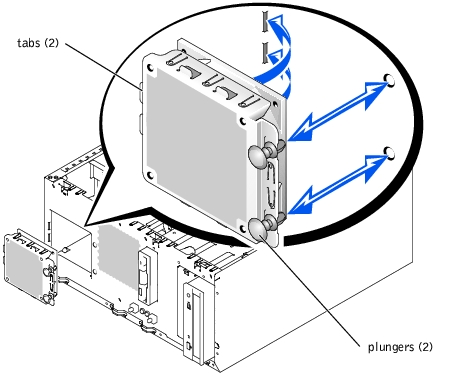
- Carefully pull the fan cable through the routing hole in the expansion-card guide
bracket.
- On the front of the system, pull the two plungers that secure the fan bracket to the
front panel (see Figure 4-5).
- Pull the top of the fan bracket away from the front panel and then lift the fan assembly
until the tabs on the bottom of the fan bracket disengage the front panel (see
Figure 4-5).
- Carefully pull the fan cable through the hole in the front panel and lift the fan
assembly away from the system.
Figure 4-5. Removing the Front System Fan
|
|
CAUTION: See your System Information Guide for complete information about safety precautions, working inside the computer, and protecting against electrostatic discharge. |
- Route the fan cable through the front panel toward the system board.
- Align the tabs on the bottom of the fan bracket with the holes in the front panel and
then push the top of the fan bracket toward the front panel (see Figure 4-5).
- On the front of the system, push the two plungers that secure the fan bracket to the
front panel (see Figure 4-5).
- Route the fan cable through the hole in the expansion-card guide bracket.
- Connect the fan cable to the fan connector on the system board.
To identify system board connectors, see Figure 5-3.
- Stand the system upright.
- Install the bezel (see "Installing the Bezel").
- Install the cover (see "Installing the Cover").
- Reconnect the system to its electrical outlet and turn the system on, including any
attached peripherals.
|
|
CAUTION: See your System Information Guide for complete information about safety precautions, working inside the computer, and protecting against electrostatic discharge. |
- Turn off the system, including any attached peripherals, and disconnect the system
from the electrical outlet.
- Remove the cover (see "Removing the Cover").
- Lay the system on its right side.
- Disconnect the fan cable from the fan connector on the system board.
To identify system board connectors, see Figure 5-3.
- Pull the fan bracket release tab away from the back panel and slide the fan assembly
toward the expansion cards about 6.35 mm (0.25 inch) (see Figure 4-6).
- Lift the fan assembly away from the back panel and out of the system.
Figure 4-6. Removing the Back System Fan

|
|
CAUTION: See your System Information Guide for complete information about safety precautions, working inside the computer, and protecting against electrostatic discharge. |
- Align the tabs on the fan bracket with the mounting holes in the back panel and slide
the fan assembly toward the power supply about 6.35 mm (0.25 inch) (see Figure 4-6).
- Connect the fan cable to the fan connector on the system board.
To identify system board connectors, see Figure 5-3.
- Stand the system upright.
- Install the cover (see "Installing the Cover").
- Reconnect the system to its electrical outlet and turn the system on, including any
attached peripherals.
|
|
CAUTION: See your System Information Guide for complete information about safety precautions, working inside the computer, and protecting against electrostatic discharge. |
- Turn off the system, including any attached peripherals, and disconnect the system
from the electrical outlet.
- Remove the cover (see "Removing the Cover").
- Lay the system on its right side.
- Disconnect the microprocessor fan cable from the fan connector on the system board
(see Figure 4-7).
To identify system board connectors, see Figure 5-3.
- Remove the microprocessor fan and heat sink assembly (see Figure 4-7):
- Press down on the heat-sink securing clips to release the clips from the retaining
tabs.
- Swing the securing clips to the fully open position.
|
|
CAUTION: The microprocessor and heat sink can become extremely hot. Be sure the microprocessor has had sufficient time to cool before handling. |
|
NOTICE: Do not operate the system without the fan and heat sink assembly installed. The
assembly is required to maintain proper thermal conditions.
|
|
NOTICE: After removing the fan and heat sink assembly, place it upside down on a flat surface
to prevent the thermal interface material on the heat sink from being damaged or contaminated.
|
|
NOTICE: The microprocessor fan and heat sink are constructed together as a single assembly.
Do not attempt to remove the fan from the heat sink.
|
- Lift the assembly away from the microprocessor and set it upside down, out of the
way.
Figure 4-7. Removing the Microprocessor Fan and Heat Sink Assembly
|
|
CAUTION: See your System Information Guide for complete information about safety precautions, working inside the computer, and protecting against electrostatic discharge. |
- Place the new microprocessor fan and heat sink assembly on top of the microprocessor
(see Figure 4-7).
- Swing the securing clips to the closed position.
- Press down on the heat-sink securing clips to secure the clips.
|
NOTICE: The cooling fan must be connected for the microprocessor to maintain proper thermal
conditions.
|
- Connect the fan cable to the fan connector on the system board (see Figure 4-7).
To identify system board connectors, see Figure 5-3.
- Stand the system upright.
- Install the cover (see "Installing the Cover").
- Reconnect the system to its electrical outlet and turn the system on, including any
attached peripherals.
|
|
CAUTION: See your System Information Guide for complete information about safety precautions, working inside the computer, and protecting against electrostatic discharge. |
- Turn off the system, including any attached peripherals, and disconnect the system
from the electrical outlet.
- Disconnect the AC power cable from the receptacle on the system back panel.
- Remove the cover (see "Removing the Cover").
- Lay the system on its right side.
- Disconnect the cables from the connectors PWR CONN (CN1) and (CN2) on the
system board.
To identify system board connectors, see Figure 5-3.
- Disconnect the power cables from the diskette drive, CD drive, and hard drive(s).
- At the back of the system chassis, remove four screws that secure the power supply to
the back panel (see Figure 4-8).
- Carefully lift the power supply out of the system.
Figure 4-8. Removing and Installing a Power Supply
|
|
CAUTION: See your System Information Guide for complete information about safety precautions, working inside the computer, and protecting against electrostatic discharge. |
- Insert the power supply into the system chassis with its fan aligned with the fan grille
on the back panel, and the output cables toward the front of the system.
- Install the four screws that secure the power supply to the back panel.
|
|
CAUTION: Operating the system with only power supply cable connector P1 installed may cause the system board to overheat, damaging the system board. Ensure that both power cables P1 and P10 are properly connected to the system board. |
- Connect power cable P1 to system board connector CN1, and power cable P10 to
system board connector CN2
For the location of these system board connectors, see Figure 5-3.
- Connect the power cables to the diskette drive, CD drive, the hard drive(s), and any
other installed 5.25-inch drive.
- Install the cover (see "Installing the Cover").
- Reconnect the AC power cable to its receptacle on the system back panel.
- Reconnect the system to its electrical outlet and turn the system on, including any
attached peripherals.
The system includes five PCI expansion slots. Slot 1 operates 32-bit, 33-MHz, and slots 2 through 5 operate at 64-bit, 33-MHz. The expansion slots are all on one PCI bus. To identify expansion slots and operating speeds, see Figure 5-3.
The system supports only 3.3-V PCI expansion cards.
The system's BIOS scans and numbers PCI buses and devices during startup. Expansion slots are scanned according to the host bus ordering, not the slot numbers. See Table 4-1 for the order in which the expansion slots and embedded PCI devices are scanned. Figure 5-3 provides a diagram of the PCI buses and expansion slots.
Certain operating systems do not allow the PCI bus number of the system's boot controller to change after the operating system loads. Installing an expansion card with its own PCI bridge chip in an expansion slot earlier in the PCI bus scan order than the boot controller can cause the renumbering of the boot controller PCI bus number. To allow your operating system to properly use the boot controller expansion card, install the boot controller card, such as a RAID or SCSI controller card, in expansion slot 2.
An additional factor affects the assignment of PCI bus numbers: an expansion card may have its own PCI bridge chip which requires the assignment of a bus number for the card as well as one for the bridge. A particular expansion card may have two PCI bridge chips which would result in three sequential PCI bus numbers all assigned in the same expansion slot.
If you install expansion cards, you may have some difficulty in directly determining the bus number of a controller on a particular expansion card. However, the PCI bus scan order can help you determine the relative numbering of PCI buses within the expansion slots. For example, a PCI controller residing in expansion slot 3 will never have a lower bus number than one in slot 2 because slot 2 precedes slot 3 in the scan order.
Table 4-1. PCI Bus Scan Order
|
Order
|
Device or Expansion Slot
|
|---|
1 | Integrated NIC |
2 | Expansion slot 1 (32-bit, 33-MHz) |
3 | Expansion slot 2 (64-bit, 33-MHz) |
4 | Expansion slot 3 (64-bit, 33-MHz) |
5 | Expansion slot 4 (64-bit, 33-MHz) |
6 | Expansion slot 5 (64-bit, 33-MHz) |
7 | Video |
|
|
CAUTION: See your System Information Guide for complete information about safety precautions, working inside the computer, and protecting against electrostatic discharge. |
 |
NOTE: A RAID controller card must only be installed in expansion slot 2.
|
- Unpack the expansion card, and prepare it for installation.
For instructions, see the documentation that accompanied the card.
- Turn off the system, including any attached peripherals, and disconnect the system
from the electrical outlet.
- Remove the cover (see "Removing the Cover").
- Lay the system on its right side.
- Install the expansion card (see Figure 4-9).
- Position the expansion card so that the card-edge connector aligns with the
expansion-card connector on the system board.
- Insert the card-edge connector firmly into the expansion-card connector until the
card is fully seated.
- Install the screw that secures the expansion-card bracket to the back panel.
- Close the card-guide latch.
Figure 4-9. Removing and Installing an Expansion Card
- Connect any cables that should be attached to the card.
See the documentation that accompanied the card for information about its cable connections.
- Stand the system upright.
- Install the cover (see "Installing the Cover").
- Reconnect the system to its electrical outlet and turn the system on, including any
attached peripherals.
|
|
CAUTION: See your System Information Guide for complete information about safety precautions, working inside the computer, and protecting against electrostatic discharge. |
- Turn off the system, including any attached peripherals, and disconnect the system
from the electrical outlet.
- Remove the cover (see "Removing the Cover").
- Lay the system on its right side.
- Disconnect any cables attached to the card.
- Remove the expansion card (see Figure 4-9):
- Open the card-guide latch.
- Remove the screw that secures the expansion-card bracket to the back panel.
- Grasp the expansion card by its top corners, and carefully remove it from the
expansion-card connector.
- If you are removing the card permanently, install a metal filler bracket over the empty
expansion slot opening and close the expansion-card latch.
|
NOTICE: You must install a filler bracket over an empty expansion slot to maintain Federal
Communications Commission (FCC) certification of the system. The brackets also help keep dust
and dirt out of the system and aid in proper cooling and airflow inside the system.
|
- Stand the system upright.
- Install the cover (see "Installing the Cover").
- Reconnect the system to its electrical outlet and turn the system on, including any
attached peripherals.
|
|
CAUTION: See your System Information Guide for complete information about safety precautions, working inside the computer, and protecting against electrostatic discharge. |
- Turn off the system, including any attached peripherals, and disconnect the system
from the electrical outlet.
- Remove the cover (see "Removing the Cover").
- Remove the bezel (see "Removing the Bezel").
- Lay the system on its right side.
- Disconnect the cable from the FRONT PANEL connector on the system board.
To identify system board connectors, see Figure 5-3.
- At the front of the system chassis, remove the screw that secures the control panel to
the front panel (see Figure 4-10).
- Pivot the control panel at the bottom, and then carefully pull the control panel cable
through the hole in the front panel and lift the control panel away from the system.
Figure 4-10. Removing and Installing a Control Panel
|
|
CAUTION: See your System Information Guide for complete information about safety precautions, working inside the computer, and protecting against electrostatic discharge. |
- Insert the control panel cable into the front of the system chassis, being careful to
route the cable connector to the system board.
- Connect the control panel cable connector to the FRONT PANEL connector on the
system board.
To identify the location of this connector on the system board, see Figure 5-3.
- Insert the bottom of the control panel first, and then swing the control panel up and
align the hole at the top of the control panel with the hole in the front panel.
- Install the screw that secures the control panel to the front panel.
- Install the bezel (see "Installing the Bezel").
- Install the cover (see "Installing the Cover").
- Reconnect the system to its electrical outlet and turn the system on, including any
attached peripherals.
Your system can contain the following drives:
- Up to two externally accessible 5.25-inch drives (typically CD or tape drives). A CD drive is standard in the first external drive bay, and an additional drive of your choice can be installed in the second external drive bay.
- An externally accessible 3.5-inch diskette drive.
- Up to four 1-inch IDE or SCSI hard drives.
Most interface connectors are keyed for correct insertion. Keying ensures that the pin-1 wire in the cable connects to pin 1 in the connectors on both ends. When you disconnect an interface cable, take care to grasp the cable connector, rather than the cable itself, to avoid stress on the cable.
Each drive must connect to a DC power cable from the system power supply. The connectors on these cables are used for the 3.5-inch diskette drive, 5.25-inch devices, and hard drives.
The IDE subsystem provides three channels (primary, secondary, and tertiary). Each channel can support up to two IDE drives such as high-capacity hard drives, CD drives, DVD drives, and tape drives.
Each IDE drive should be configured for the Cable Select setting, which assigns master and slave status to a drive by its position on the interface cable. In this configuration, the drive attached to the last connector on the interface cable is the master or boot drive (drive 0) and the drive attached to the middle connector on the interface cable is the slave drive (drive 1). See the drive's documentation for instructions on configuring the Cable Select setting.
Table 4-2 lists guidelines for installing IDE drives connected to the IDE system board connectors.
Table 4-2. IDE Drive Configuration Guidelines
|
IDE Channel
|
System Board Connector
|
Drive Type(s)
|
|---|
1 | PRIMARY IDE | Hard drives |
2 | SECONDARY IDE | CD, DVD, tape, and so on |
3 | THIRD IDE | Hard drives |
NOTE: The configurations shown in this table describe IDE drives connected directly to the IDE
system board connectors. To identify system board connectors, see Figure 5-3.
|
Although SCSI drives are installed in essentially the same way as other drives, their configuration requirements are different. To install and configure a SCSI drive, follow the guidelines in the following subsections.
SCSI interface connectors are keyed for correct insertion. Keying ensures that the pin-1 wire in the cable connects to pin 1 in the connectors on both ends. When you disconnect an interface cable, take care to grasp the cable connector, rather than the cable itself, to avoid stress on the cable.
Each drive attached to a SCSI controller must have a unique SCSI ID number from 0 to 15.
- The SCSI hard drive from which the system boots is configured as SCSI ID 0.
- A SCSI tape drive is typically configured as SCSI ID 6.
- If you install optional SCSI drives or change your SCSI configuration, see the documentation for each SCSI drive for information on setting the appropriate SCSI ID number.
|
NOTE: There is no requirement that SCSI ID numbers be assigned sequentially or that
drives be attached to the cable in order by ID number.
|
SCSI logic requires that termination be enabled for the two drives at opposite ends of the SCSI chain and disabled for all drives in between. For internal SCSI drives, termination is configured automatically. For external SCSI drives, you should disable termination on all drives and use terminated cables. See the documentation provided with any optional SCSI drive you purchase for information on disabling termination.
The drive or device from which the system boots is determined by the boot order specified in the System Setup program (see "Using the System Setup Program"). To boot the system from a hard drive or drive array, the drive(s) must be connected to the appropriate controller:
- To boot from a single IDE hard drive, the master drive (drive 0) must be connected to the primary controller on the system board. To identify system board connectors, see Figure 5-3.
- To boot from a single SCSI hard drive, the drive must be connected to the SCSI controller card (see the documentation that accompanied the controller card).
- To boot from an IDE or SCSI RAID array, the drive must be connected to the RAID controller card (see the documentation that accompanied the controller card).
|
|
CAUTION: See your System Information Guide for complete information about safety precautions, working inside the computer, and protecting against electrostatic discharge. |
- Turn off the system, including any attached peripherals, and disconnect the system
from the electrical outlet.
- Remove the cover (see "Removing the Cover").
- Remove the bezel (see "Removing the Bezel").
- Lay the system on its right side.
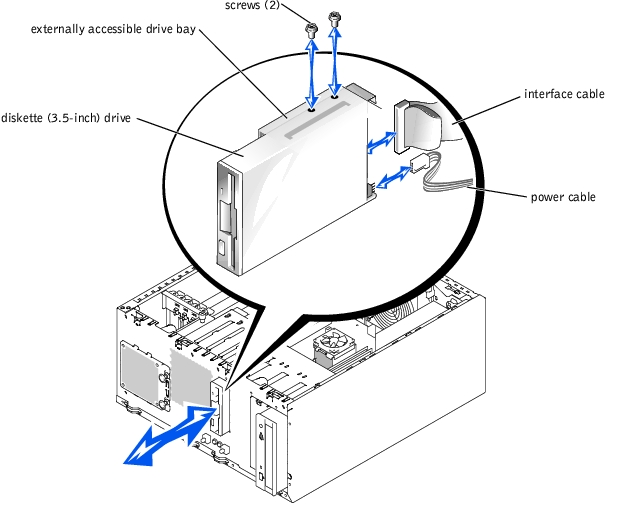
- Disconnect the power cable and the interface cable from the diskette drive.
- Remove the two screws that secure the diskette drive in the externally accessible drive
bay (see Figure 4-11).
- Slide the diskette drive forward out of the drive bay.
Figure 4-11. Removing a Diskette Drive
|
|
CAUTION: See your System Information Guide for complete information about safety precautions, working inside the computer, and protecting against electrostatic discharge. |
- Slide the diskette drive into the externally accessible drive bay.
- Install the two screws that secure the diskette drive in the drive bay (see Figure 4-11).
- Connect the power cable and the interface cable to the diskette drive.
- Stand the system upright.
- Install the bezel (see "Installing the Bezel").
- Install the cover (see "Installing the Cover").
- Reconnect the system to its electrical outlet and turn the system on, including any
attached peripherals.
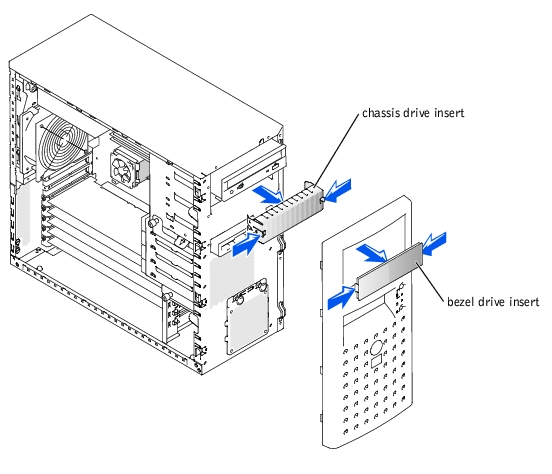
To help keep dust and dirt out of the system, a plastic insert in the bezel covers each empty external drive bay. Additionally, each empty external drive bay is covered by a metal insert in the chassis to maintain to maintain Federal Communications Commission (FCC) certification of the system.
Before you install a 5.25-inch drive in an empty external drive bay, you must first remove both front-panel drive inserts. If you remove a 5.25-inch drive permanently, you must install both the chassis and bezel inserts.
|
|
CAUTION: See your System Information Guide for complete information about safety precautions, working inside the computer, and protecting against electrostatic discharge. |
- Turn off the system, including any attached peripherals, and disconnect the system
from the electrical outlet.
- Remove the cover (see "Removing the Cover").
- Remove the bezel (see "Removing the Bezel").
- Remove the bezel drive insert (see Figure 4-12):
- From inside the bezel, press the center of the insert outward with your thumbs to
loosen the tabs on the sides of the insert.
- Pull the insert out of the bezel.
- Remove the chassis drive insert (see Figure 4-12):
- From the left side of the chassis, press the side of the insert to loosen the tab on
the side of the insert.
- Pull the insert out of the chassis.
Figure 4-12. Removing the Front-Panel Drive Inserts
|
|
CAUTION: See your System Information Guide for complete information about safety precautions, working inside the computer, and protecting against electrostatic discharge. |
|
NOTICE: You must install both inserts in an empty 5.25-inch drive bay to maintain Federal
Communications Commission (FCC) certification of the system. The inserts also help keep dust
and dirt out of the system.
|
- Install the chassis drive insert by sliding the insert into the chassis until tabs on the
side of the insert snap into place (see Figure 4-12).
- Install the bezel drive insert by sliding the insert into the bezel until tabs on the side of
the insert snap into place (see Figure 4-12).
- Install the bezel (see "Installing the Bezel").
- Install the cover (see "Installing the Cover").
- Reconnect the system to its electrical outlet and turn the system on, including any
attached peripherals.
A CD drive is standard in the first external drive bay, and an additional drive of your choice can be installed in the second external drive bay. These drives connect either to the system board or to an optional controller card.
|
|
CAUTION: See your System Information Guide for complete information about safety precautions, working inside the computer, and protecting against electrostatic discharge. |
- Unpack the drive (and controller card, if applicable), and prepare the drive for
installation.
For instructions, see the documentation that accompanied the drive. Also, see "IDE Configuration Information" or "SCSI Configuration Information" for information on configuring the drive.
- Turn off the system, including any attached peripherals, and disconnect the system
from the electrical outlet.
- Remove the cover (see "Removing the Cover").
- Remove the bezel (see "Removing the Bezel").
- Remove the front-panel inserts for the empty external drive bay (see "Removing the
Front-Panel Drive Inserts").
- Lay the system on its right side.
- If a controller card was supplied with the drive, install the controller card in an
expansion slot (see "Installing an Expansion Card").
- Slide the drive into the external drive bay.
- Install the screws that secure the drive in the drive bay (see Figure 4-13).
- Connect a DC power cable connector to the drive's power input connector.
Figure 4-13. Installing a 5.25-Inch Drive
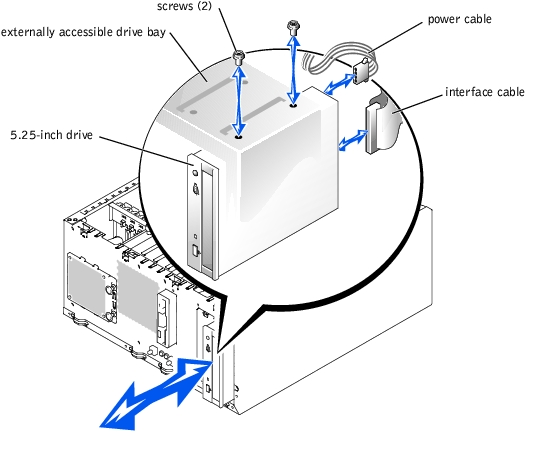
- Connect the interface cable connector to the drive's interface connector:
- If installing an IDE drive, ensure that the interface cable is properly connected between the drive and the system board. To identify system board connectors, see Figure 5-3.
Ensure that the drive is configured and connected properly (see "IDE Configuration Information").
- If the drive operates with a controller card, ensure that the interface cable is properly connected between the drive and the controller card (see the documentation that accompanied the controller card).
- Ensure that all cables are firmly connected and arranged so that they will not catch on
the computer covers or block airflow inside the system.
- Stand the system upright.
- Install the bezel (see "Installing the Bezel").
- Install the cover (see "Installing the Cover").
- Reconnect the system to its electrical outlet and turn the system on, including any
attached peripherals.
- Test the drive:
- If you installed an IDE drive, run the IDE devices tests in the system diagnostics to determine whether the tape drive operates properly (see "Running the System Diagnostics").
- If you installed a SCSI drive, run the SCSI controllers test in the system diagnostics (see "Running the System Diagnostics").
- If you installed a tape drive, see the tape drive software documentation to perform a backup and verification test.
Your system can contain up to four 1-inch IDE or SCSI hard drives in a removable drive bay. These drives connect either to the system board or to an optional controller card.
Use the following guidelines when installing hard drives:
- You should only use drives that have been tested and approved by the system manufacturer.
- You may need to use different programs than those provided with the operating system to partition and format a hard drive. See the hard drive's documentation for information on setting up the drive.
- When you format a high-capacity hard drive, allow enough time for the formatting to be completed. Long format times for these drives are normal. For example, a large drive can take over an hour to format.
- Do not turn off or reboot your system while the drive is being formatted. Doing so can cause a drive failure.
|
NOTE: The hard-drive activity indicator operates only when IDE hard drives are connected
directly to the primary IDE connector on the system board. The indicator does not operate with
SCSI drives, drives attached to a RAID controller, or drives attached to the tertiary IDE
connector on the system board. To identify the indicator, see Figure 3-1.
|
|
|
CAUTION: See your System Information Guide for complete information about safety precautions, working inside the computer, and protecting against electrostatic discharge. |
- Unpack the drive (and controller card, if applicable), and prepare the drive for
installation.
For instructions, see the documentation that accompanied the drive. Also, see "IDE Configuration Information" or "SCSI Configuration Information" for information on configuring the drive.
- Turn off the system, including any attached peripherals, and disconnect the system
from the electrical outlet.
- Remove the cover (see "Removing the Cover").
- Lay the system on its right side.
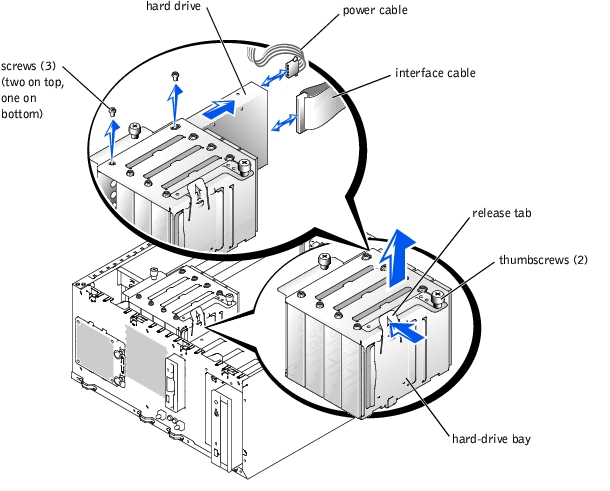
- Disconnect all power cables and interface cables from the hard drives in the drive bay.
- Remove the hard-drive bay (see Figure 4-14):
- Loosen the two thumbscrews that secure the drive bay in the system.
- Press the drive bay release tab, and lift the drive up and out of the system.
- Remove the drive from the drive bay (see Figure 4-14):
- Remove the three screws that secure the drive in the drive bay.
One screw is located at the bottom of the drive bay.
- Slide the drive out of the drive bay.
Figure 4-14. Removing a Hard Drive
- Install the hard-drive bay (see Figure 4-14):
- Lower the drive bay into the system until it snaps into place.
- Tighten the two thumbscrews that secure the drive bay in the system.
- Connect all power cables and interface cables to the hard drives remaining in the drive
bay.
- Stand the system upright.
- Install the cover (see "Installing the Cover").
- Reconnect the system to its electrical outlet and turn the system on, including any
attached peripherals.
|
|
CAUTION: See your System Information Guide for complete information about safety precautions, working inside the computer, and protecting against electrostatic discharge. |
- Unpack the drive (and controller card, if applicable), and prepare the drive for
installation.
For instructions, see the documentation that accompanied the drive. Also, see "IDE Configuration Information" or "SCSI Configuration Information" for information on configuring the drive.
- Turn off the system, including any attached peripherals, and disconnect the system
from the electrical outlet.
- Remove the cover (see "Removing the Cover").
- Lay the system on its right side.
- If a controller card was supplied with the drive, install the controller card in an
expansion slot (see "Installing an Expansion Card").
- Disconnect all power cables and interface cables from the hard drives in the drive bay.
- Remove the hard-drive bay (see Figure 4-14):
- Loosen the two thumbscrews that secure the drive bay in the system.
- Press the drive bay release tab, and lift the drive up and out of the system.
- Install the drive into the drive bay (see Figure 4-14):
- Slide the drive into the drive bay with the back of the drive toward the back of the
drive bay.
- Install the three screws that secure the drive in the drive bay.
One screw is located at the bottom of the drive bay.
- Install the hard-drive bay (see Figure 4-14):
- Lower the drive bay into the system until it snaps into place.
- Tighten the two thumbscrews that secure the drive bay in the system.
- Connect a DC power cable connector to the drive's power input connector.
- Connect the interface cable connector to the drive's interface connector:
- If you are installing a single IDE hard drive, connect the interface cable between the drive and the system board. To identify system board connectors, see Figure 5-3.
- If you are installing a single SCSI hard drive, connect the interface cable between the drive and the SCSI controller card (see the documentation that accompanied the controller card).
- If you are installing a drive in an IDE or SCSI RAID array, connect the interface cable between the drive and the RAID controller card (see the documentation that accompanied the controller card).
- Connect all power cables and interface cables to the other hard drives in the drive bay.
- Ensure that all cables are firmly connected and arranged so that they will not catch on
the computer covers or block airflow inside the system.
- Stand the system upright.
- Install the cover (see "Installing the Cover").
- Reconnect the system to its electrical outlet and turn the system on, including any
attached peripherals.
|
NOTE: The hard-drive activity indicator operates only when IDE hard drives are connected
directly to the primary IDE connector on the system board. The indicator does not operate
with SCSI drives, drives attached to a RAID controller, or drives attached to the tertiary
IDE connector on the system board. To identify the indicator, see Figure 3-1.
|
|
NOTICE: Do not turn off or reboot your system while the drive is being formatted. Doing so can
cause a drive failure.
|
- Partition and logically format the hard drive (see the operating system
documentation).
- Test the drive:
- If you installed a single IDE drive, run the hard drive tests in the system diagnostics to determine whether the drive operates properly (see "Running the System Diagnostics").
- If you installed a drive in an IDE RAID array, run the hard drive tests in the system diagnostics (see "Running the System Diagnostics"). Also, see the RAID controller's documentation for information on testing the controller.
- If you installed a single SCSI hard drive, run the SCSI controllers tests and the hard drive tests in the system diagnostics (see "Running the System Diagnostics").
- If you installed a drive in a SCSI RAID array, run the SCSI controllers tests and the hard drive tests in the system diagnostics (see "Running the System Diagnostics"). Also, see the RAID controller's documentation for information on testing the array.
Follow these general guidelines when installing a RAID controller card. For specific instructions, see the documentation supplied with the card.
|
|
CAUTION: See your System Information Guide for complete information about safety precautions, working inside the computer, and protecting against electrostatic discharge. |
|
NOTE: A RAID controller card must be installed in expansion slot 2.
|
- Unpack the expansion card, and prepare it for installation.
For instructions, see the documentation that accompanied the card.
- Turn off the system, including any attached peripherals, and disconnect the system
from the electrical outlet.
- Remove the cover (see "Removing the Cover").
- Lay the system on its right side.
- Install the controller card in expansion slot 2 (see "Installing an Expansion Card").
- Connect the interface cable(s) to the card and to the drives.
See the documentation that accompanied the card for information about its cable connections.
- Stand the system upright.
- Install the cover (see "Installing the Cover").
- Reconnect the system to its electrical outlet and turn the system on, including any
attached peripherals.
- Ensure that any required device drivers are installed and are configured correctly.
For information on installing device drivers, see the Dell OpenManage Server Assistant CD and the documentation that accompanied the controller card.
- Test the array:
Also, see the RAID controller's documentation for information on testing the array.
The four memory module connectors on the system board can accommodate up to 4 GB of memory by installing combinations of 128-, 256-, 512-MB, and 1-GB registered DDR SDRAM modules. You can purchase memory upgrade kits as needed.
|
NOTE: The DDR SDRAM memory modules must be PC-1600 compliant.
|
For optimum performance, install the memory modules starting with the first connector (farthest from the microprocessor) and leaving no open connectors between installed memory modules.
Table 4-3 lists sample memory configurations based on these guidelines.
Table 4-3. Sample Memory Module Configurations
|
Total Memory
|
Socket A
|
Socket B
|
Socket C
|
Socket D
|
|---|
128 MB | 128 MB | None | None | None |
256 MB | 128 MB | 128 MB | None | None |
384 MB | 256 MB | 128 MB | None | None |
512 MB | 256 MB | 256 MB | None | None |
768 MB | 512 MB | 256 MB | None | None |
1 GB | 512 MB | 512 MB | None | None |
1.5 GB | 1 GB | 512 MB | None | None |
2 GB | 512 MB | 512 MB | 512 MB | 512 MB |
2 GB | 1 GB | 1 GB | None | None |
3 GB | 1 GB | 1 GB | 512 MB | 512 MB |
4 GB | 1 GB | 1 GB | 1 GB | 1 GB |
NOTE: This table only lists sample memory module configurations. Not all
possible configurations are listed.
|
|
|
CAUTION: See your System Information Guide for complete information about safety precautions, working inside the computer, and protecting against electrostatic discharge. |
- Turn off the system, including any attached peripherals, and disconnect the system
from the electrical outlet.
- Remove the cover (see "Removing the Cover").
- Lay the system on its right side.
- Install or remove memory modules as necessary to reach the desired memory total (see
"Installing Memory Modules" and "Removing Memory Modules").
See Figure 5-3 to locate the memory module connectors.
- Stand the system upright.
- Install the cover (see "Installing the Cover").
- Reconnect the system to its electrical outlet and turn the system on, including any
attached peripherals.
After the system completes the POST routine, it runs a memory test.
The system detects that the new memory does not match the system configuration information, which is stored in NVRAM. The monitor displays an error message that ends with the following words:
Press <F1> to continue; <F2> to enter System Setup
- Press <F2> to enter the System Setup program, and check the System Memory
setting.
The system should have already changed the value in the System Memory setting to reflect the newly installed memory.
- If the System Memory value is incorrect, one or more of the memory modules may not
be installed properly. Repeat step 1 through step 8, ensuring that the memory modules
are firmly seated in their connectors.
- Run the system memory test in the system diagnostics (see "Running the System
Diagnostics").
|
|
CAUTION: See your System Information Guide for complete information about safety precautions, working inside the computer, and protecting against electrostatic discharge. |
- Turn off the system, including any attached peripherals, and disconnect the system
from the electrical outlet.
- Remove the cover (see "Removing the Cover").
- Lay the system on its right side.
- Locate the memory module connectors in which you will install a memory module
(see Figure 5-3).
- Press down and outward on the memory module connector ejectors, as shown in
Figure 4-15, to allow the memory module to be inserted into the connector.
Figure 4-15. Removing and Installing a Memory Module

- Align the memory module's edge connector with the alignment key, and insert the
memory module in the connector (see Figure 4-15).
The memory module connector has an alignment key that allows the memory module to be installed in the connector in only one way.
- Press down on the memory module with your thumbs while pulling up on the ejectors
with your index fingers to lock the memory module into the connector (see
Figure 4-15).
When the memory module is properly seated in the connector, the memory module connector ejectors should align with the ejectors on the other connectors with memory modules installed.
- Repeat step 4 through step 7 of this procedure to install the remaining memory
modules.
- Perform step 5 through step 10 of the procedure in "Performing a Memory Upgrade."
|
|
CAUTION: See your System Information Guide for complete information about safety precautions, working inside the computer, and protecting against electrostatic discharge. |
- Turn off the system, including any attached peripherals, and disconnect the system
from the electrical outlet.
- Remove the cover (see "Removing the Cover").
- Lay the system on its right side.
- Locate the memory module connectors from which you will remove memory modules
(see Figure 5-3).
- Press down and outward on the memory module connector ejectors until the memory
module pops out of the connector (see Figure 4-15).
- Repeat step 4 and step 5 of this procedure to remove any other memory modules.
- Perform step 5 through step 10 of the procedure in "Performing a Memory Upgrade."
To take advantage of future options in speed and functionality, you can replace the microprocessor.
The microprocessor and its associated cache memory are contained in a PGA package that is installed in a ZIF socket on the system board.
The following items are included in the microprocessor upgrade kit:
- A microprocessor
- A heat sink with cooling fan
|
|
CAUTION: See your System Information Guide for complete information about safety precautions, working inside the computer, and protecting against electrostatic discharge. |
- Turn off the system, including any attached peripherals, and disconnect the system
from the electrical outlet.
- Remove the cover (see "Removing the Cover").
- Lay the system on its right side.
|
NOTICE: Do not operate the system without the fan and heat sink assembly installed. The
assembly is required to maintain proper thermal conditions.
|
- Remove the microprocessor fan and heat sink assembly (see "Removing the
Microprocessor Fan").
- Pull the microprocessor socket release lever upward to the fully open position (see
Figure 4-16).
|
NOTICE: Be careful not to bend any of the pins when removing the microprocessor. Bending
the pins can permanently damage the microprocessor.
|
- Lift the microprocessor out of the socket and leave the release lever in the open
position so that the socket is ready for the new microprocessor (see Figure 4-16).
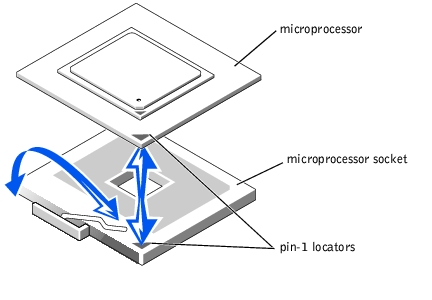
Figure 4-16. Replacing the Microprocessor
- Unpack the new microprocessor.
If any of the pins on the microprocessor appear bent, contact the system manufacturer.
- Ensure that the microprocessor ZIF socket release lever is in the fully open position.
|
NOTICE: Positioning the microprocessor incorrectly can permanently damage the
microprocessor and the system when you turn on the system. When placing the microprocessor
in the socket, be sure that all of the pins on the microprocessor go into the corresponding holes.
Be careful not to bend the pins.
|
- Align pin 1 on the microprocessor (see Figure 4-16) with pin 1 on the microprocessor
ZIF socket.
- Install the microprocessor in the socket (see Figure 4-16).
|
NOTE: No force is needed to install the microprocessor in the ZIF socket. When the
microprocessor is aligned correctly, it should drop into the socket.
|
- When the microprocessor is fully seated in the socket, rotate the ZIF socket release
lever back down until it snaps into place, securing the microprocessor in the socket.
- Install the microprocessor fan and heat sink assembly (see "Installing the
Microprocessor Fan").
- Stand the system upright.
- Install the cover (see "Installing the Cover").
- Reconnect the system to its electrical outlet and turn the system on, including any
attached peripherals.
- Enter the System Setup program, and ensure that the microprocessor options match
the new system configuration (see "Using the System Setup Program").
As the system boots, it detects the presence of the new microprocessor and automatically changes the system configuration information in the System Setup program. A message similar to the following appears:
One 1.8 GHz Processor, Processor Bus: 400 MHz, L2 cache
512 KB Advanced
- Confirm that the top line of the system data area in the System Setup program
correctly identifies the installed microprocessor(s) (see "Using the System Setup
Program").
- Exit the System Setup program.
- Run the system diagnostics to verify that the new microprocessor is operating
correctly.
See "Running the System Diagnostics" for information on running the diagnostics and troubleshooting any problems that may occur.
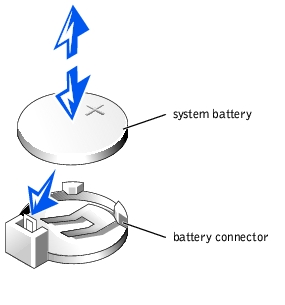
The system battery is a 3.0-V, coin-cell battery.
|
|
CAUTION: See your System Information Guide for complete information about safety precautions, working inside the computer, and protecting against electrostatic discharge. |
|
|
CAUTION: There is a danger of a new battery exploding if it is incorrectly installed. Replace the battery only with the same or equivalent type recommended by the manufacturer. Discard used batteries according to the manufacturer's instructions. See your System Information Guide for additional information. |
- Turn off the system, including any attached peripherals, and disconnect the system
from the electrical outlet.
- Remove the cover (see "Removing the Cover").
- Lay the system on its right side.
- Remove the system battery (see Figure 4-17).
See Figure 5-3 to locate the system battery on the system board.
You can pry the system battery out of its connector with your fingers or with a blunt, nonconductive object such as a plastic screwdriver.
- Install the new system battery with the side labeled "+" facing up (see Figure 4-17).
Figure 4-17. Replacing the System Battery
- Stand the system upright.
- Install the cover (see "Installing the Cover").
- Reconnect the system to its electrical outlet and turn the system on, including any
attached peripherals.
- Enter the System Setup program to confirm that the battery is operating properly (see
"Using the System Setup Program").
- Enter the correct time and date in the System Setup program's Time and Date fields.
- Exit the System Setup program.
- To test the newly installed battery, turn off the system and disconnect it from the
electrical outlet for at least an hour.
- After an hour, reconnect the system to its electrical outlet and turn it on.
- Enter the System Setup program and if the time and date are still incorrect, replace
the system board.
|
|
CAUTION: See your System Information Guide for complete information about safety precautions, working inside the computer, and protecting against electrostatic discharge. |
- Turn off the system, including any attached peripherals, and disconnect the system
from the electrical outlet.
- Remove the cover (see "Removing the Cover").
- Remove the back cooling fan (see "System Fans").
- Remove the expansion-cards (see "Removing an Expansion Card").
- Remove the memory modules (see "Removing Memory Modules").
- Remove the microprocessor (see "Replacing the Microprocessor").
- Disconnect all cables attached to the system board.
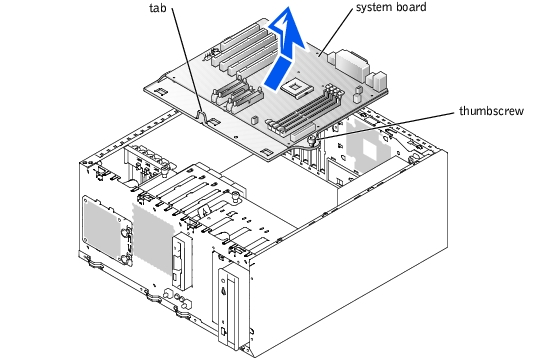
- Remove the system board (see Figure 4-18):
- Loosen the thumbscrew at the top of the system board.
- Slide the system board and its mounting plate away from the back panel about
12.7 mm (0.5 inch).
- Tilt the back of the system board up, and lift it out of the system (see
Figure 4-18).
Figure 4-18. Replacing the System Board
|
|
CAUTION: See your System Information Guide for complete information about safety precautions, working inside the computer, and protecting against electrostatic discharge. |
- Replace the system board (see Figure 4-18):
- Holding the board at the sides of the mounting plate, pivot the system board
down, front end first, into the system chassis.
|
NOTICE: Use care when lowering the front of the system board. You must first position the
front edge of the board beneath the hard drive cage, and then lower the back of the board.
Ensure that the tabs on the bottom of the system board mounting plate engage in their slots on
the bottom of the system chassis.
|
- Slide the system board back (toward the back panel) until the board's thumbscrew
can be tightened into the chassis to secure the system board in place.
- Connect all appropriate cables to the system board.
|
|
CAUTION: Operating the system with only power supply cable connector P1 installed may cause the system board to overheat, damaging the system board. Ensure that both power cables P1 and P10 are properly connected to the system board. |
- Power cable P1 to system board connector CN1, and power cable P10 to system board connector CN2
- Control panel cable from the control panel board
- Front fan power cable
- Rear fan power cable
- IDE cable from the CD drive
- Diskette drive (FDD) cable
- Install the microprocessor (see "Replacing the Microprocessor").
- Install the memory modules (see "Installing Memory Modules").
- Install all expansion cards that were removed (see "Installing an Expansion Card").
- Replace the back cooling fan (see "System Fans").
- Replace the cover (see "Installing the Cover").
- Reconnect the system to its electrical outlet and turn the system on, including any
attached peripherals.
Back to Contents Page
 SCSI Configuration Information