![]()
![]()
Dell™ PowerVault™ 220S and 221S Systems Service Manual
This section provides procedures for removing and replacing components and assemblies in your storage system:
Unless otherwise noted, each procedure assumes the following conditions:
Most of the procedures in this section require the use of one or more of the following tools:
Your storage system features a SCSI backplane that greatly simplifies cabling and configuration of SCSI hard drives. The SCSI backplane configures all SCSI IDs.
When used in combination with a host RAID controller that supports hot-pluggable drives, the SCSI backplane allows you to remove and insert hard drives without shutting down the storage system. This means that you can replace a failed drive without requiring network users to log off, thus avoiding potential loss of time and data. For more information about whether your RAID controller supports hot-plugging, see the documentation that came with the card.
| NOTICE: If the storage system is connected to a supported RAID controller, you can remove and insert SCSI hard drives while the storage system is running. However, hot-plugging hard drives without a supported card could result in data loss. See your RAID controller documentation to ensure that the host adapter is configured correctly to support hot-plug hard drive removal and insertion. HBA cards do not support hot-plugging of drives while the system is running. For more information on supported cards, see your system's readme file. |
This section describes how to remove and install hard drives in your storage system.
| CAUTION: See "Protecting Against Electrostatic Discharge" in the safety instructions in your System Information document. |
| NOTICE: Extra care must be taken when handling and storing the hard drives. The carriers provide some protection, but the hard drives can be damaged by rough handling. When removing the hard drives from the storage system, place them on a padded surface. Never drop the hard drives. |
| NOTICE: To avoid damage, never leave a drive carrier partially removed from the storage system. Rotating a carrier handle next to an unseated drive carrier will result in serious damage to the unseated drive carrier. |
| NOTICE: To avoid data loss when removing a hard drive from an active RAID array, you must first use the array management software to prepare the drive for removal. See your array management software documentation for more information. |
Figure 9. Installing and Removing Hard Drives
 |
|
| NOTE: If the wrong drive is inadvertently removed, your array management software issues a message that a logical disk has failed after I/O has started. For more information about what to do if the wrong drive is removed, see your array management documentation. |
| NOTICE: To avoid damage, never leave a drive carrier partially removed or inserted into the storage system. Rotating a carrier handle next to an unseated drive carrier will result in serious damage to the unseated drive carrier. |
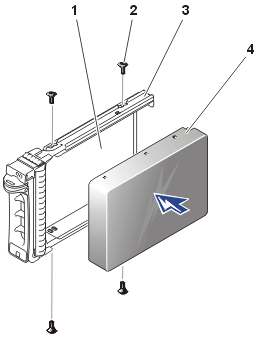
Figure 10. Installing the Hard Drive in the Carrier
 |
|
The status LED indicator (see Table 2 for description) is a steady green if the hard drive is inserted properly. If the indicator is not illuminated, see "Troubleshooting SCSI Hard Drives."
While the drive rebuilds, the hard-drive carrier LED flashes green twice per second at unequal intervals.
| NOTE: For information on adding a hard drive to a storage array, see your array management software documentation. |
A system with redundant enclosure management features two EMMs that are designated as primary and secondary and can be configured in either a cluster or joined-bus mode. A system with nonredundant enclosure management consists of one EMM and one SCSI terminator card configured in a joined-bus mode, or two EMMs configured in a split-bus mode. In redundant EMM systems, only one EMM per SCSI bus is active at one time, so only one EMM per SCSI bus can respond to SCSI commands from an initiator.
EMMs and the SCSI terminator card are "warm-pluggable" and can be removed and installed without shutting down the storage system, provided all I/O to the module has ceased.
This section describes how to remove and install EMMs and the SCSI terminator card in your storage system.
| NOTE: In a joined-bus or cluster configuration, you must turn off any server nodes connected to the storage system while you replace an EMM. |
This step is optional if I/O activity to the device has ceased.
| NOTE: If you did not turn off power to the storage system in step 1, after the module is removed from the system, the amber shelf-fault indicator will be illuminated until the module is replaced. See Figure 2 for location of the shelf-fault indicator. |
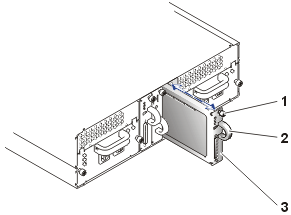
Figure 11. Removing and Installing an EMM or SCSI Terminator Card
 |
|
Your system comes equipped with one "warm-pluggable" split-bus module which can be removed or replaced with the system powered on, provided that all I/O activity to the module has ceased. However, since the split-bus module is an extension of the backplane, it must be present for proper operation of the system. If you turn on your system without a split-bus module present or the module is removed while the system is powered on, the shelf-fault LED illuminates, and an audible alarm sounds continuously until a split-bus module is inserted. For more information on split-bus module features and functions, see "Split-Bus Module."
This section describes how to remove and install split-bus modules in your storage system.
This step is optional if I/O activity to the device has ceased.
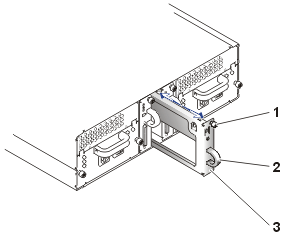
Figure 12. Removing and Installing a Split-Bus Module
 |
|
- Up (rack systems) or right (tower systems) for joined-bus mode
- Center for split-bus mode (both rack and tower systems)
- Down (rack systems) or left (tower systems) for cluster mode
For more information on these modes, see "Split-Bus Module."
| NOTE: To change the SCSI bus mode, you must change the position of the bus configuration switch before turning on the storage system. Changing the position of the bus configuration switch while the system is on will not affect system operation. If you change the configuration, you must first reboot the storage system and then the host server for the changes to take effect. For more information, see your Installation and Troubleshooting Guide. |
Your system supports two combined power supply and cooling modules. While the system is designed to operate normally with only one functional power supply, both cooling modules (with two blowers each) must be present for proper cooling. If only one power supply is needed, a blank must be inserted into the other slot to mount the second cooling module.
| NOTICE: The maximum amount of time that power supply and cooling modules may be removed from the system while it is operating is 5 minutes. If power supply and cooling modules are not replaced within 5 minutes, the system begins to overheat. When the system reaches a critical temperature, it shuts down to prevent damage to the system. |
The cooling module is securely mounted to the power supply using a hook-and-latch fastening design. This simplifies the removal and installation of cooling modules and power supplies.
| NOTICE: If you have a system with two power supplies, the power supplies are hot-pluggable. You can install or remove one of the two power supplies while the system is turned on. If you have a system with only one power supply, you must turn off the system before replacing the power supply (see "Replacing a Power Supply in Systems With Nonredundant Power Supplies"). |
| NOTE: When a power supply fails, fan speeds increase to provide additional cooling. In addition, when replacing power supplies, fan speeds also increase until the replacement power supply or power supply blank has been installed. |
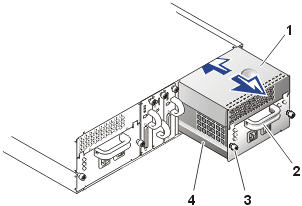
Figure 13. Replacing the Power Supply (Systems With Redundant Power Supplies)
 |
|
| CAUTION: The power supply and cooling modules are heavy. Use both hands when removing. |
| NOTICE: The power-supply handle is provided to ease the task of pulling the power supply free from the bay. Do not use this handle to carry the storage system. |
Figure 14. Detaching the Cooling Module From the Power Supply
 |
|
The power supply is seated when its front plate is even with the front plate of the adjacent power supply.
| NOTE: The power-supply fault indicator (see Figure 8) remains illuminated until you connect the AC power cable to the power supply and turn on the on/off switch. |
To replace the power supply in a system that uses only a single power supply, perform the following steps:
| NOTE: When a power supply fails, fan speeds increase to provide additional cooling. In addition, when replacing power supplies, fan speeds also increase until the replacement power supply or power supply blank has been installed. |
| CAUTION: The power supply and cooling modules are heavy. Use both hands when removing. |
| NOTICE: The power-supply handle is provided to ease the task of pulling the power supply free from the bay. Do not use this handle to carry the storage system. |
The power supply is seated when its front plate is even with the front plate of the adjacent power supply.
Your system supports two combined power supply and cooling modules. While the system is designed to operate normally with only one functional power supply, both cooling modules (with two blowers each) must be present for proper cooling. If only one power supply is needed, a power-supply blank must be inserted into the other slot to mount the second cooling module.
| NOTICE: The maximum amount of time that power supply and cooling modules may be removed from the system while it is operating is 5 minutes. If power supply and cooling modules are not replaced within 5 minutes, the system begins to overheat. When the system reaches a critical temperature, it shuts down to prevent damage to the system. |
The cooling module is securely mounted to the power supply or blank using a hook-and-latch fastening design. This design simplifies the removal and installation of cooling modules, power supplies, and blanks.
To replace a cooling module, perform the following steps:
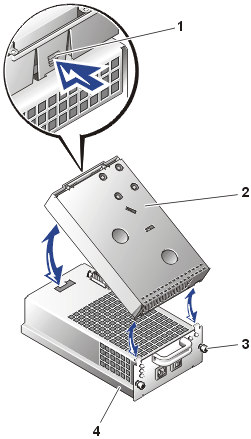
Figure 15. Replacing a Cooling Module
 |
|
| CAUTION: The power supply or power supply blanks and cooling modules are heavy. Use both hands when removing. |
| NOTICE: The handle on the power supply and blank is provided to ease the task of pulling the power supply or blank free from the bay. Do not use this handle to carry the storage system. |
The power supply or blank is seated when its front plate is even with
the front plate of the adjacent power supply.
The SCSI backplane in your storage system provides an interface for up to fourteen LVD SCSI hard drives, two EMMs, two combined power supply and cooling modules, and one split-bus module. With the exception of redundant temperature sensors and an EEPROM for storing system data, the backplane contains only passive electrical components.
To replace the SCSI backplane in your storage system, perform the following steps:
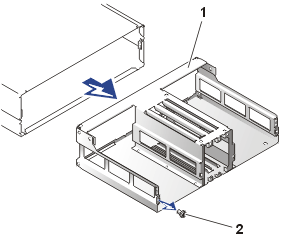
Figure 16. Removing Chassis Tray
 |
|
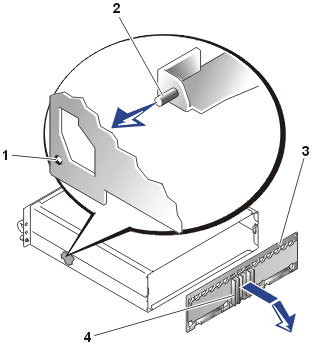
Figure 17. Removing the SCSI Backplane
 |
|
Replace the screws you removed in step 7.
Replace the EMM(s) and/or SCSI terminator card.
See "Removing and Installing EMMs and the SCSI
Terminator Card."
Replace the power supply and cooling modules. If
you have two power supplies, replace both (see "Replacing
the Power Supply"). If you have one power supply, replace the power supply blank
as well as the power supply.
Replace the hard drives. See "Removing and Installing Hard Drives."
Reconnect the SCSI cable(s) and power cables.
Turn on power to the storage system. (If you
have two power supplies, turn on both).
Turn on power to the host system.
Use your array management software to restore
temperature defaults and service tag data. For more information, see your array management
documentation.