 Front-Panel Features
Dell™ PowerVault™ 715N Systems User's Guide
Other Documents You Might Need
The Dell™ PowerVault™ 715N network attached storage (NAS) appliance enables you to easily add storage to a workgroup, small office or small business network, and offload the file management responsibilities from the server. It is a "headless" device, which means it has no keyboard, mouse, or monitor but can be managed through the network or by using console redirection through a serial connection. The system offers the data security capabilities of general-purpose servers.
This document provides basic information about the system features and specifications. For information about installing, servicing, or managing the system, see the documents listed in "Other Documents You Might Need."
This section provides a basic overview of the system's features on the front panel, which is shown in Figure 1-2.
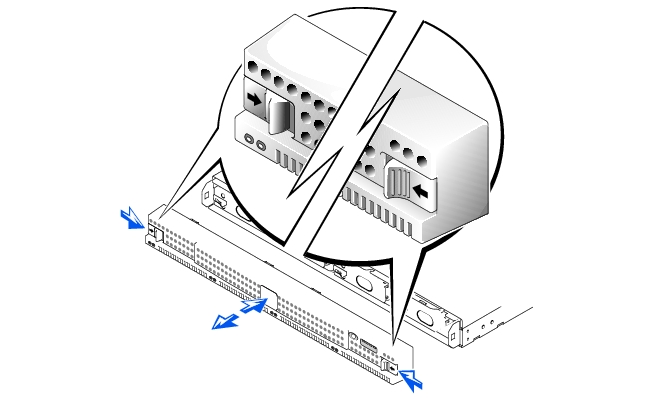
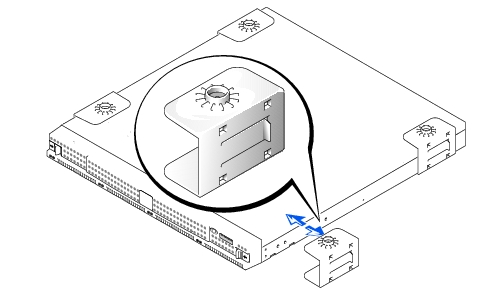
The system's front bezel includes the power button and clear markings of the light emitting diodes (LEDs) for each hard drive. See the following sections for more information about the front panel LEDs. Remove the bezel if you need to remove or replace hard drives. To remove the bezel, push the release latches inward, and pull the bezel away from the system (see Figure 1-1).
Figure 1-1. Removing the Front Bezel
Push the power button to turn on the system.
The system has four integrated drive electronics (IDE) hard drives. Each hard drive is mounted in a carrier that snaps into one of the four hard drive bays on the system.
 |
NOTE: The hard drives are not hot-swappable. Therefore, before you replace a drive, you must shut down and turn off the system. |
Figure 1-2. Front-Panel Indicators
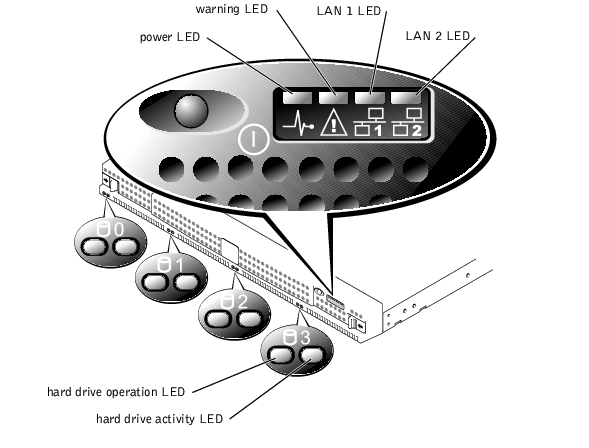
Each hard drive has two LEDs. The LEDs are most visible when the bezel is attached to the front of the system. The LEDs provide the following information for each hard drive:
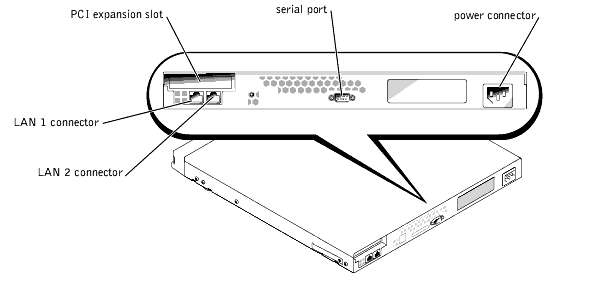
This section provides a basic overview of the system's features on the back panel. Figure 1-3 shows the back-panel features of the system.
The power cable plugs in to this connector.
Two LAN ports connect the system to an Ethernet network with RJ-45 connector LAN cables.
The serial port enables you to connect to the appliance through console redirection or remote access services (RAS).
|
NOTE: Console redirection is enabled by default. However, if you disable it in the BIOS Setup utility, you can re-enable it only by pressing the console redirection button on the system board. See your Installation and Troubleshooting Guide for information about enabling console redirection. |
Figure 1-3. Back-Panel Features
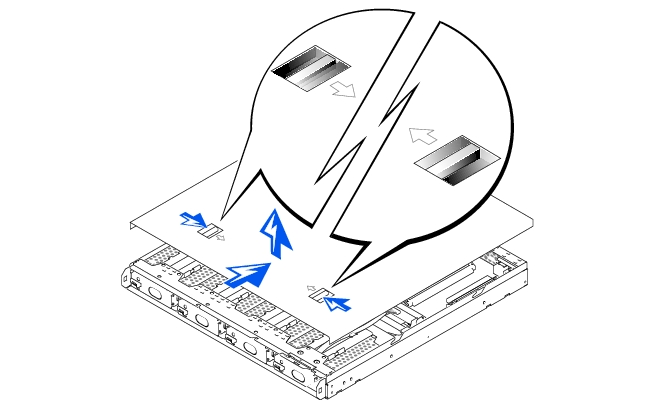
Although you do not need to configure the system hardware, you can remove the cover as needed to troubleshoot the hardware or replace parts. To remove the cover, press the latches on the cover inward, grasp the cover on both sides, then slide the cover backwards about an inch and carefully lift it off (see Figure 1-4).
To replace the system cover, fit the cover over the sides of the chassis, and slide the cover forward, slightly applying pressure to the rear part of the cover, until it snaps into place.
Figure 1-4. Removing the System Cover
The system comes with plastic brackets that you can clip to the sides (see Figure 1-5). Use this option if you do not plan to install the system in a rack. You can also use the brackets to stack systems on top of each other. If you are installing the system in a rack, see your Rack Installation Guide.
Your system includes the following features:
The following software is included with your Dell system:
Normally, the system boots fully on its own with no intervention. However, if you want to update or make changes to the BIOS, run diagnostics, or reinstall the system image, use the Function Select menu. To access the Function Select menu, you must connect a client system to the appliance through console redirection. See the Administrator's Guide for information about console redirection. When the appliance boots, press <F2> (or <Esc><2> if running Windows 2000 prior to Service Pack 2) when the screen displays the following message:
Press F2 to enter the Function Select Menu
The following options are available:
Devices are available that protect against power problems such as power surges, transients, and power failures. The following subsections describe some of the devices.
Surge protectors are available in a variety of types and usually provide a level of protection commensurate with the cost of the device. Surge protectors prevent voltage spikes, such as those caused during an electrical storm, from entering a system through the electrical outlet. Surge protectors, however, do not offer protection against brownouts, which occur when the voltage drops more than 20 percent below the normal AC line voltage level.
Line conditioners go beyond the overvoltage protection of surge protectors. Line conditioners keep a system's AC power source voltage at a fairly constant level and, therefore, can handle brownouts. Because of this added protection, line conditioners cost more than surge protectors—up to several hundred dollars. However, the devices cannot protect against a complete loss of power.
UPS systems offer the most complete protection against variations in power because they use battery power to keep the system running when AC power is lost. The battery is charged by the AC power while it is available, so once AC power is lost, the battery can provide power to the system for a limited amount of time—from 15 minutes to an hour or so—depending on the UPS system.
UPS systems range in price from a few hundred dollars to several thousand dollars, with the more expensive units allowing you to run larger systems for a longer period of time when AC power is lost. UPS systems that provide only 5 minutes of battery power allow you to conduct an orderly shutdown of the system, but they are not intended to provide continued operation. Surge protectors should be used with all UPS systems, and the UPS system should be Underwriters Laboratories (UL) safety-approved.
In addition to this User's Guide, the following documentation is included with your system:
You might also have one or more of the following documents.
|
NOTE: Documentation updates are sometimes included with your system to describe changes to your system or software. Always read the updates before consulting any other documentation because the updates often contain the latest information. |
When you purchase options separately from your system, you typically receive the documentation that you need to configure and install the options in your Dell system.
Technical information files—sometimes called "readme" files—might be installed on your hard drive to provide last-minute updates about technical changes to your system or advanced technical reference material intended for experienced users or technicians.
If at any time you do not understand a procedure described in this guide or if your system does not perform as expected, Dell provides tools to help you. For more information about the help tools, see "Getting Help" in your Installation and Troubleshooting Guide.