BCR # 5
 |
FECO:
|
BCR
# 5 |
|
MODIFICATION NO:
|
N/A |
|
PRODUCT:
|
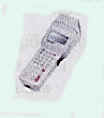
PDT
3100 HAND HELD DATA CAPTURE UNIT. |
|
SUB-ASSEMBLY:
|
N/A |
|
ESTIMATED MAN HOURS:
|
N/A |
|
CLASS OF CHANGE:
|
INFORMATIONAL
|
|
REASON FOR CHANGE:
|
INSTALLATION
INSTRUCTION FOR HHDCU - ON MOTOROLA. AIX SYSTEM. |
|
RELATED FECO/AB
|
N/A |
PDT 3100 HHDCU ON MOTOROLA AIX SYSTEM
1.
Note:
Throughout this FECO a SPACE in a string is shown by a Ń .
All other spaces are purely cosmetic.
2. This FECO details
the installation of a Symbol PDT 3100 Hand Held Data
Capture Unit (HHDCU) on a Motorola system running AIX.
3. A project
plan must be completed which should include a check on the disk space.
4. The Symbol PDT
3100 HHDCU has a 35 key keyboard and a 4 line display.
The head scans to the left or right. It is designed as a Portable data Terminal (PDT) to
capture
data in warehouses goods in/out etc, then be placed in the cradle, and download the data
to the
system.
5. PDT 3100
SPECIFICATIONS
Dimensions: 4- or 8-line with display with 1-D scanning:1.9" D x 3" W x
9.38" H/4.8 cm
D x 7.6 cm W x 23.83 cm H
Weight: 15.5oz./440 gm to 16.9oz./480 gm
ESD: 15 kV electrostatic discharge to all surfaces without loss of data
Drop: Unit functions normally after 4-ft./1.2m drop to concrete
Operating Temperature: 32° to 104°F/0° TO 40°C
Storage Temperature: -4° to 140°F/-20° TO 60°C
Humidity: 0% to 95% noncondensing at 122°F/50°C
Microprocessor: 80c88 type (8 MHz/V25)
ROM: System EPROM 128 KB (operating system of DOS, BIOS, and terminal diagnostics)
Non-Volatile Memory: 256K for program storage in a protected area
RAM Memory: Up to 7.6 MB for data and/or program storage
Keyboard: 21-key hard key cap; 35 key, or 46-key conductive rubber; side alpha-shift
key and
scan trigger
Display: 4-line or 8-line by 20 characters, supertwist (STN) LCD, back light, reverse
video,
double-high and double-wide characters
Real-Time Clock: Time and Date stamping under software control
Interfaces: DE9: tethered laser scanner or contact wand; RJ-41: for cradle or cable
interface<
RJ-41: Limited RS-232-C communications capable of transmission speeds from 150 bps to
38.4 kbps (software selectable)
Optional Laser Module: Scanning module rotates 180° for right or left-handed
operation;
supports one-dimensional bar codes only; standard and long-range models
Communications/Charging Adapter: Provides trickle charging of NiCd batteries and
provides
full RS232C voltages and signals
Single Slot Cradle FullRS232C, 25 pin connector, optional internal modem;Rapid
charging
90 mins NiCd, 120 mins. NiMH
Power: 9-volt alkaline battery; Rechargeable NiCd battery pack; High capacity NiMH
battery pack
6. PDT 3100
KEYBOARD
This model has 35 keys, other variants are 21 or 46 keys. The keys are multifunctional and
may
require the press of the FUNC or ALPH key to give the desired input; as well as using the
normal shift key.
7.
PDT 3100 BOOT
Cold Boot
Press and hold
SPACE FUNC Ý
keys
Press and release
PWR
key
Release
SPACE FUNC Ý
keys
Warm Boot
Press and hold
\
+
keys
Press and release PWR
key
Release
\
+
keys
8. PDT
3100 INSTALLATION
8.1. Connect the Cradle to
COM1, 9 pin D Type, by means of a cable type BO1.
This MUST have a thin low profile cover on the end, to ensure proper connection.
8.2. Install the PDT in the
Cradle
8.3. Connect the PSU to the Cradle
and switch on.
8.4. If necessary allow the PDT
3100 to charge up fully.
9. COM1 SET
UP
Set up COM1 for 9600 8 I N XON XOFF
10. C RUNTIME TAPE
10.1. To load the C Run Time Tape
10.2. See the Project Plan
to determine directory, to load it into, in para 10.4
10.3. Login to root.
10.4. Enter cd Ń <DIRECTORY> <CR>
10.5. Enter tar Ń x v f Ń /dev /r m t ? <CR>
where ? is tape id.
10.6. Enter smit Ń install <CR>
10.7. Select Install &
Update follow prompts or <CR> and the system will install.
11. SCANNER
SCRIPTS.
11.1. Login to bml
11.2. Enter password
11.3. Enter cd Ń bin <CR>
11.4. Enter tar Ń x vof Ń /dev /r m t ? <CR>
11.5 Associated Programs.
To cope with ports to other systems, other programs & scripts are required to work
with the
rscan replacement program.
These are:
UVgetdefs
to get the final settings of a specific ttylabel.
UVls
to get the file ownership of the required device.
UVpmadm
to get the ttylabel of the required port.
UVsort
to sort various pieces of information.
BCRGrabDeviceDriver
to claim & lock the port to prevent system o/s interference.
BCRReleaseDeviceDriver to unlock &
release the port to the system.
Enter exit
<CR>
Login to root
Enter cd Ń / charisma1 / users / bml / bin <CR>
Enter chown Ń bml Ń UV* <CR>
Enter chown Ń root Ń BCR* <CR>
Enter chmod Ń 774 Ń UV* <CR>
Enter chmod Ń 774 Ń BCR* <CR>
Enter chmod Ń u+s Ń UV* <CR>
Enter chmod Ń u+s Ń BCR* <CR>
Enter exit
<CR>
Login to bml
11.6. Enter rscan Ń - v
Screen displays version number.
Ensure version is
2.1.1 or greater.
12. IMPLEMENTOR.
The implementor at
this point will configure the PDT 3100 for use, and test for function.
13 TEST PDT 3100
13.1. Once set up, pressing the PWR button brings up the
main menu, shown below
CHARISMA
1, STOCK ISSUE
2, KANBAN
3, REMOTE CONTROL |
To select an option,
highlight it, using 1 2 or 3, Ý or ß
keys; then press ENTER.
13.2. Select Option 1, STOCK ISSUE, by highlighting, then press
ENTER.
13.3. At prompt FILE , enter a filename, eg STKISSU.
13.4. At prompt Bar, point scanner left or right, at the
target bar code and press the Black Buttons on
each side.
A bleep indicates a
successful read and decode.
13.5. At prompt Batch, either enter a Batch Number
and press ENTER; or just press ENTER.
13.6. Repeat 13.3 and 13.4 till you have successfully read several
different bar codes.
13.7. To return to the main menu press FUNCT, then
ENTER.
13.8. Place PDT 3100 in the Cradle.
13.9. From the main menu select 3 REMOTE CONTROL
and ensure that the details displayed are
correct. Enter
the filename to download e.g. STKISSU
Then press ENTER.
13.10 On the system log to bml
13.11 Enter the password.
13.12 Enter
rscan Ń -d Ń -p <DEV PATH> Ń
-f Ń D: <DEV FILE
NAME> Ń -o <FILENAME> Ń -c10
13.13 The data is downloaded from the HHDUU to the system
file.
13.14 Display the system file to show the data in it. e.g
vi TEST1 ; and ensure that the bar code
displayed
is correct. There may be some extra digits added before or after the number.
-
Sample Output File Formats.
- D:STKISSU.DAT
ddddddddddddddddN/A------------N/A---qqqqqqqq
3033710093083 N/A
N/A
1
3033710092918 N/A
N/A
1
3033710093083 N/A
N/A
1
9770010478021 N/A
N/A
2
14. Warning 1.
Do not remove
the LDT from the cradle if the COMM light is flashing as it indicates that data is
being transmitted or a command is
being received.
15 Warning 2.
A log file named RscanLog_ppp
will also be created to give a summary of the communication
with the scanner, where ppp is the
same as for the debug file.
Data is appended to this
file for each communication with the scanner, so it must be
checked regularly by the system administrator to
prevent it becoming too large.
16. Complete all documentation
Return to
Index