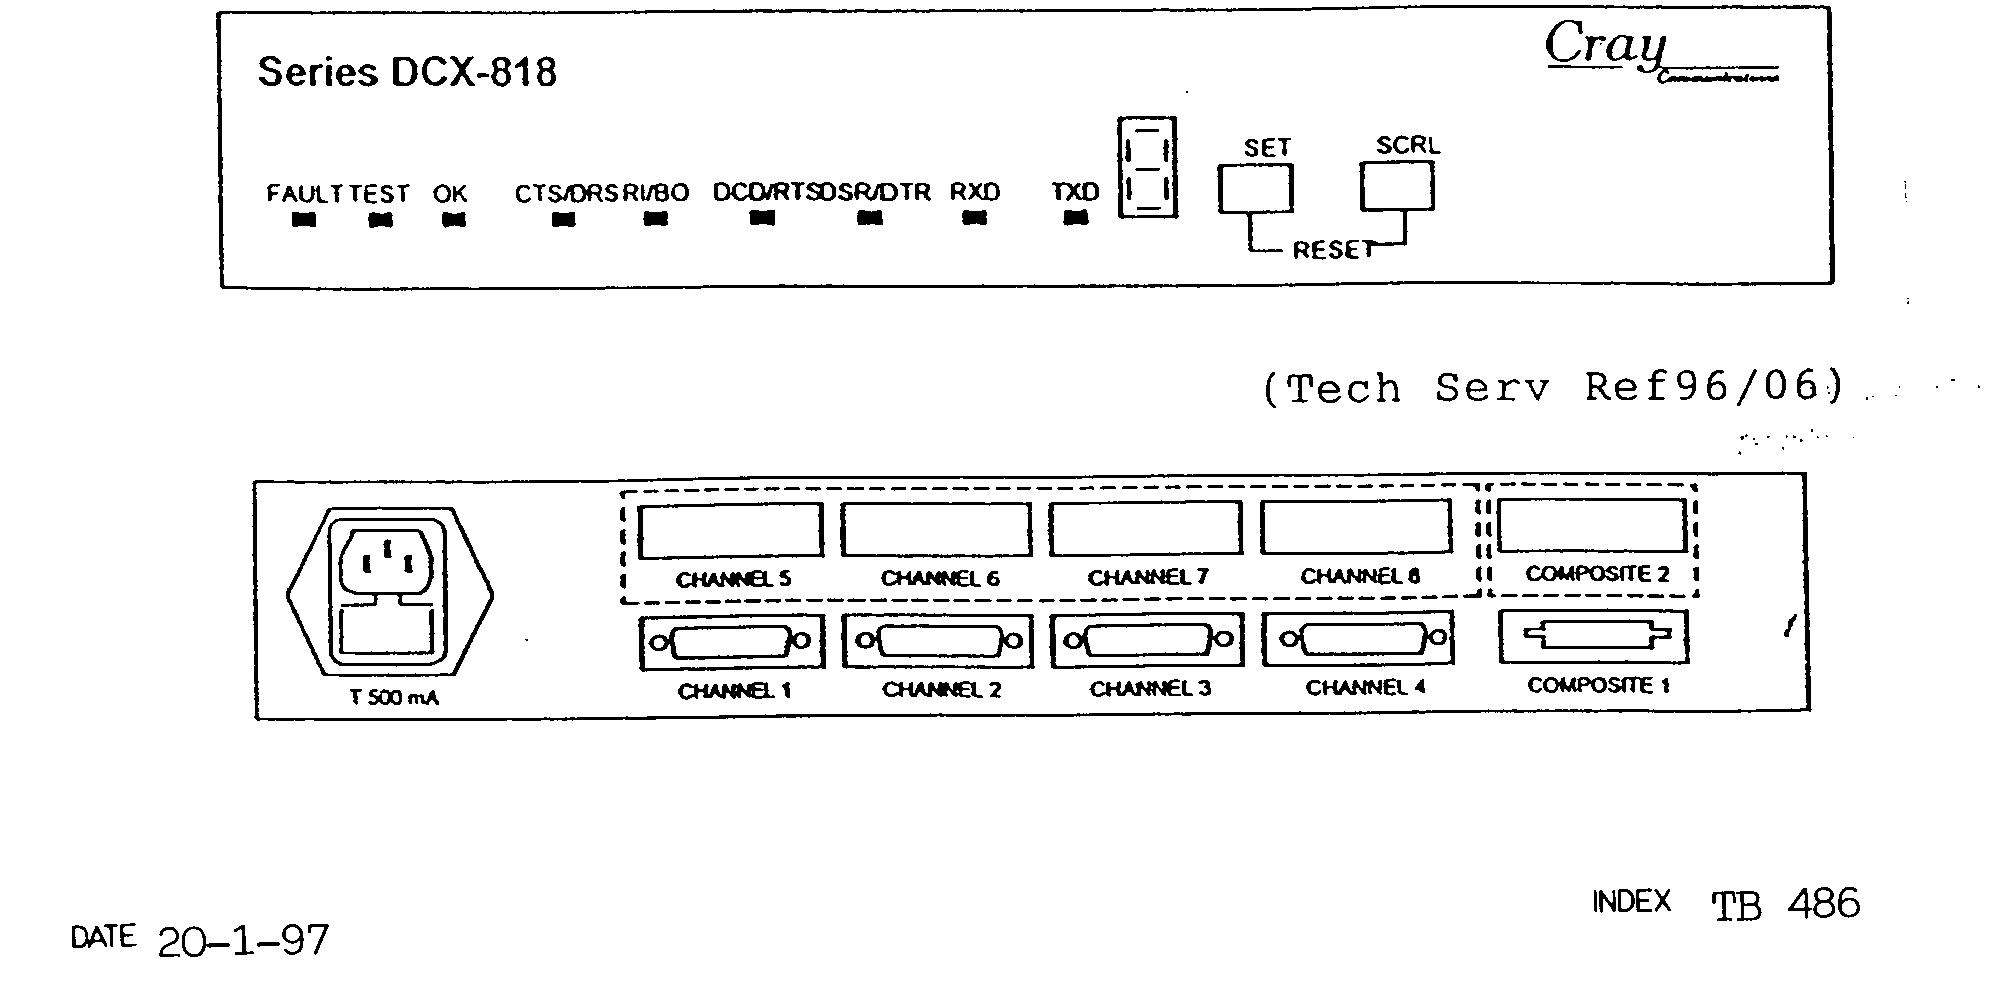
It is light grey in colour and measures
approximately 16in x 9in x 2.5in.
See the diagram below.
The DCX818 has a similar function to a gandalf minimux in that it is only a point to point
multiplexor,
but
with the crayDCX832 multiplexor could be used as the end or ends of a daisy chain, with a
maximum
of 3 nodes.
Ensure esd precautions are observed.
7.1. select option 1 channel configuration.
7.2. enter channel number required.
7.3. select option 4 - load default setting.
7.4. select option 1 to configure all parameters, or letter to configure only one, then
reset parameters as
necessary to those below:-
| a line speed 9600 |
B local echo off |
| C character code 8+1 |
D uso connect character off |
| E system messages off |
F parity trans |
| G term.flow control dc1 |
H term.flow control x-off dc3 x-on |
| I flyback buffering off |
J buff overflow prot x-on off |
| K buff. Overflow off |
L cts to follow rts on prot x-off |
| M special flow none |
N user escape character ctrl-a |
| O inactivity timer off |
P parity error character * |
| Q host abr off |
R host control monitor off(for dll) |
| S setup pins |
T data limit 48 |
7.5. the line speed selection must be compatible with it's adjacent channel. Adjacent
channels are
defined as channels 1/2,channels 3/4, channels
5/6, channels 7/8.
To determine compatible speeds for adjacent
channels, select only speeds from the speed table
below. The speeds may be identical or
different.
| speed table 2 |
| (bps) |
| 75 |
| 110 |
| 134.5 |
| 150 |
| 300 |
| 600 |
| 1200 |
| 1800 |
| 2000 |
| 2400 |
| 4800 |
| 9600 |
| 19200 |
7.6. Channel parameters may be copied to other channels using options 2 or 3.
7.7. Channels will always connect to channels at the remote end on a 1-1 2-2 3-3 basis.
7.8. to exit channel configuration enter x.
8. link configuration option 4 standard settings
8.1. select option 4 link configuration.
8.2. the composite level driver will display type of link fitted, v24 or v11. All the
other link
parameters will be displayed.
8.3. set the parameters to those listed below by selecting the appropriate letter:-
A
maintenance clock rate set to link line speed.
V24
up to 19.2k
V11
up to 64k
B
internal/external clockext
C
link inactivity10sd inter frame delay24ms
Timeout
E
poll mode timeout 1sf number of channels set 4 or 8
G
data inactivity noneh sarm burst length limit none
Timeout
I
reset interval1sj rr burst length limitnone
K
for v24
X.21
bis interface disabled
For
v11
Isdn
interface disabled
L
extended window off
8.4. to exit link configuration enter x.
9. composite connectors
9.1. the v24 composite link terminates in a 15 way modular jackplug. An interface cable
terminating in a 25 way d type male connector
interfaces with the modem/ntu.
Cray cable type x890-405011 for modems
Cray
cable type x818-401511 for ntu.
The
specs are shown below.
X818-401511
x890-405011
15
pin25 pin15 pin25 pin
For
NTU For Modems Only
| Modular Jack |
D Type Male |
Modular Jack |
D Type M |
2 |
2 |
2 |
2 |
3 |
3 |
3 |
3 |
4 |
4 |
4 |
4 |
5 |
5 |
5 |
5 |
6 |
6 |
6 |
6 |
7 |
7 |
7 |
7 |
8 |
8 |
8 |
8 |
9 |
9 |
9 |
9 |
10 |
10 |
10 |
10 |
11 |
11 |
11 |
11 |
| |
|
12 |
22 |
| |
|
13 |
23 |
| |
|
14 |
24 |
| |
|
15 |
25 |
10. diagnostics/trouble shootings
10.1 fault location can be assisted by the validation local and remote loopback tests.
If there is
a fault within the DCX818 itself the front
indicator will display an f and error number.
10.4 if at power-up the DCX818 fails it's diagnostics, an alternating f and an error
code will be
displayed on the front panel seven-segment
display. The following list briefly explains
each, and any possible action that can be taken
to remedy the fault; however in all cases
the unit should be reset and allowed to run the
diagnostics again.
Fault
cause action
Number(s)
1eprom
checksum incorrect replace the eproms, ug7and uj7
2-5
soft abort fault check link lk3, swab, not shorted
6/7set
switch fault/scrl check that the switch is not pressed during the power testing.
11-17bus
error fault fatal error, reset and retry.
18-26ram
fault check that the correct issue of software is fitted reset and try again.
27-35bram
fault fatal error, reset and try again.
52-63duart
access fault fatal error, reset and try again.
64-74duart
interrupt faulten sure pal5, uj4 isfitted, reset and try again.
75-122duart
data fault fatal error, reset and try again.
139-141dmsc
access fault ensure dmsc, ub3 is fitted reset and try again.
142-145dmsc
interrupt fault fatal error, reset and try again.
158-169dmsc
data fault ensure pal6, uc2 is fitted reset and try again.
It
is possible that during the course of diagnostic testing an unexpected exception may
occur.
This
will cause testing to cease and an alternating u and an exception number to bedisplayed:
U
- -
Pressing
the scrl key will cause the test number being performed at the time to be displayed in
the
format:
U
- -
The
unit should be reset and allowed to run the diagnostics again.
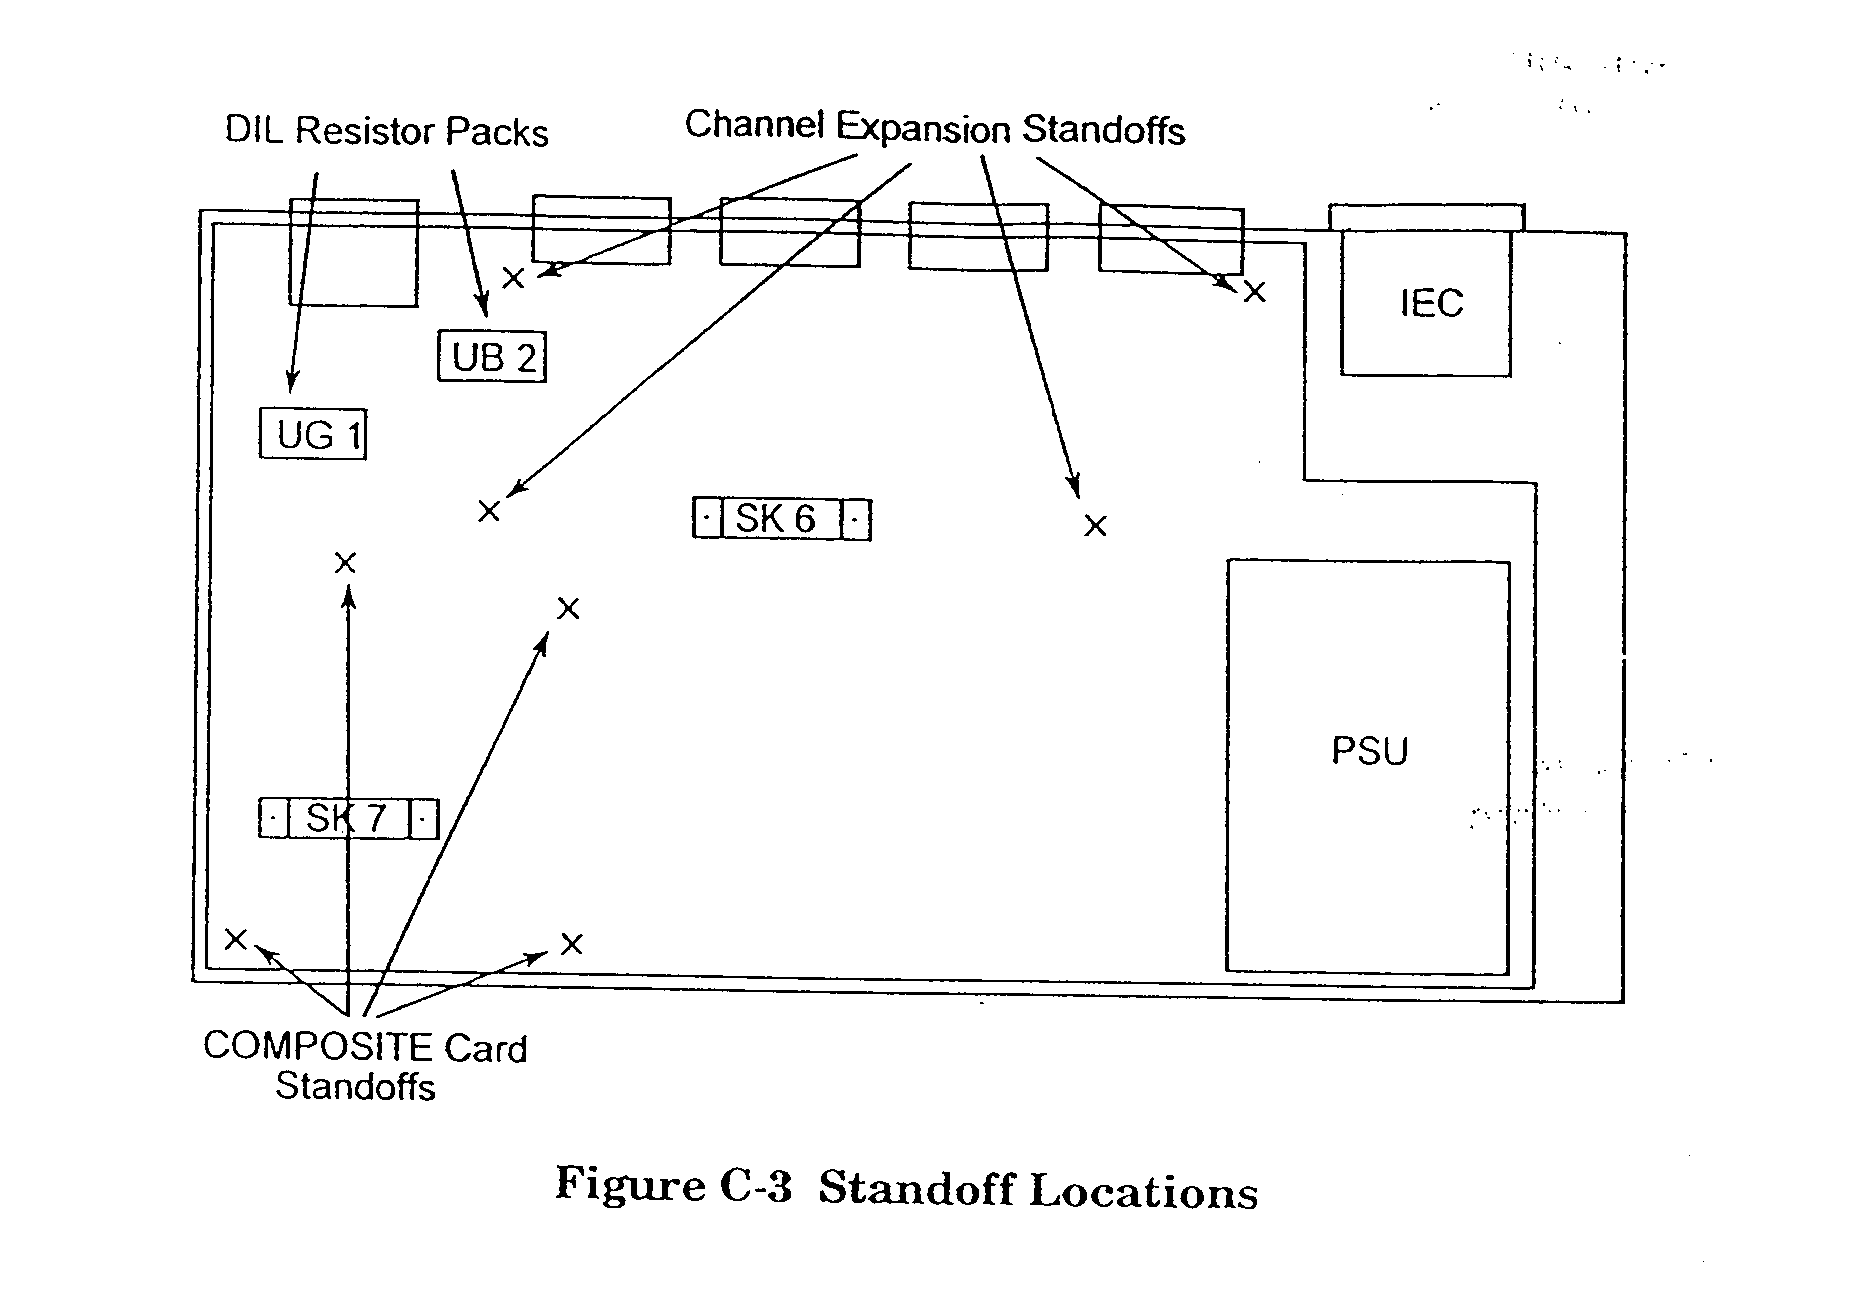
11. four channel expansion card upgrade
11.1 the four-channel expansion card, cray part no. X818-60111102, increases the number
of
asynchronous channels supported from four to
eight. The card is supplied with four plastic
mounting pillars (a762-280008) and two m3
retaining screws with washers. Two sets of
d-type jacking posts are supplied, oneset for
early, and one set for the late models.
11.2. before the card may be installed, access the interior, see para.4.
11.3. the channel expansion blanking panel should be removed from the inside of the
rear panel
by removing the two retaining screws and
lifting the panel clear.
11.4. insert the four mounting pillars into the main card (figurec-3 below), then press
the
expansion card into the socket connector and
mounting pillars.
11.5. replace the two retaining screws to secure the expansion card to the rear panel.
11.6. using a 5mm nut-spinner, fit the longer of the supplied jacking posts into each
of the
d-type connectors on the expansion card (8
posts in total).
[using
a 5mm nut-spinner, fit the shorter of the supplied jacking posts into each of the d-type
connectors.
This must be done by passing the threaded section through the holes in therear
panel
(8 posts in total).]
11.7. replace the top cover by locating it over the base and carefully sliding it into
position.
Avoid fouling the switches. Then replace and
secure the two fixings.
11.8. re-fit the data cables, adding any new ones as appropriate.
11.9. re-connect the mains power and power-up the system.
11.10. refer to para. 13 for details of power-up and check out Procedures
12v11
composite interface card upgrade
12.1. these are three types of composite interface card: v.11, v.35,and tdm. The
installation
procedure for each is identical.probably only a
v11 interface card upgrade will be
carried out.
12.2. the composite interface card is supplied complete with four plastic mounting
pillars, two
retaining screws, and the relevent composite
cable.
12.3. remove the top cover as per para.4.
12.4. using a medium flat-bladed screw driver, carefully remove the two dil resistor
packs from
their sockets, ub2 and ug1, thus disconnecting
composite 1. Save these and return
to production.
12.5. the composite blanking panel should be removed from the inside of the rear panel.
To do
this remove the two retaining screws and lift
the panel clear.
12.6. insert the four plastic mounting pillars as indicated infigure c-3 on the
previous page, then
press the card into socket sk7 and the mounting
pillars. Replace the two retaining screws
to secure the composite card to the rear panel.
12.7. replace the top cover by locating it over the base and carefully sliding it into
position.
Avoid fouling the switches. Then replace and
secure the two fixings.
12.8. re-fit the data cables, adding any new ones as appropriate.
12.9. re-connect the mains power and power-up the system.
12.10. refer to para.13 for details of power-up and check out Procedures.
13. power up and check out procedures.
13.1. starting up the DCX818
This
section explains the sequence of events following power-up for the DCX818. Error
situations
that may arise arealso explained.
When
the DCX818 is switched on the following sequence should be observed.
Stage
1: the hardware is diagnostically tested.
When
the DCX818 is first powered on all the front panel indicators should extinguish and a t
should
be visible on the seven-segment display. This indicates that the power-up diagnostics
are
running.
If
on power-up a p is displayed along with alternative flashing leds, the unit has entered
production
diagnostic mode. The unit should immediatley be reset by pressing both front panel
buttons
together. On releasing the buttons the unit should display t. If it does not, reset the
unit
again, ensuring that the set key is released first.
If
any diagnostic test fails, an error code is displayed on the seven- segment display. The
format
of this display is:
F-
-
The
error message will be repeated until either the system is turned off, or it is reset by
pressing
both front panel buttons together. A full description of the diagnostic error codes is
given
in para 10.4
Stage
2: the hardware passes diagnostics
Once
all the required diagnostics tests have been performed and have passed, the DCX818 will
indicate
this by lighting all segments of the seven-segment display. Control is handed over to
the
application software.
Stage
3: application software running
The
front panel display will now change to show the current composite link utilisation on the
seven-segment
diaplay, and the leds indicate the condition of the composite link interface. A
lower
case c is displayed on the seven-segment display if the link is down.
It
should now be possible to log on to use the DCX818 supervisor menu.
13.2. checkout procedure
This
procedure should be carried out after installing or re-configuring the DCX818 system.
Ensure
that the DCX818 has been correctly configured and connected and that it is
disconnected
from the mains power.
13.2.1 connect a terminal to channel 1 of the DCX818 with a suitable cable, usually
cable
type h. Connect to mains power.
13.2.2 log on through the supervisor terminal, see para 6.
13.2.3 set composite loopback mode.
13.2.4 set one channel into local loopback mode. Verify that the loopback has been set,
and
reset it.
13.2.5 send data form the terminal. Verify the correct operation ofthe data. If the
returned
characters do not correspond to those
transmitted, then check that the terminal settings
are compatible with those given in the channel
configuration. If they are incompatible
then either alter the terminal settings or
change the configuation.
13.2.6 move the terminal to the next channel and repeat steps13.2.4 and 13.2.5 until
all the
channels have been checked.
13.2.7 reset composite loopback mode. If after 10 seconds the green led is not lit
steadily, a
fault exists between the two units (ignore the
following steps, and cure the problem first).
13.2.8 validate each chanel in turn.
13.2.9 set one channel into remote loopback mode. The DCX818 will indicate if this is
successful
through the display at the supervisor terminal.
Send and verify data. Perform a
channnel reset on the channel. Repeat for all
channels.
13.2.10 examine the status of each channel in turn. Each should report a port reset and
possibly a speed mis-match error.
This
indicates that the channel speeds difer at each end of the multiplexor link (but this will
not
affect
the correct operation of multiplexers). If any other errors are reported the refer to
para.
10.3.
14. front panel features
14.1 the DCX818 front panel controls and indicators, shown below, comprise nine led
indicators,
a 7-segment indicator and two push buttons.
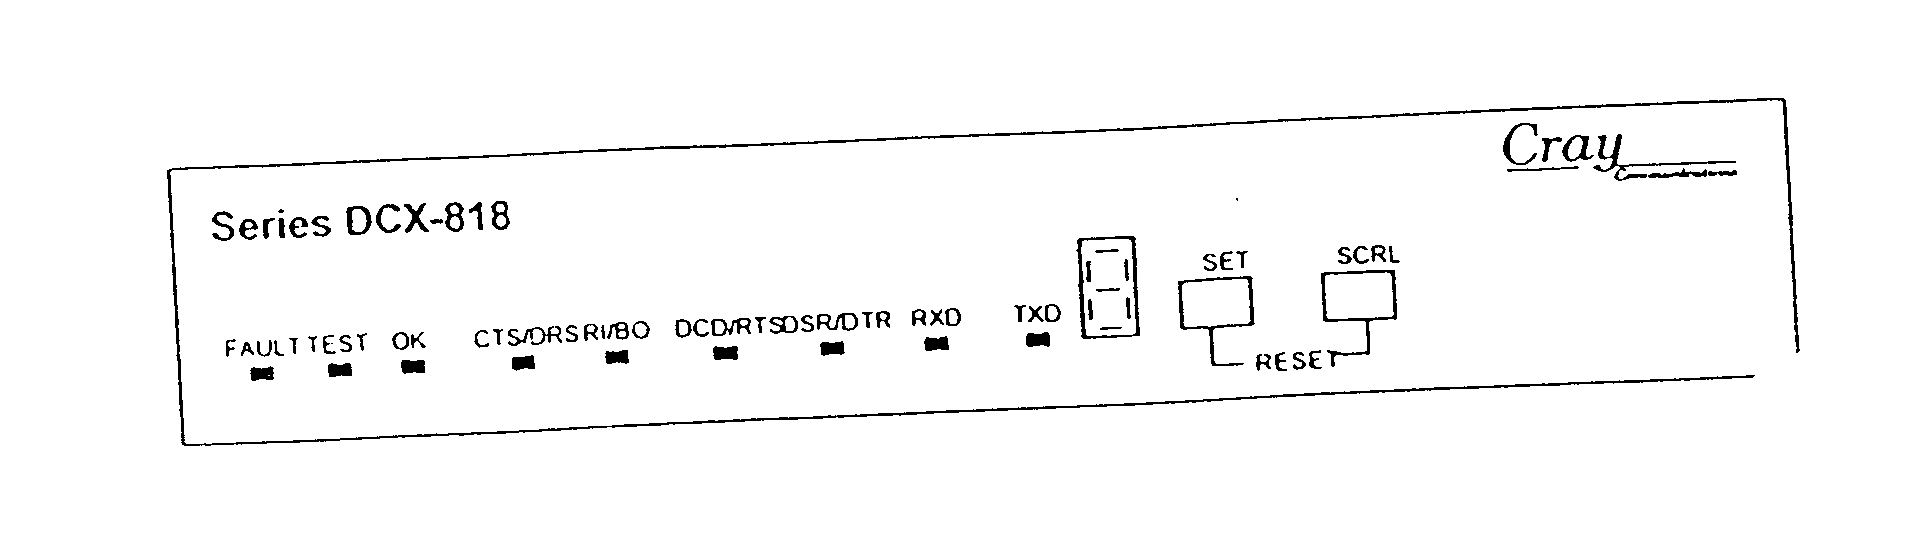
Figure
1-3 818 front panel
These
controls and indicators allow the supervisor to perform configuration, control, monitoring
and
diagnostics functions. from the front panel you can:
*
reset channel configurations and the password to default values.
*
monitor port control and data singnal states.
*
validate and perform loopback errors.
*
identify and clear local errors.
*
perform a hardware reset of the unit.
14.2. controls and indicators
The
set and scrl (scroll) push buttons are used in various sequences to step through the
monitoring,
control and diagnostics functions availble on the panel.
The
term `press' is used to mean depressing and releasing the button once. `pulse' is used to
mean
depressing and releasing the button a number of times until the stated result occurs.
Progress
through the sequences and the status of the functionsis monitored on the 7-segment
indicator.
Additionally, this indicator has a dot in its lower right corner to indicate loop backs
and
errors in the unit.
Front
panel controls and indicators are disabled whenever a supervisor logs on from a terminal.
This
is indicated by the7-segment indicator displaying s.
14.3. channel monitoring
The
individual leds on the front panel indicate a selected channels low speed data and
interface
control
conditions. To monitor a channel when a channel number is already displayedon the
7-segment
indicator, pulse the scrl push button to moveto the desired channel. If a channel is
not
displayed, follow the procedure below:
A.
Pulse the scrl push button until the 7-segment indicator displays a large capital c
(for
channel).
B.
Press the set push button once. The 7-segment indicator displays the last channel
previously
selected.
C.
Pulse the scrl push button to move to the channel number of interest (after 4/8, the
display
returns
to 1). When reached,the leds display current conditions on that channel.
Indicatons
of the monitored channel update automatically as conditions change.
The
leds have the following meanings:
Cts/drs
depending on the selection of `control leds display' on the next page.
Ri/bo
these leds will show the status of either the four incoming or the four outgoing
Dcd/rts
Dsr/dtrv.24
controls
Txd
transmitted data is on from local dte
Rxdreceived
data is on to local dte
14.4. front panel operation
There
are six main indications on the 7-segment indicator that can be scrolled through in a
continuous
loop with the scrl push button. These indications can be considered as gateways
to
the functions they represent:
C
channel diagnostics, the gateway to channel loop backs,validation and port reset.
E
error, the gateway to error location, identification and elimination.
P
password reset, the gateway to password reset.
D
default configuration reset, the gateway to default value resets.
C
control leds display, the gateway to select whether input or output v.24 signals are
displayed
on
the leds.
H
high speed (arq) features.
A
route map to front panel operation state, showing the action of the scrl and set push
buttons
on
the 7-segment indicator, is shown on the previous page.
When
the DCX818 module is powered up, the indicator will showa 1, which is channel 1. In
normal
operation it will probably indicate a channel number, 1 to 4/8.
Reference
to the previous page shows that to carry out a function on the displayed channel,
you
first press set (displays u, validate) then pulse scrl to obtain l, r, a or
f.alternativly, to
access
another channel, pulse scrl first.
To
obtain c, the channel gateway, press scrl from f.
From
c you can pulse scrl to obtain e,p,d,c or h, and any of them press set to access their
functions.
The
following indications, when present, cannot be scrolled off the display:
S
supervisor logged on. When the DCX818 is accessed by a supervisor connected to one of the
channels,
the front panel controls are locked out. If these controls are in use when a supervisor
logs
on, front panel operations are suspended for the duration of the supervisor access.
Unless
they were modified by the logged-on supervisor, the front panel operations are restored
to
their previous state when the supervisor logs off. The only exception is the hardware
reset
obtained
by pressing both buttons simultaneouly.
F
fault exists on the unit. If this should occur, refer to para.10
15.isdn operation
15.1it may be more cost effective for a low volume user to connect their multiplexor
via an isdn
terminal adapter and "dial up"each
time the link is used.
The
DCX818 is set to raise dtr ion its composite output whenever any data is fed into any of
the
data channels. The terminal adapter (ta) recognises the raised dtr and will dial the
preprogrammed
number, making the link. The connection time is almost instantaneous and
the
"join" will almost be invisible to the operator. After a preset time without
data flow, the link
is
dropped. This is repeated as necessary.
15.2 all the data channels are to be set up as standard.
15.3 set up for case DCX818 with v24 composite interface.
15.3.1 from main menu select option 4 link configuration.
Set
the parameters to those listed below by selecting the appropriate letter:-
A
maintenance clock rate set to link line speed.
V24
up to 19.2k.
B
internal/external clock ext
C
link inactivity 10sd interframe delay 24ms
Timeout
E
poll mode timeout 1sf number of channels set 4 or 8
G
data inactivity 10sh sarm burst length limit none
Timeout
I
reset interval 5sj rr burst length limit none
15.3.2 select option k x21bis interface
Select
option 4- protocol operation
Select
a enable
Confirm
action y
Select
option 2- default configuration
Confirm
action y
Select
option 1- custom configuration
Set
the parameters to those listed below by selecting the appropriate letter:-
A
outbound timeout 4s
B
connect delay 2s
C
inbound error timeout 4s
D
inbound failure timeout10s
E
protocol timeout10s
F
signal 106 delay50ms
G
disconnect timeout 4s
H
disc. Failure timeout10s
I
reconnect delay1-6s
J
reattempt delay60s
K
maximum reconnects 5
L
maximum reattempts25
Exit
custom configuration and confirm action y
Exit
x21bis interface
Exit
link configuration
15.3.3 from main menu select option 7- system administration
15.3.4 select option 7- system reset
Select
yes
Confirm
action y
Do
not exit from configuration / supervisor yet.
15.4 ensure the ta is correctly configured for the type of ta useda nd connected to the
DCX818, powered on, and connected to the isdn
line connector.
15.5 on the screen exit from the configuration/supervisor facility completely.
This
resets the DCX 818 system.
15.6 on completion of the reset the DCX818 will raise dtr to establish the initial link
up.
Once
established, the link will be dropped after the timeout period.
15.7 normal operation can then continue.
15.8 if the initial link up does not occur successfully, retriesare attempted. A total
of 5 attempts
are made, then a wait of 60 seconds before
repeating the 5 attempts. This will continue
for 25 minutes after which an error state is
set. An incoming call or system reset is
needed to reset the error state. A system reset
is shown in para.15.3 or you can press
and release both DCX818 front panel switches
simultaneously..
Return
to Index