IO # 9
 |
FECO:
|
IO
# 9 |
|
MODIFICATION
NO:
|
N/A |
|
PRODUCT:
|
AXIS
5600+ NETWORK PRINT SERVER |
|
SUB-ASSEMBLY:
|
UNIX
SVR4, SCO, AIX, LINUX |
|
ESTIMATED
MAN HOURS:
|
N/A |
|
CLASS
OF CHANGE:
|
MANDATORY |
|
REASON
FOR CHANGE:
|
INTRODUCTION
OF NEW PRINT SERVER. |
|
RELATED
FECO/AB
|
N/A |
AXIS 5600+ NETWORK PRINT SERVER
1. NOTE1 Throughout this FECO
a SPACE in a string is shown by a Ñ .
All other spaces are
purely cosmetic
NOTE2 As this FECO
refers to configurations on various Operating Systems, if a
paragraph does not
apply to all, then the OS it refers to will be written under
the para number i.e.
SVR4 4.4 SCO 4.5 AIX 4.7
LINUX 4.7
SV SCO
AIX
LIN
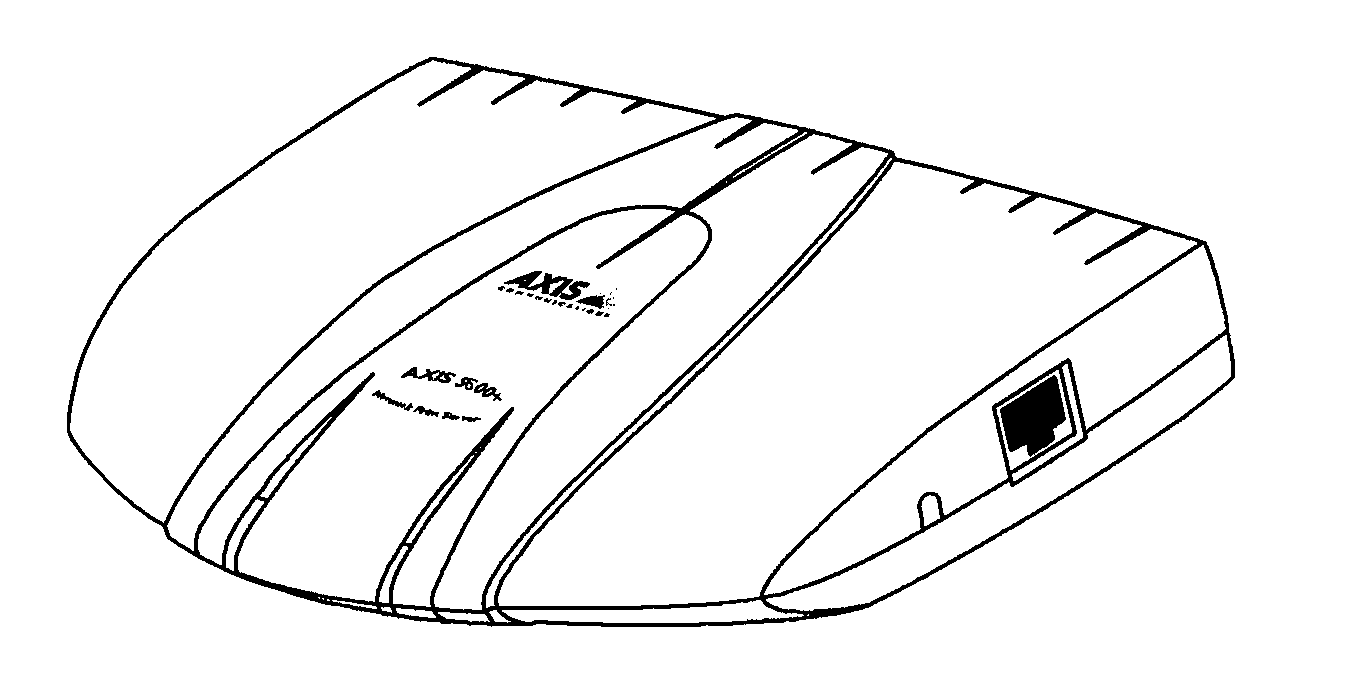
2. This is to introduce
the Axis 5600+ Network Print Server, shown below. It looks similar to the Axis 560, but it
is different.

3. This FECO details how to
connect the Axis 5600+ Version 6.20 and above;
on SVR4 03.02.; AIX 4.2.1;
SCO Openserver 5.0.5 & Linux Redhat 6.2 .
4. Previous flow control
problems experienced with the AXIS 560 print server on SVR4 with long print runs, seem to
be no
longer present.
5 MANUFACTURERS TECHNICAL
SPECIFICATIONS.
5.1 Supported Systems
All Operating Systems supporting the TCP/IP suite of protocols, including:
BSD
Systems:
BSD 4.2, 4.3, 4.4, SunOS4 (Solaris 1.x), DEC Ultrix etc.
System
V Systems:
R3, R4, AT&T, Inter-active, SCO, SunOS5 (Solaris2.x), HP-UX, IBM AIX, Silicon
Graphics IRIX, DEC Alpha OSF/1, BULL (BOS, AIX).
Other
Systems:
IBM (MVS, VM, VSE, OS/400), DEC VMS, guideline for other systems.
Print
Methods:
LPD, FTP, PROS (named pipe & filtered), Reverse Telnet IPP
Apple
Ether Talk:
Print Method: Apple Talk Phase 2
WWW:
Netscape Navigator 4.0 and higher and MS Internet Explorer 4.0 and higher
Novell
NetWare:
Versions 3.11, 3.12, 4.10 and above, supporting both NDS and Bindery Emulation. A
maximum of 16 bindery file server and 96 print queues can be served. NDPS supported
by versions 4.11 and above. NetWare 5 and Pure IP supported. User messages are
also supported. Print Methods: RPRINTER/NPRINTER, PSERVER
Microsoft LAN Manager:
LAN Manager 2.0c and above, running under OS/2 ver 1.3 and above.
IBM LAN
Server:
LAN Server 1.3 and above, running under OS/2 ver 1.3 and above including OS/2 Warp,
OS/2 Warp Connect.
Microsoft Windows:
Windows NT ver. 3.5 and above, Windows for Workgroups, Windows 95, Windows 98
LANtastic:
LANtastic 7.0, from any of the supported Windows clients, defined above.
5.2
Supported Protocols
NetWare:
IPX, SAP, RIP, SPX, SNMP and NCP (extended with NDS). NLSP, DIAG, TCP/IP
Windows andOS/2:
NetBIOS/NetBEUI, TCP/IP, WINS
TCP/IP:
LPD, LPR, FTP, Telnet, Reverse Telnet, PROS, BOOTP, ARP, RARP, DHCP, ICMP,
IP, TCP, UDP, HTTP, SNMP, TFTP, SLP.
LANtastic:
NetBIOS/NetBEUI
Apple
Ether Talk:
AARP, ATP, DDP, NBP, PAP, RTMP, ZIP
5.3 Network Management
Network Management:
SNMP-MIB II compliant, (over UPD.IP and IPX), host resource MIB compliant (over
UPD/IP and IPX) private enterprise MIB included. LAN Network Manager for OS/2,
Print server status in NWAdmin/PCONSOLE.
5.4 Hardware
32 bit 100 MHz RISC Controller, 1 Mbyte Flash memory, 2 MB RAM
5.5 Font Panel
2 LED indicators: Power and Network. Push button for printouts.
5.6 Logical Connection
Nway support to provide auto-detection of the network speed. Running simultaneously
any combination of the supported protocols. Use of IEEE802.2, IEEE802.3, SNAP
and Ethernet II frame types simultaneously.
5.7 Attachments
RJ45 connector for Category 5 UTP for 10baseT Ethernet and 100baseTX Fast
Ethernet.
5.8 Security
UNIX:
Root password, User access list and printer access.
NetWare:
Encrypted passwords. Packet signature supported.
5.9 Logical Printers
The logical printer ports can be programmed to perform auto ASCII to PostScript
conversion, string before and after job, string substitution, alternative output and
character set conversion.
5.10 Parallel Printers
Two IEEE 1284 compliant, high-speed parallel ports with 25 pin DSUB connectors.
Bi-directional support for Apple, Reverse Telnet and PROS. Sustained throughput
over 1 Mbytes/s using NetWare or LAN Server/LAN Manager. EDP Cable Type AS1
5.11 Serial Printer
1 serial port, RS 232, 9 pin DSUB. XON/XOFF or RTS/CTS. Data rates up to 115,200
baud EDP Cable Type BM.
5.12 Power Consumption
Maximum 450MA at 12VDC. Power provided by external supply (Type PS-D, 12v 800
mA).
5.13 Dimensions
Height x Width x Depth
1.1 x 6.3 x 5.1 inches (2.9 x 16.0 x 12.9 cm)
5.14 Weight
0.64 lb. (0.28 kg)
5.15 Environmental
Temperature: 40° - 105° F (5° - 40° C).
Humidity: 10 -95% non-condensing.
5.16 Approvals
EN 55022/1994, EN50082-1/1992. FCC Class A & CE
EN 60950. Approved power supplies for all countries
6 PRODUCTION
CONFIGURATION.
6.1 The Factory Default configuration of
the Axis 5600+ is; for it to automatically be given its IP Address, over the network from
a
DHCP Server, from an entry in the
Boot Table or using Auto-IP.
The Non Default configuration is to
give the unit its IP Address, Manually.
It must be determined beforehand which
method of IP Address Configuration is to be used, and the unit configured
accordingly.
This MUST be carried out PRIOR
to the unit going to site, as there may be difficulties carrying out this configuration on
site.
6.2 The table below shows the settings of the
DHCP_ENB, AUTOIP_ENB and BOOTP_ENB parameters.
DHCP_ENB AUTOIP_ENB BOOTP_ENB
DEFAULT DHCP Server
Only
YES
YES
YES
DEFAULT
Automatically with NO DHCP Server
YES
YES
YES
Boot Table Entry
NO
NO
YES
Manually
NO
NO
NO
6.3 To configure the Axis 5600+ :-
The desired configuration must be known.
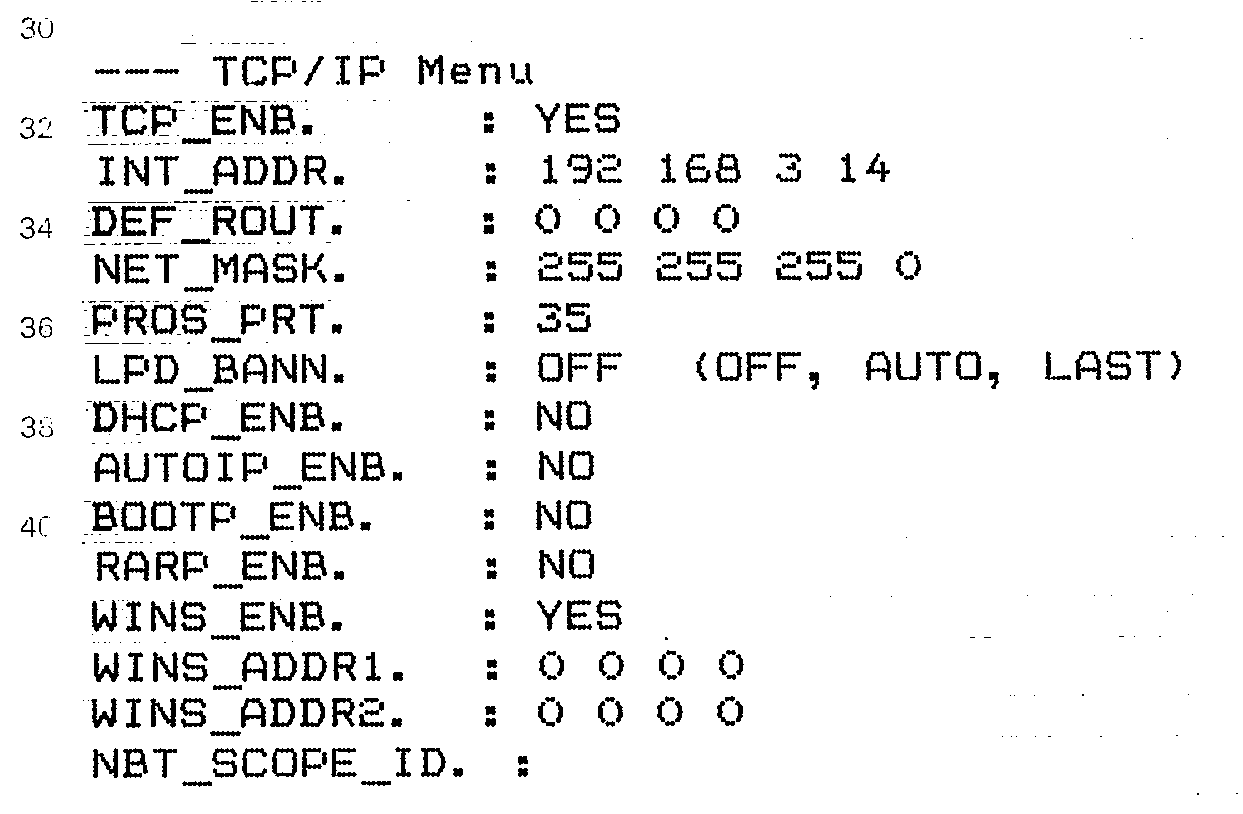
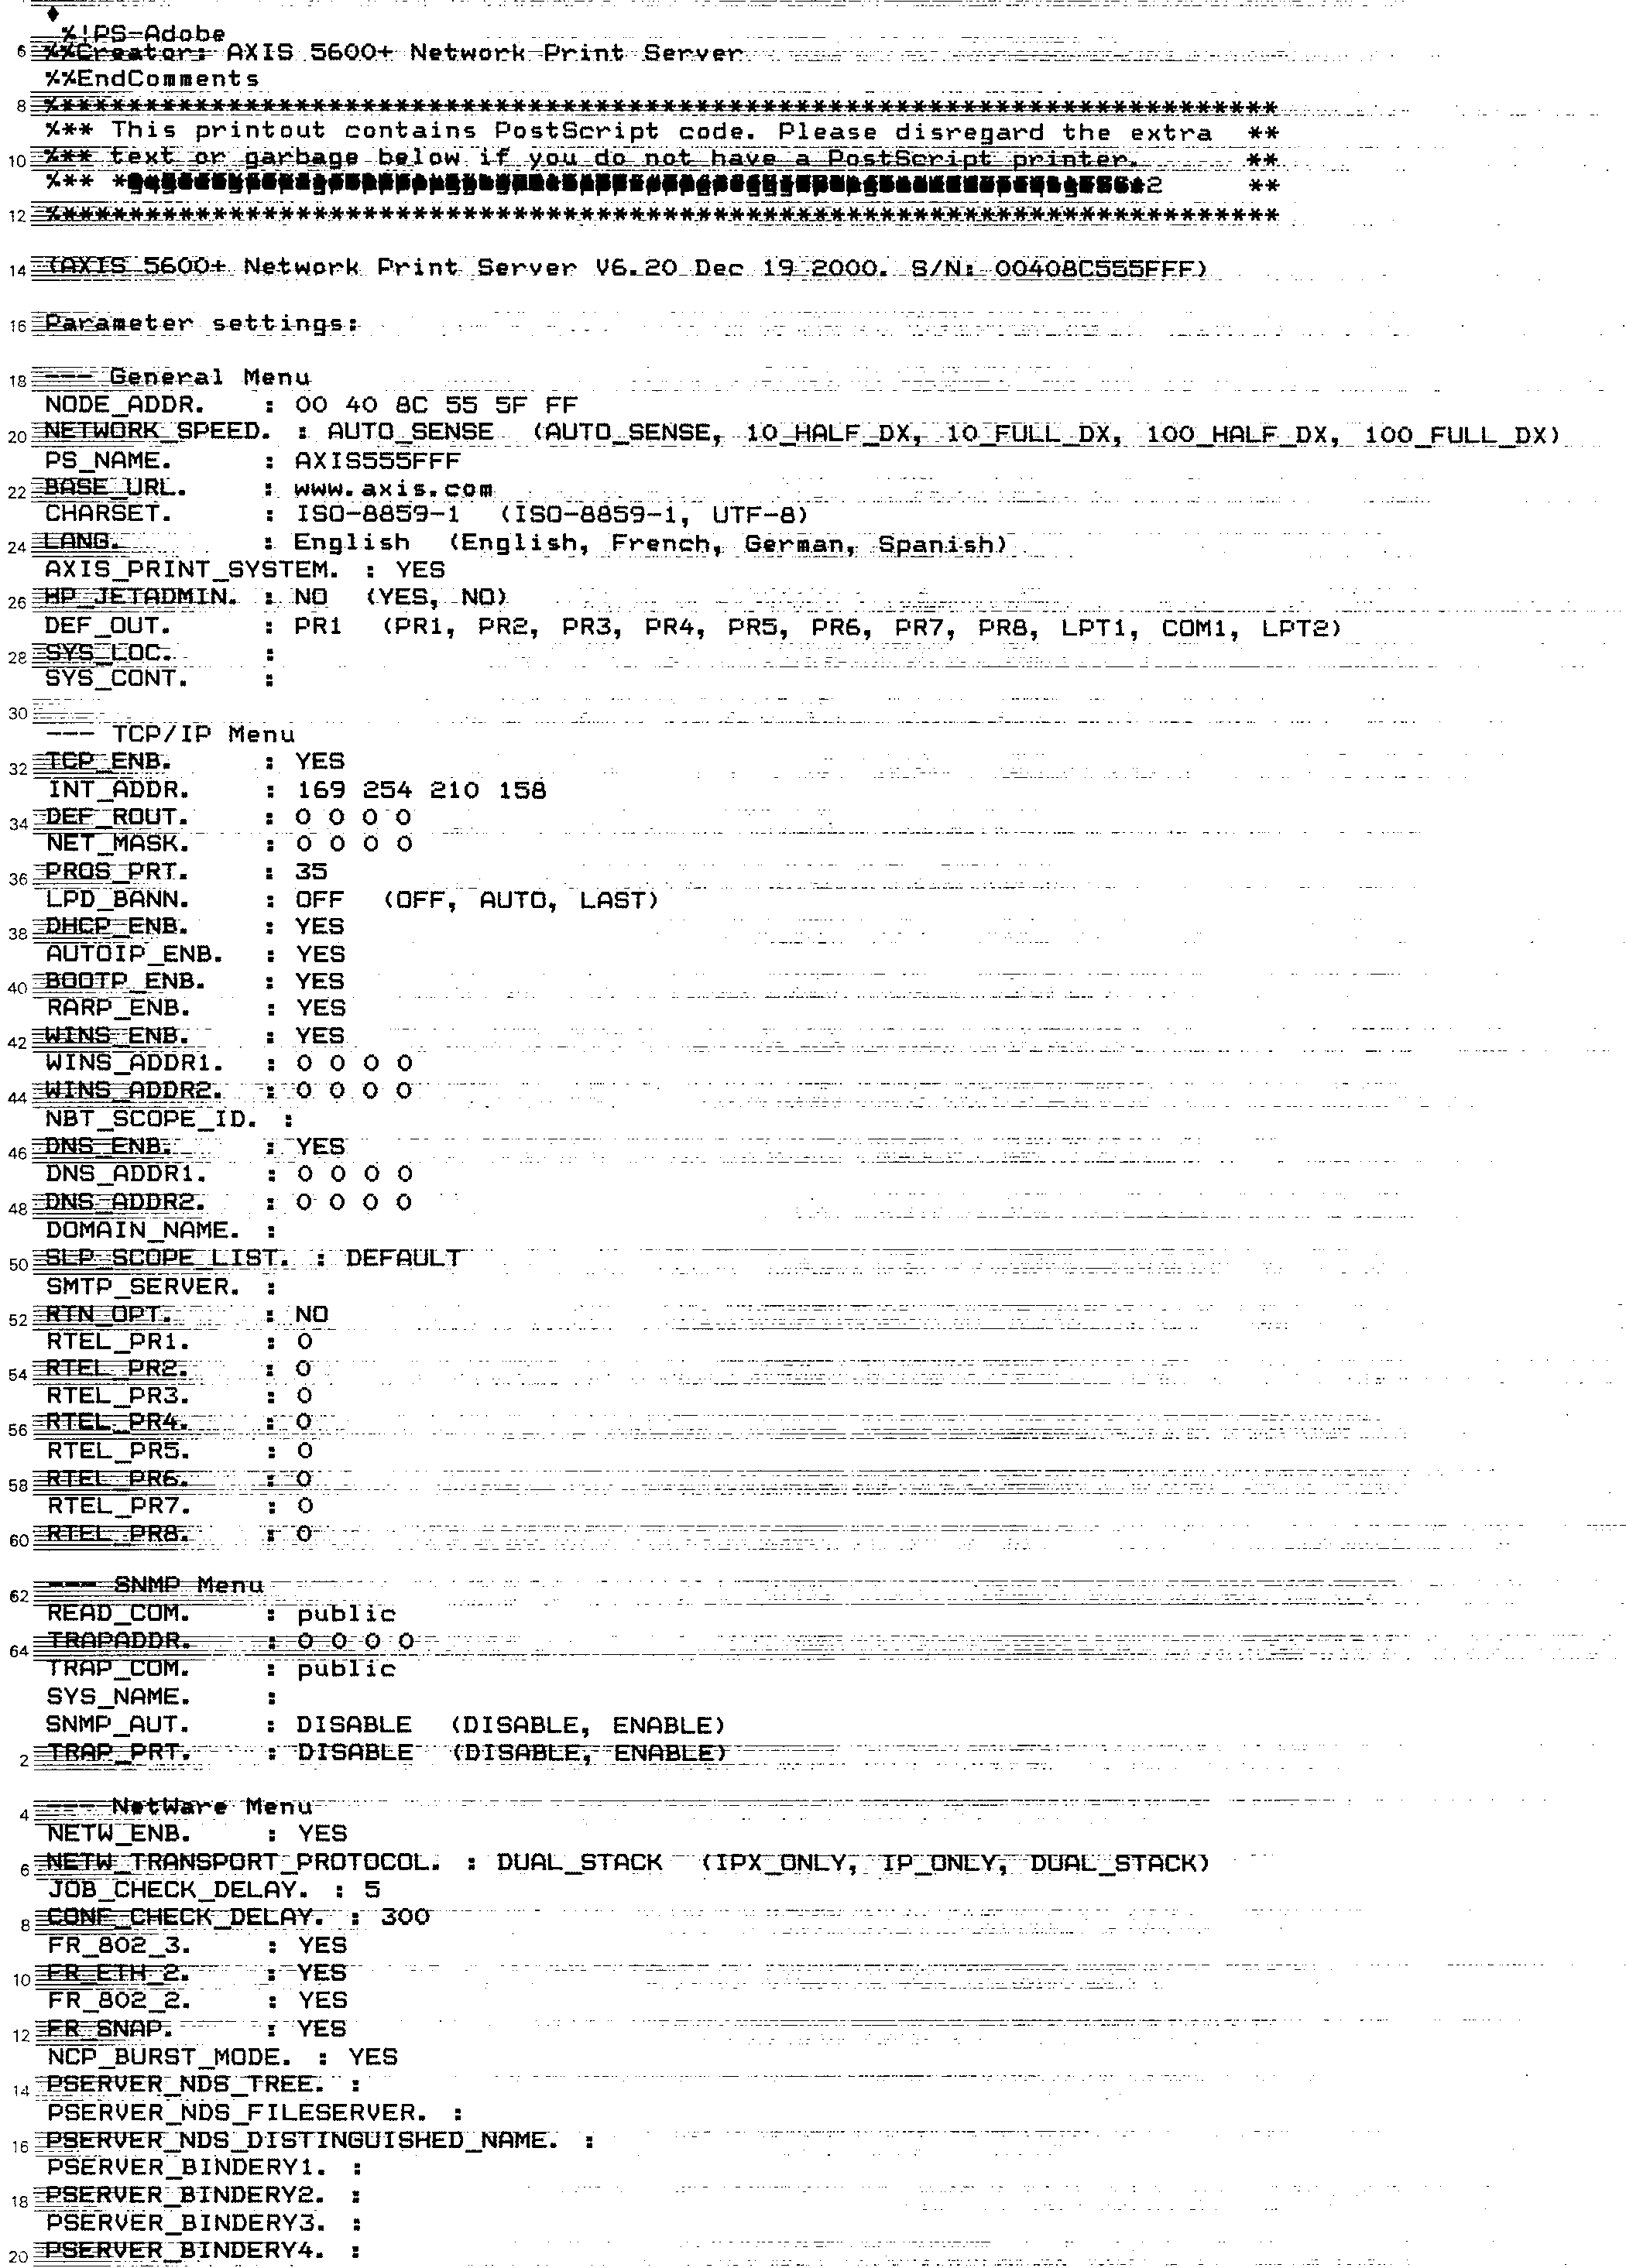
The present configuration must be determined by means of a printout.
The present IP Address of the Axis5600+ may have to be changed.
The DHCP_ENB AUTOIP_ENB BOOTP_ENB settings may have to be changed.
Finally The IP Address may be required to be reset.
6.4 Connection
Ensure that the system and the Axis 5600+
are connected together on the same network, and all cables are connected
properly and it is turned on.
Wait at least one minute before doing
anything!.
Cable Type JP- Direct to system
Cable Type JF- Via Local Network
6.5 To Produce a Test Print
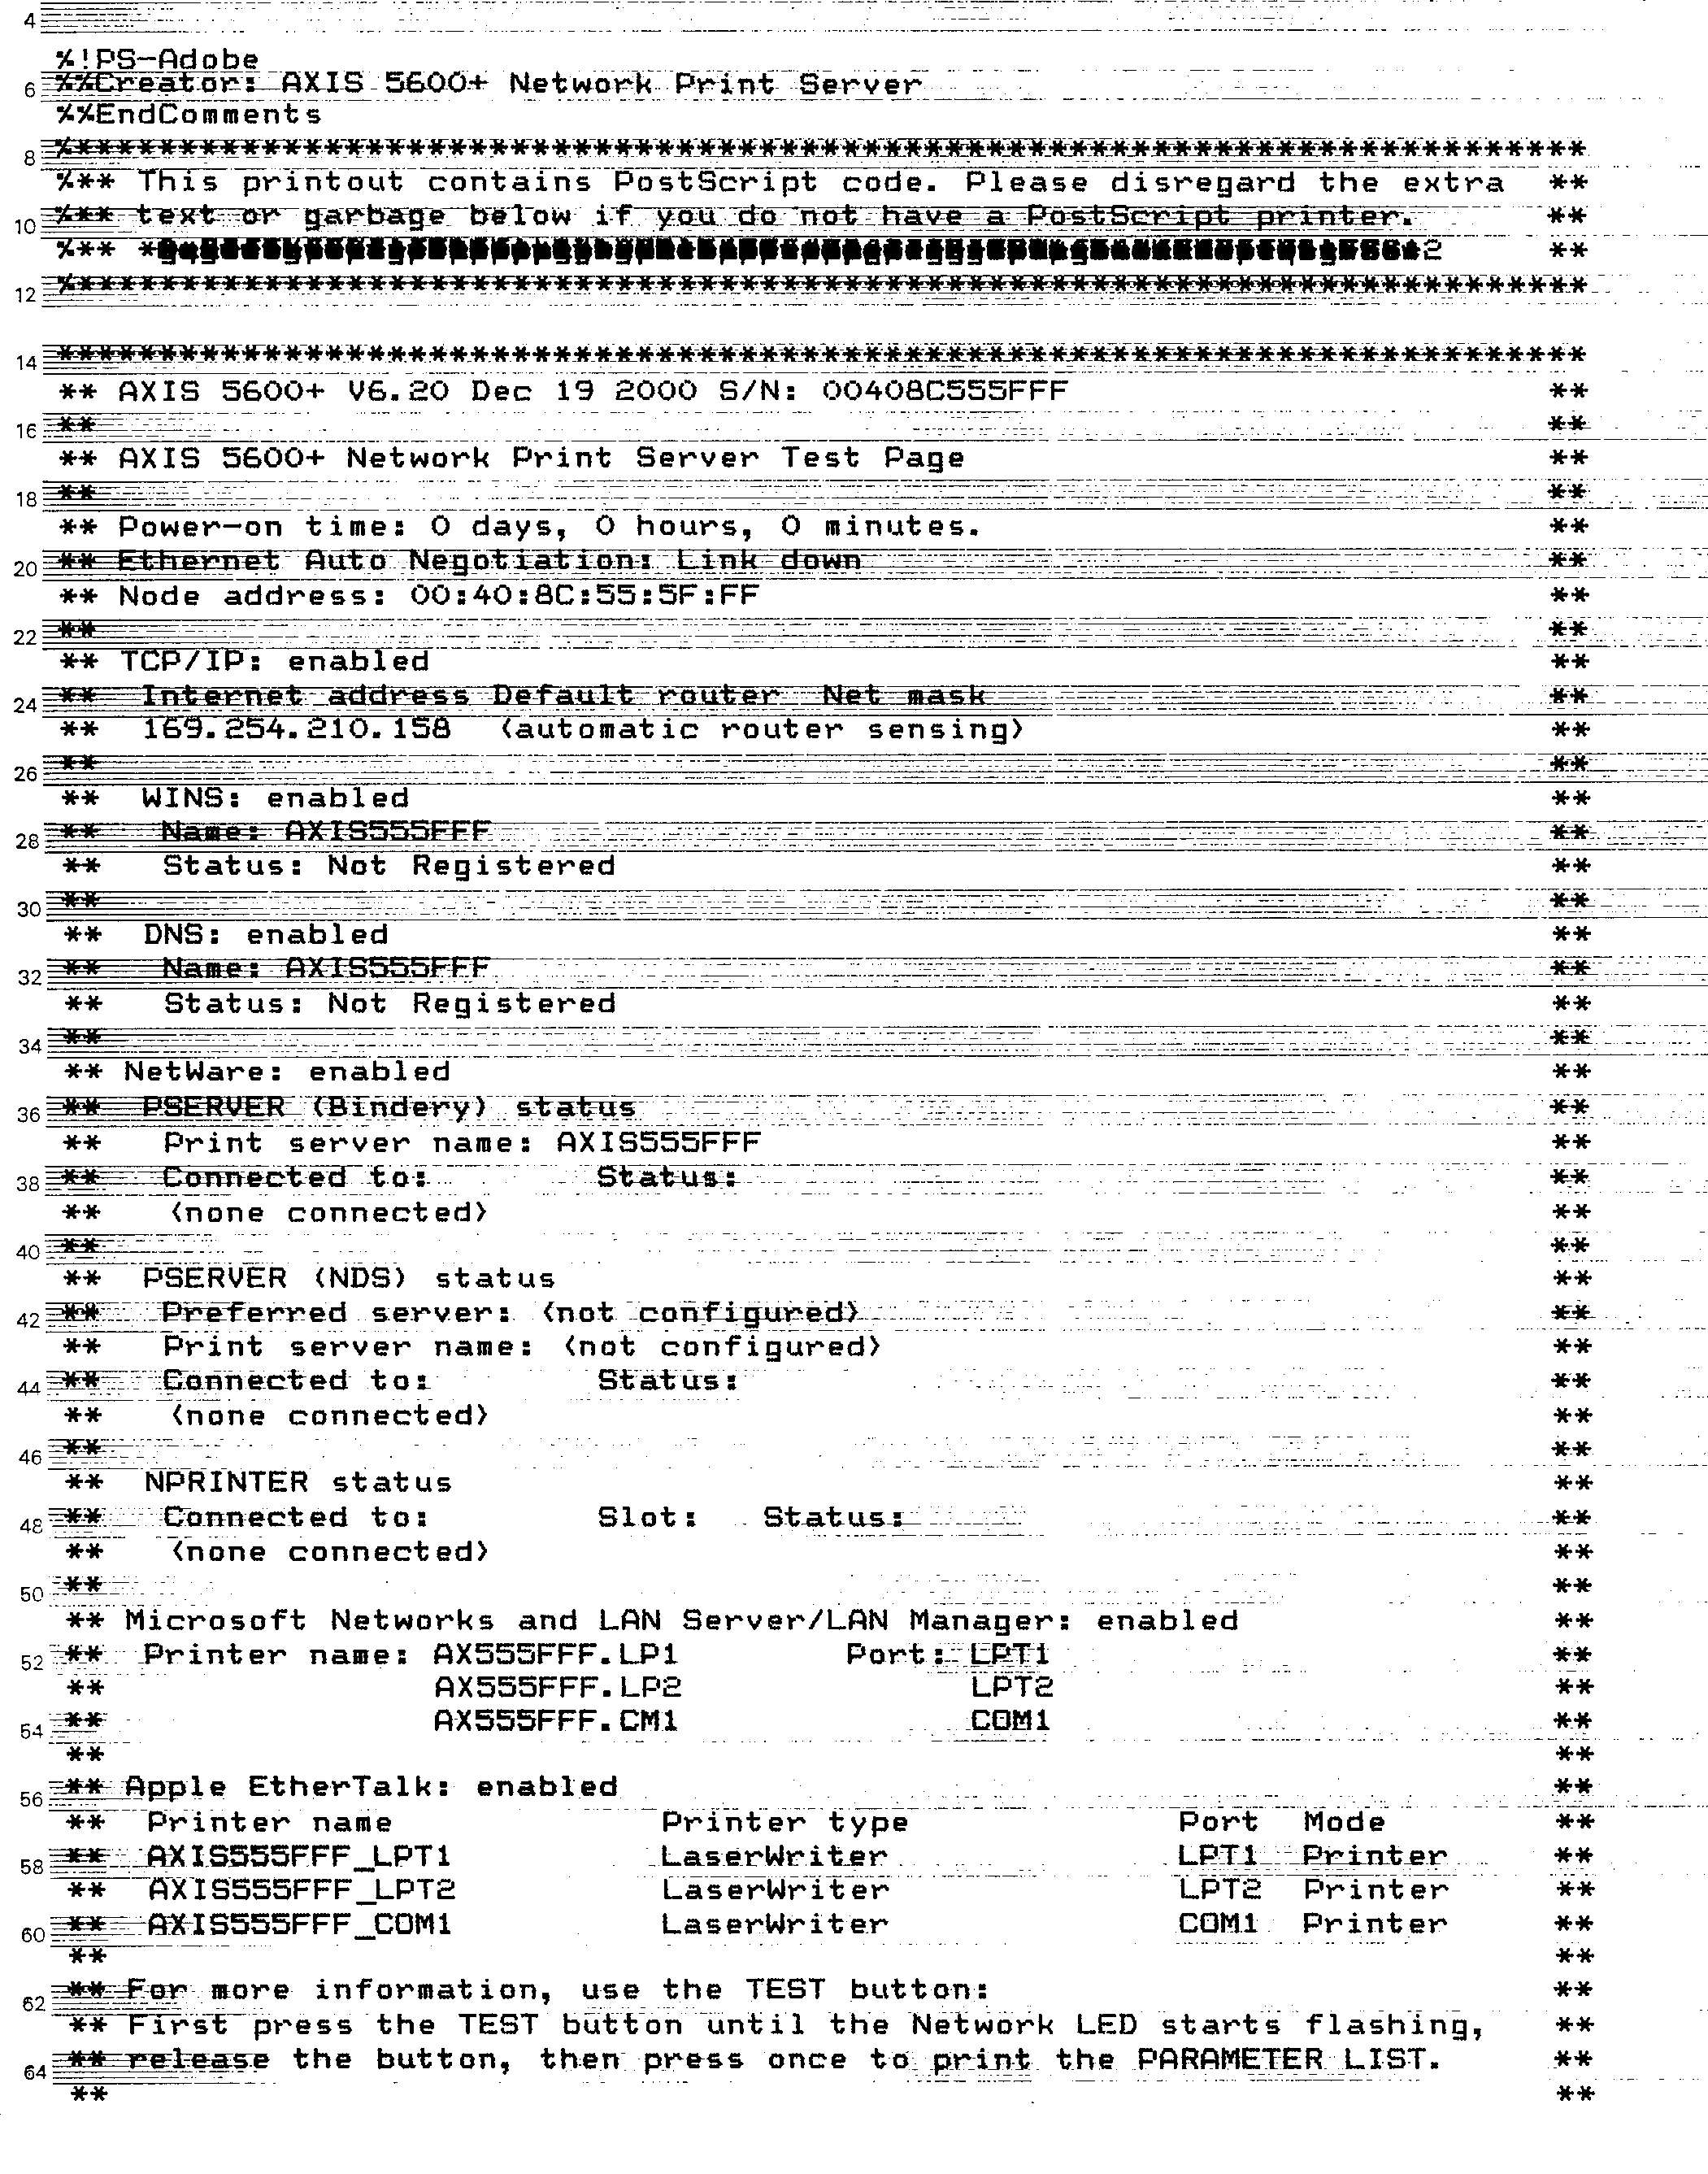
To produce a test print that shows the MAC Address/Serial Number, the current IP Address
and SubNet Mask, as well as the
settings for DHCP_ENB, AUTOIP_ENB and
BOOTP_ENB; ensure a printer is connected to the Axis 5600+.
Press the test button twice, see para
13.2.
This will produce a Test Page, on the
printer connected to LP1, by default; or if there is no printer on LP1; it will print on
the
connected printer.
6.6 To Change the IP ADDRESS using the Axis
CD-ROM.
6.6.1 Insert the Axis product CD. V2.1 into the CD Drive.. The CD will
automatically run
6.6.2 Select Axis Print Servers
6.6.3 Select Axis Print Server Utilities
6.6.4 Navigate to, then double click on Axis IP Jumpstarter for
Axis 5600+ Version 6.20 and above. For Version 6.10 and below
see FECO IO # 10.
6.6.5 Select Run this program from its current location
6.6.6 Click YES to install and run the – Axis IP
Jumpstarter
6.6.7 At prompt Welcome to AXIS IP Jumpstarter.setup Click Next
6.6.8 Click Next take default for install director
6.6.9 Click Next. Click Next and then Finish
6.6.10 Now shutdown and reboot your system
6.6.11 Run Axis IP Jumpstarter
(c:\program files\axis
communications\IP installer\AXIS IP Jumpstarter)
6.6.12 The software will find any Axis servers after the Axis has been
rebooted
6.6.13 Select the desired Axis. Then Select / Set IP Address
from Mac address /IP address
6.6.14 Enter desired IP address now select Close
6.7 To Edit the Axis 5600+
Configuration File
6.7.1 To edit the configuration file you must download it
from the Axis 5600+ to a system. Use the systems text editor change the
settings, then upload the changed
configuration file back into the Axis 5600+.
6.7.2 Use the browser facility and log into the Axis 5600+
by typing:
ftp Ñ <IP address>
in DOS window or in a Unix shell window.
6.7.3 Enter the user ID and the password.
(The default entries are root and pass).
6.7.4 Download the configuration file to your host by
typing:
get Ñ config
6.7.5 Edit the file using your preferred text editor..
Changing the YES to NO on the following:-.
DHCP_ENB AUTOIP_ENB BOOTP_ENB
6..7.6 Save the config file to the Axis 5600+ by typing:
put Ñ config Ñ CONFIG
Note: It is
important that the destination file is specified in capital letters. Otherwise the edits
are temporary and will be lost
once the Axis 5600+ has
been powered down.
6.8 Reset the Axis 5600+ IP address
to the standard default, 169.254.210.158 or if known, the IP address to be used on
installation.
6.9 Production Configuration complete.
7 TO CONFIGURE THE
NETWORK ON SITE
7.1 Determine the IP address and alias
that has been assigned to the AXIS 5600+. eg 128.0.0.10 UVaxis.
7.2 Attach the print server to the
network and ensure all cables are connected properly and it is turned on. Wait at least
one
minute before doing anything!
7.3 For Test Prints, which include the
Node Address (MAC Address), see para 13.
Press the test button on the side
of the print server twice, to get a list of settings; including the Mac
address (called Node address on the
test print out). It will be in the form nn:nn:nn:nn:nn:nn where n is a number or letter.
E.g. 00:40:2B:12:55:9E.
The MAC address is also the Serial
Number of the unit; located on its underside. Check that the two MAC Addresses are the
same.
Ensure that the configuration
for
DHCP_ENB
AUTOIP_ENB
BOOTP_ENB
Are all set to NO as per 7.4
below if they are not set as above, then the unit may change it's IP address.
7.4

7.5 Hosts File Amendment.
7.5.1 On the host system, Enter root and cd
to the /etc/hosts file.
7.5.2 Edit the /etc/hosts file in order
to assign the print server the designated IP address. Do this by executing vi Ñ /etc/hosts.
7.5.3 At the bottom of this file add in
the IP address and alias you want the print server to be configured with and save. (For UV
use UVaxis, for
AIX use Lpaxis etc)
e.g. 128.0.0.10
UVaxis
7.6 Note: It is not possible
to arp to a remote site across a router.
If
necessary use para 6.3 to give the Axis an IP Address, this replaces para 7.8 to 7.10.
7.7 Axis IP Address
SETUP
7.8 NOTE. It is not possible
to arp across a router connection. Use the method described in para 6 instead.
7.9 Log to root using su
(if not already in as a root) and
SV at the # enter: arp Ñ –s Ñ [alias] Ñ
[mac address] Ñ pub
SC e.g. arp Ñ
-s Ñ UVaxis Ñ 00:40:2B:12:55:9E Ñ pub
7.10 Log to root using su (if not already in as a
root) and
AIX at the # enter: arp Ñ
–s Ñ [ether] Ñ [alias] Ñ [mac address] Ñ pub
e.g.
arp Ñ -s Ñ ether Ñ
UVaxis Ñ 00:40:2B:12:55:9E Ñ
pub
7.11 Log to root using su (if not already in as
a root) and
LIN at the # enter: arp Ñ
–s Ñ [alias] Ñ [mac address]
e.g. arp Ñ -s Ñ UVaxis Ñ
00:40:2B:12:55:9E
7.12 It is now possible to test the unit with a
ping.
Execute ping [alias] at the
#. e.g. ping Ñ -c3 Ñ Uvaxis
8. TO SET UP THE
PRINT PROCESS
8.1 The
print process set up is different, for the different operating systems.
8.2 For
AIX the setup is via "smit"; see para 10.
For SVR4 and SCO use
" edp axinstall 2.0.4."; see para 8.
For Linux use
"UVpt"; see para.9.
Both UVpt & edp axinstall
2.0.4., are available on one Unix format floppy. A copy of this has been sent to
Production and
each Customer Services
Supervisor.
8.3 Production
is responsible for sending out a copy of this floppy with every Axis 5600+ Print Server.
8.4 The
"edpaxinstall 2.0.4" is an EDP modified script to overcome existing problems.
8.5 Existing Axis
axinstall scripts are available and could be used; version 2.0.3 or 2.0.4 for SVR4; but
for SCO, only version
2.0.1 must be used.
8.6 The UVpt is an
EDP utility which is available with UniVision 8.0.6, but you do not have to have UniVision
on the system to run
it.
9 PRINT PROCESS SET UP SVR4
& SCO ONLY
SV
SC
9.1 Check which directory you are in now by doing a
‘pwd’ at the # and ensure you are in root. Copy the configuration
utility from
the floppy into the root directory. The
utility is in tar format.
9.2 Enter tar Ñ xvf /
dev / rdsk / f0t
SV This will extract it into the root directory.
9.3 Enter tar Ñ xvf /
dev / fd0
SC This will extract it into the root directory.
9.4 You should be back at the #. Here enter sh
Ñ edpaxinstall
9.5 The system should now display either a list of
Operating Systems or attempt to identify the host OS. Either accept (for SCO)
or select:
Generic SYSVR4 (Unix System V Release
4) (for SVR4 ONLY)
9.6 Menu Displayed
1 Install new printer
2 Remove Printer
3 View Log file
4 Delete Log file
0 Exit Program
Select Option 1 to install a
new printer <CR>.
9.7 The system will now prompt for the print method,
so select FTP.
9.8 It will now ask you to enter the host name of the
print server, i.e. UVaxis.
9.9 The system will now prompt for a
Axis Port
logical printer, so select as
appropriate:
Logical Printer
LPT1
PR 5
LPT2
PR6
COM1
PR7
(N.B. Do not use PR1 to PR4)
9.10 The system will now ask for a name for the
printer.
Enter the name eg. Uvax
_pr5
9.11 The screen displays the following menu:-
Options
1 Install new Printer
2 Remove Printer
3 Abort Installation
Select Option
1
9.12 The screen will display the sequence
of events and the last line will read:-
SC Installation of printer xyz FAILED
THIS IS NOT
TRUE.
It will also display the next prompt below, disregard the failure message and just carry
on.
9.13 Do you want a test print out.
Enter n <CR>
Do you wish to install
more printers y n
Select y <CR>
till all printers are installed then select n <CR>
9.14 The menu will be displayed
1 Install new printer
2 Remove Printer
3 View Log file
4 Delete Log file
0 Exit Program
Select 0
to exit
9.15 Using the lpadmin command set the
printer type to UVdumb.
SV e.g. lpadmin Ñ
-p Ñ UVax_pr5 Ñ -T Ñ Uvdumb
9.16 Using the lpadmin command set the
printer type to UVdumb.
SC e.g. / usr / lib / lpadmin Ñ -p Ñ UVax_pr5 Ñ
-T Ñ UVdumb
9.17 The printer should now be configured
correctly.
To test it
execute lp Ñ -d Ñ [printername]
Ñ [filename]'
e.g. lp Ñ -d Ñ Uvax_pr5 Ñ
test
Ensure that
the printers prints the test print.
9.19 Note
You must modify the
printer configuration for UniVision. Hewlett Packard printers must have a printer type
configured as
hplazer.
9.20 Unix SVR4 and SCO installation
complete
10. PRINT PROCESS SETUP
LINUX ONLY
LIN
10.1 Check which directory you are in now
by doing a ‘pwd’ at the # and ensure you are in root. Copy the configuration
utility
from the floppy into
the root directory. The utility is in tar format.
10.2 Enter tar Ñ
xvf / dev / fd0
This will extract it into
the root directory.
10.3 Enter sh Ñ Uvpt
10.4 UniVision Print Tool Main Menu
(0) Exit
(1) Add a Printer
(2) Remove a Printer
(3) Display "/etc/printcap" file
Select option 1
10.5 This displays a list installed printers
10.6 Use a name not already on the list.
10.7 Enter this name
10.8 Menu displayed. Connection Type Menu
1 Local
2 Remove UNIX (lpd)
3 SAMBA/Windows
4 Direct to remote
port (rcp)
Select 2
10.9 Select the paper size from menu
10.10 Do you want to print a header y n N <CR>
10.11 Enter the remote host name i.e. Enter - axis
<CR>
10.12 Enter the remote printer queue
10.13 Select from the list below the appropriate :
Logical
Printer LPT1
Axis Port
PR
5
LPT2
PR6
COM1
COM1
10.14 Is ASCII to Post Script translation required y n
Enter N <CR>
10.15 Is CR to LF translation required y n
Enter
Y <CR>
10.16 Is an EOF required y n
If
UniVision is not loaded then Enter N
<CR>
If
UniVision is loaded then
Enter
Y <CR>
10.17 The details are then displayed
10.18 Ok to add that entry y n
Enter
Y <CR>
10.19 Ok to create spool directory y n
Enter
Y <CR>
10.20 Do you want to send a test print y n
Enter
Y <CR>
Ensure that the printers prints the test print.
10.21 Do you want to send another test print y n
Enter N
<CR>
10.22 Do you want to quit this function y n
Enter
Y <CR>
10.23 This menu is diplayed UniVision Print Tool
Main Menu
(0)
Exit
(1)
Add a Printer
(2)
Remove a Printer
(3) Display
"/etc/printcap" file
Select
Option 0 to exit
10.24 Linux installation completed
11 PRINT
PROCESS SETUP AIX ONLY
AIX
11.1 After logging in as root on
the system console, run smit from a terminal command line.
11.2 From the displayed options, select Devices
and from the next display select Printer/Plotter ..
11.3 Now select the Print Spooling option,
followed by the Add a Print Queue option.
11.4 From the next display, select the Remote
option and from the resulting display, select the Standard Processing option.
11.5 The Name of QUEUE to add field should be set
to the required name, e.g. UVremote.
11.6 The HOSTNAME of remote server field should be
set to the required name, e.g. UVaxis.
11.7 The Name of QUEUE on remote server field
should be set to match the port that the printer is connected to on the Axis
box, i.e. enter pr5 if
it is on LPT1, pr6 if it is on LPT2, pr7 if it is on COM1 or pr8 if it is on COM2.
11.8 The TYPE of print spooler on remote server field
should be set to BSD.
11.9 The DESCRIPTION of printer on remote server field
is optional text to describe the printer and need not be set unless
required.
11.10 Then select OK and await the confirmation of a successful
addition.
11.11 Select F10 to exit
11.12 The printer should now be configured correctly.
To test it execute lp Ñ -d Ñ [printername] Ñ
[filename]'
e.g. lp Ñ -d Ñ UVax_pr5 Ñ
test
Ensure that the printers
prints the test print.
11.13 AIX installation completed
12 FACTORY DEFAULT SETTINGS
12.1 IMPORTANT
A Factory Default
will reset the internal settings of the print server to default and should only be
performed with
extreme caution.
All parameters except Node Address, (NODE_ADDR), Internet Address (IP_ADDR) and D enabled
or
disabled (DHCP_ENABLE)
are reset. Para 6 will have to be performed after a Factory Default.
12.2 Remove the external power supply from the Axis
5600+.
12.3 Press and hold the test button, whilst you plug in
the power supply. Continue to hold the test button until the network
indicator begins to
flash at one second intervals. This should take at least 5 seconds.
12.4 Release the test button and wait until the network
indicator flashes at least five times.
12.5 Press and hold the test button until the network
indicator remains lit constantly.
12.6 Restart the Axis 5600+ by disconnecting and
reconnecting the external power supply. The print server is now reset to the
factory defaults.
13 TEST PRINTS
13.1 Press the test button once.
This will produce a Test
Page, on the printer connected to LP1, by default; or if there is no printer on LP1; it
will print on the
connected printer.
A sample print is shown
below.

13.2 Press the test button twice.
This will produce the parameter
list, part of which will look like this:-

Return to Index


