IO # 7
 |
FECO:
|
IO
# 7 |
|
MODIFICATION
NO:
|
N/A |
|
PRODUCT:
|
SPECIALIX
JETSTREAM 4000 |
|
SUB-ASSEMBLY:
|
N/A |
|
ESTIMATED
MAN HOURS:
|
N/A |
|
CLASS
OF CHANGE:
|
INFORMATIONAL |
|
REASON
FOR CHANGE:
|
INTRODUCTION
OF JETSTREAM 4000 |
|
RELATED
FECO/AB
|
N/A |
SPECIALIX JETSTREAM 4000 NETWORK ACCESS SERVER.
- NOTE: Throughout this FECO a SPACE in a string is shown by a
Ń .
All other spaces are purely cosmetic
- INTRODUCTION
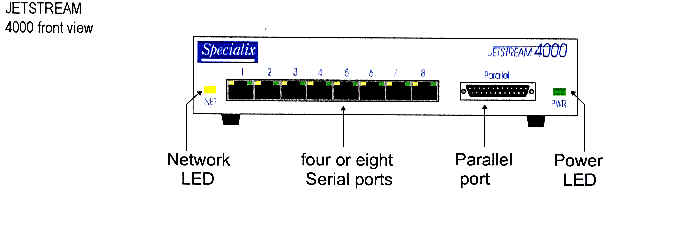
EDP introduce the Specialix Jetstream 4000, Network Access Server, as an smaller addition
to the Jetstream 8500. The single size box houses 8 RJ45 ports, on the front; together
with a 25pin D-Type Parallel Printer connector. The rear has the mains input and the 9 pin
D-Type administrators port, together with the input AUI and 10 BaseT connectors.
See diagram

3. SPECIFICATION
Size: Width, 200mm Height, 45mm (in) Depth 230mm.
Weight: – max 0.9kg
Power: consumption max 10 watts.
8 ports non upgradeable, with port speeds of up to 230kbs
RJ45 connections allow direct connection to CAT5 cabling.
Interface Cable, Cable Type HR, has 25pin D Type connector and allows
connection to existing standard EDP cabling as well as for new installations.
(See Paragraph 3).
There is a 25 pin D-Type parallel port.
The revision level should be 2.07 or higher
Easily set-up using unique supervisor port.
Standard EDP Protocol is TCP/IP.
Connection to host via thin net requires a 10 Base 2 to AUI transceiver.
Direct connection to host using AUI or 10 BaseT
4. CABLES
4.1 NOTE Only shielded cables should be used for connection to
Jetstream ports
INTERFACE CABLE EDP Cable Type HR
4.2 This MUST be foil screened twisted pair cable (FTP)
Specialix Jetstream 4000 to Pseudo RTC connector
Network Terminal Adapter
4000
RTC connector
8pin
25pin
RJ45
D type
Male
Female
Side connector_Shield_
1-------------WHITE/ORANGE--------------8
2-------------------ORANGE-------------------6
3---------------WHITE/GREEN---------------20
4----------------------BLUE----------------------7
5-----------------WHITE/BLUE----------------3
6---------------------GREEN--------------------2
7---------------WHITE/BROWN---------------5
8--------------------BROWN---------------------4
Max Length 2ft.
ADMIN PORT CABLE EDP Cable Type BT
Specialix Jetstream 4000 Admin Port to VDU
Network Terminal Adapter
4000
VDU
9 pin
25pin
D Type
D type
Male
Female
------------SCREEN----------------------1
3-----------------------RED--------------------------2
2----------------------WHITE------------------------3
5---------------------GREEN------------------------7
5. MEC
IDENTITY
SP-JET4008
6. EDP STANDARD SET-UP
6.1 Set VDU to VT100 emulation, 9600, 8,
1, N, DC1/DC3; and connect to the ADMIN port on
the rear, with Cable Type. BT .
6.2 Power on the Jetstream
6.3 The login: prompt should be displayed
6.4 Press the Factory Default button to
reset to the Factory Defaults (If required)
6.5 Enter admin <CR>
At password prompt just enter <CR>
JS_4000# or similar should be displayed.
6.6 To display main menu Enter screen
<CR>
6.7 NOTE: To move through menus do not
use the arrow keys as these may cause problems
but use –
CTRL-J for down
CTRL-K for up
CTRL-L for right
CTRL-H for left instead
6.8 FROM MAIN MENU SELECT SERVER
CONFIGURATION AND SET AS FOLLOW:-
Parameter
Sample setting
server name
js1, js2 etc
internet address
192.0.0.2.
broadcast address
192.255.255.255
subnet mask
255.255.255.0
domain name
blank
ip-host
blank or i/p address
authorisation
both
gui access
off
banner
off
OEM mode
blank
When set press <CR>
prompt accept and exit from press <CR>
6.9 DO NOT SET PASSWORD
6.10 SET DATE/TIME
From main menu select hardware
Highlight then Set date and time
When set press <CR>
Prompt accept and exit from Enter <CR>
6.11 SET HOST
From the main menu select network
configuration
From the network configuration menu
select host table
From the host table menu select add
host
At the prompt enter host name
enter the name of the host
6.12 SET LINE CONFIGURATON
From main menu select line
configuration
Select line port settings
<CR>
Displayed are the available
lines, i.e. for 8 port line numbers 1-8 are displayed
Select the line number required
See the following paragraphs for setting up a VDU or printer
6.13 FOR VDU SET UP
The following require
to be set up:-
Service dir tel
Speed 9600
terminal
dumb
flow soft
pages 4
bits 8
user
parity none
hostname
xyz
stop 1
host
port 2xxx
JS
port 2xxx
Dial none
modem name
phone number
idle timer 0
session
timer
6.14 FOR SERIAL PRINTER ON UNIX SVR4 AND
UNIVISION
The printer on Unix
SVR4 and Univision, the following require to be set up:-
Service
printer
Speed 9600
terminal
dumb
Flow
soft
pages
4
bits
8
user
parity
none
hostname
xyz
stop
1
host port 2xxx
JS port 2xxx
Dial
none modem name
phone
number
idle
timer 0
session timer
6.15 FOR SERIAL PRINTER ON SCO UNIX
The following require
to be set up:-
Service rev raw
Speed 9600
terminal
dumb
flow
soft
pages
4
bits 8
user
parity
none hostname
xyz
stop
1
host
port 2xxx
JS port
2xxx
dial none
modem name
phone number
idle timer 0
session timer
6.16 COPY SETTINGS to other lines
Select the donor line,
then press <CR> to display options
Select copy settings
to other lines
Select the other
recipient lines
6.17 FOR PARALLEL PRINTER ON UNIX SVR4
From main menu select
line configuration
Select parallel port
settings <CR>
At prompt parallel
1 enter <CR>
From parallel 1 menu
set:-
Service printer
hostname xyz é Configure hostname and it
defaults to first
host port 2xxx ę host in units host table. You
do not need to
JS port 2xxx ë set host port or JS
port.
6.18 TO EXIT after line characteristics
are set,
Select command line
mode
Select exit and
save changes
Display of saving
to flash ROM. This may take several seconds, please wait.
When complete prompt is
JS_8500#
to reboot, enter reb
<CR>
prompt confirm
reboot jetstream y/n enter y
The Jetstream will reboot and run diagnostic routine displaying results before returning
to the log
in prompt.
6.19 TO RESET Serial/Parallel lines to
default
From Line Port
Settings press <CR> to display options
Select reset to
default then press <CR>
6.20 TO TEST PRINTER in Unix SVR4
Serial Printer from the
command line enter rcp Ń filename Ń
product name : pn
Parallel Printer from
the command line enter rcp Ń filename Ń
product name : n
where n is the serial
or parallel port number the printer is connected to.
E.g. rcp Ń myfile Ń js2 : p3 or rcp Ń myfile Ń js2 : 1
6.21 TO TEST PRINTER in SCO UNIX
Example
Device Name
Comment
Configuration
Host Server Unix1
Running SCO OpenServer 5.0.2
192.65.146.124
JS8500 jstest
Serial port 1 setup for rcp printing
192.65.146.122
Printer Name jstestp 1 SCO printer name
Printer Model jstestp 1 Modified dumb printer model
Test Printer
Wyse 60 terminal
SCO Configuration
Add an entry for the jstest device in /etc/hosts
Test that rcp printing is working correctly using the rcp command from the command
line; use syntax:
rcp Ń /etc/hosts Ń jstest :
p1
In /usr/spool/lp/model find the printer model you need and copy it. For this
example the printer model dumb was used and copied to jstestm1. Modify the
new printer model to include the rcp command.
The original line was:
0 < $ {file} Ń eval Ń $
{FILTER} Ń 2 Ń >&1
The new line is:
rcp Ń $ file Ń jstest : p1 Ń 2 >&1
Create a new printer using scoadmin with a printer model of jstestm 1 and
a
device of /dev/null.
Once the printer had been started (Enable and accept) the lp command can be used
to print to the JETSTREAM 4000.
7 In the following paragraphs if the number of the paragraph has a U
in it it is for UniVision only; and if it has
a C in it, it is for Charisma only.
8 U UNIVISION INTERFACE SCRIPTS
8.1 A modified interface script must be
created for each printer to be connected to a terminal
U server port:-
#cd Ń /usr/spool/lp/model
<CR>
8.2 For UniVision systems
U
#cp Ń UVstandard Ń UVstandard.orig
<CR>
8.3 For each printer a unique interface
script must be created.
U Enter #cp Ń UVstandard Ń UVstandardx <CR>
where x is the unique file number for each printer e.g.
UVstandard1 UVstandard2
8.4 Each interface file has to have
the following change made:
U
#vi Ń UVstandardx <CR>
where x is the unique file number
Now go to para 10
9 C CHARISMA INTERFACE SCRIPTS
9.1 A modified interface script must be
created for each printer to be connected to a terminal
C server port:-
#cd Ń /usr/spool/lp/model
<CR>
9.2 For Charisma systems
C
#cp Ń crnlmap Ń crnlmap.orig
<CR>
9.3 For each printer a unique interface
script must be created. These will be called:-
C For Charisma systems
crnlmap1
crnlmap2
9.4 Each interface file has to have the
following change made:
C
#vi Ń crnlmapx
where x is the unique file number
9.5 Find the line :-
C
echo "\f\c"
and insert a hash sign "#"
at the front of the line. There will be two of these. Now go to the next
paragraph.
10 Find the line which is approximately 10 lines from the
bottom of the file and just above the last line you
edited.
This line contains the commands 0<$
{file} eval ${FILTER} 2> &4
11 Replace the line with:
rcp Ń ${file} Ń [Jetstream
name]:p[port] Ń 2>&1 Ń
1>&3
Where [Jetstream name] is the name of the jetstream in the /etc/hosts file and [port]
is the physical port number.
12 For example Ptr LPO1 is connected onto a terminal server named as
Jet2 onto port 1
rcp Ń $ {file} Ń Jet2 : p1 Ń 2>&1 Ń 1>&3
13 Note for Parallel Ports omit the p for the printer so the
above example for Ptr LPO1 when connected to
Jet2 on the Parallel Port 1 is :-
rcp Ń $ {file} Ń Jet2 : 1 Ń 2>&1 Ń 1>&3
14 DEVICE FILES
14.1 Each printer to be connected to a terminal server must
have its own file in the /dev directory.
This has to be /dev/znullx
where x = a number.
14.2 As a default there is only 1 /dev/null
14.3 To create additional files in UniVision:-
U
#cd Ń / dev <CR>
#ls Ń -l Ń
null Ń | Ń pg <CR>
14.3 To create additional files in Charisma:-
C
#cd Ń / dev <CR>
#ls Ń -l Ń
*null* Ń | Ń pg <CR>
14.4 Make a note of the Univision major numbers
U
#mknod Ń /dev/znullx Ń c Ń [major number] Ń [minor number]
<CR>
where x is the unique file number
14.4 Make a note of the Charisma major numbers
C
#mknod Ń /dev/nullx Ń c Ń [major number] Ń [minor number]
<CR>
where x is the unique file number.
Major / Minor numbers usually 2 2
14.5 Change permissions on the UniVision znull device just
created
U Enter # chmod Ń 666 Ń znullx
use the same major/minor number you recorded above.
14.5 Change permissions on the Charisma null device just
created
C Enter # chmod Ń 666 Ń nullx
use the same major/minor number you recorded above.
14.6 Repeat as required.
15 U UNIVISION FINAL CONFIGURATION
15.1 For UniVision systems:
U
#/usr/lib/lpadmin Ń -pUVtest Ń
-v/dev/null* Ń -TUVdumb Ń
-mUVstandard* Ń -onobanner
15.2 Ensure that UniVision printers have a name prefixed by
UV and the printer type is set to
U UVdumb. (HP laser printers do not work properly with
UVdumb).
16.1 ADDING PRINTERS IN Univision
U
16.2 Once the printer has been added in Unix then add the
printer in Univision
U
16.3 Enter UVsetup and select option 5 Maintain
Printer Records
U
Option A to ADD a Printer
16.4 When prompted for the printer name enter it e.g.. UVLP01
U
16.5 The printer will be added to the next available port
if the system is networked,
U if it is not networked it will be added to the designated
process for the direct device.
17 U TESTING IN UNIVISION
7.1 Unix test enter # lp Ń
-d Ń [ptr name] Ń [file]
<CR>
U
17.2 Univision test from $ prompt $ lp Ń -d Ń [ptr name] Ń
[file] <CR>
U
18 C CHARISMA FINAL CONFIGURATION
18.1 Using scoadmin/sysadmin configure each printer
in the usual way.
C Once all printers have been set up, then to configure the
correct interface script, issue the
following command for each printer
18.2 For Charisma systems:
C
#/usr/lib/lpadmin Ń -p[ptr name] Ń
-v[device name] Ń -Tdumb Ń
-mcrnlmap* Ń -onobanner
<CR>
where [ptr name] is the printer label assigned via sysadm
and standardx is the interface script name.
where * of -mcrnlmap* is the unique file number.
19C CHARISMA TESTING
19.1 From Unix use lp Ń -d Ń [ptr name] Ń [file] <CR> to
test each printer.
C
19.2 From Charisma, login as bml
C
then from the tty prompt use lp Ń -d Ń [ptr name] Ń [file] <CR>
20 REPAIR
Repair is by
replacement
Return
to Index