LVC # 10
![]() |
FECO: |
LVC # 10 |
MODIFICATION NO: |
N/A | |
PRODUCT: |
POWER MON II on NCR 4091 UPS | |
SUB-ASSEMBLY: |
UNIX SVR4 03.02.xx | |
ESTIMATED MAN HOURS: |
N/A | |
CLASS OF CHANGE: |
INFORMATIONAL | |
REASON FOR CHANGE: |
INTRODUCTION OF POWER FAIL RECOVERY WITH NCR 4091 UPS | |
RELATED FECO/AB |
LVC # 8 |
POWER FAIL RECOVERY
POWERMON II UPS SOFTWARE for NCR 4091, UPS on NCR S20, S40, or 4300 running UNIX SVR4 03.02.xx
1. NOTE:
Throughout this FECO a SPACE in a string is shown by a Ñ
All other spaces are purely cosmetic.
2. INTRODUCTION
Basic Installation procedures for PowerMon II with the NCR 4091 UPS on an NCR S20, S40 or
4300 running Unix SVR4. Ver 03.02.xx to provide a Power Fail Recovery facility.
On the NCR 4300, PowerMon II is designed to be installed onto a system that does not have the
internal UPS system fitted.
Power Fail Recovery is known not to function on an NCR 3416, 3259 or 3269.
The correct version of the PowerMon II software comes at present in a box with K519 in its part
number and the diskette has MP-RAS Ver 3.2.3 written on it.
Any other part number or version may not work.
3. If
Powermon II is being installed onto an existing installed system, then a Project Plan must
be produced and approved prior to this
installation. Before installation of Powermon II, ensure that the customer has two
full
verified file saves.
4. Installation and configuration consists of the following:
Checking & setting System
Setting up the serial port
Installing the communications cable
Installing the utility
5. SYSTEM
5.1. Dump Slice
On the
system ensure that there is a dump slice on the disk, and that its size is adequate for
the amount
of memory in the machine.
5.2. The ups_status File
The ups_status file contains UPS-OFF or UPS-ON. If the file contains UPS-OFF; at
power fail it attempts to log out of UniVision, down dating the other UV control files as it
exits. If it completes this task successfully, the process returns to the UNIX login. If
ups_status does not exist the system defaults to UPS-OFF.
The ups_status file is located in the ./UniVision/univision/admin directory.
This means that for a system with a powerfail recovery strategy, this file must contain
UPS-ON. If it does not, in the event of a failure all processes are returned to UNIX login.
To configure ups_status, login to SYSPROG and enter ! <CR>. At the UNIX prompt ($)
enter UVups <CR>.
If ups-status does not exist the system prompts:
Current ups_status setting = xxx.xxx
Do you want to continue with the change file? (Y/N):
Enter Y <CR>
File "univision/admin/ups_status" not found or of zero size
Do you want to create the file? (Y/N)
Enter Y <CR>
If you enter Y the file is created and the system prompts you as follows:
Enter "0" to set UPS_OFF or "1" to set UPS-ON:
If you enter 1 you get the following message:
New setting of "ups_status" = UPS=ON
NOTE For Orderley Shutdown, the ups_status file must either not exist or if it does it must be set to UPS_OFF.
6. SERIAL PORT
The serial port must use tty01
Ensure that no service is running on the port. If there is one running then remove it.
Enter pmadm Ñ -l Ñ | Ñ pg <CR> to display Port Services.
7. STRATEGY
Ensure that the strategy is Power Fail Recovery.
To display the strategy in root
Enter strategy and ensure response is Current Strategy is Power Fail Recovery.
If it is Orderly Shutdown, then change it to Power Fail Recovery.
Enter # strategy Ñ -s <CR>
8. COMMUNICATIONS CABLE
Connect the communications cable between the UPS and the NCR 3000 COM 2 port.
This should be the correct type of cable for the appropriate UPS used.
For Powerware Prestige (NCR4091) use Cable Type JT or JU1.
9. INSTALLATION OF POWERMON II
9.1 On the system login to root
9.2 Enter pkgadd Ñ -d Ñ diskette1 <CR>
9.3 Insert the diskette into the floppy drive
9.4 Enter go <CR> & follow all the prompts to install the software.
When prompted to select the packages, select all.
9.5 The software will load and display the configuration screen similar to the one below.
9.6 At prompt do you wish to modify them at this time? Enter y <CR>
9.7 Select the options listed below as the EDP standard setting:
Installation Directory = /etc/ups.D
Cable type = 3 - Or Details Inside Front Cover Of Manual
Diagnostic device = console
Shutdown Timer = 180 seconds ***
Shutdown Type = Power Fail Recovery
Polling Interval = 1 second
Startup Delay = 120 seconds
Message Broadcasting Enabled = yes
Message Broadcasting Wait = 10 seconds
Message Broadcast Interval = 60 seconds
Dialing Out on events Enabled = no
Do you wish to rebuild kernel after installation Y
Do you wish to automatically start to monitor UPS after installation N
***The EDP standard (default) setting is 180 secs.
Please refer to para 14 for the latest setting for the type of system used.
9.8. Follow prompts and reboot the system, removing the diskette first.
CONTROL CENTRE
10.1 The Control Centre can be used to view and alter settings, start or stop Power Mon, and
view history
10.2 When the system has run up again, run the control centre to check settings.
10.3 Login to root and enter
cd Ñ /etc/UPS.d <CR> to access working directory
10.4 Start the Control Centre by entering
./upsmenu <CR>
10.5 The following Control Centre Screen will appear:-
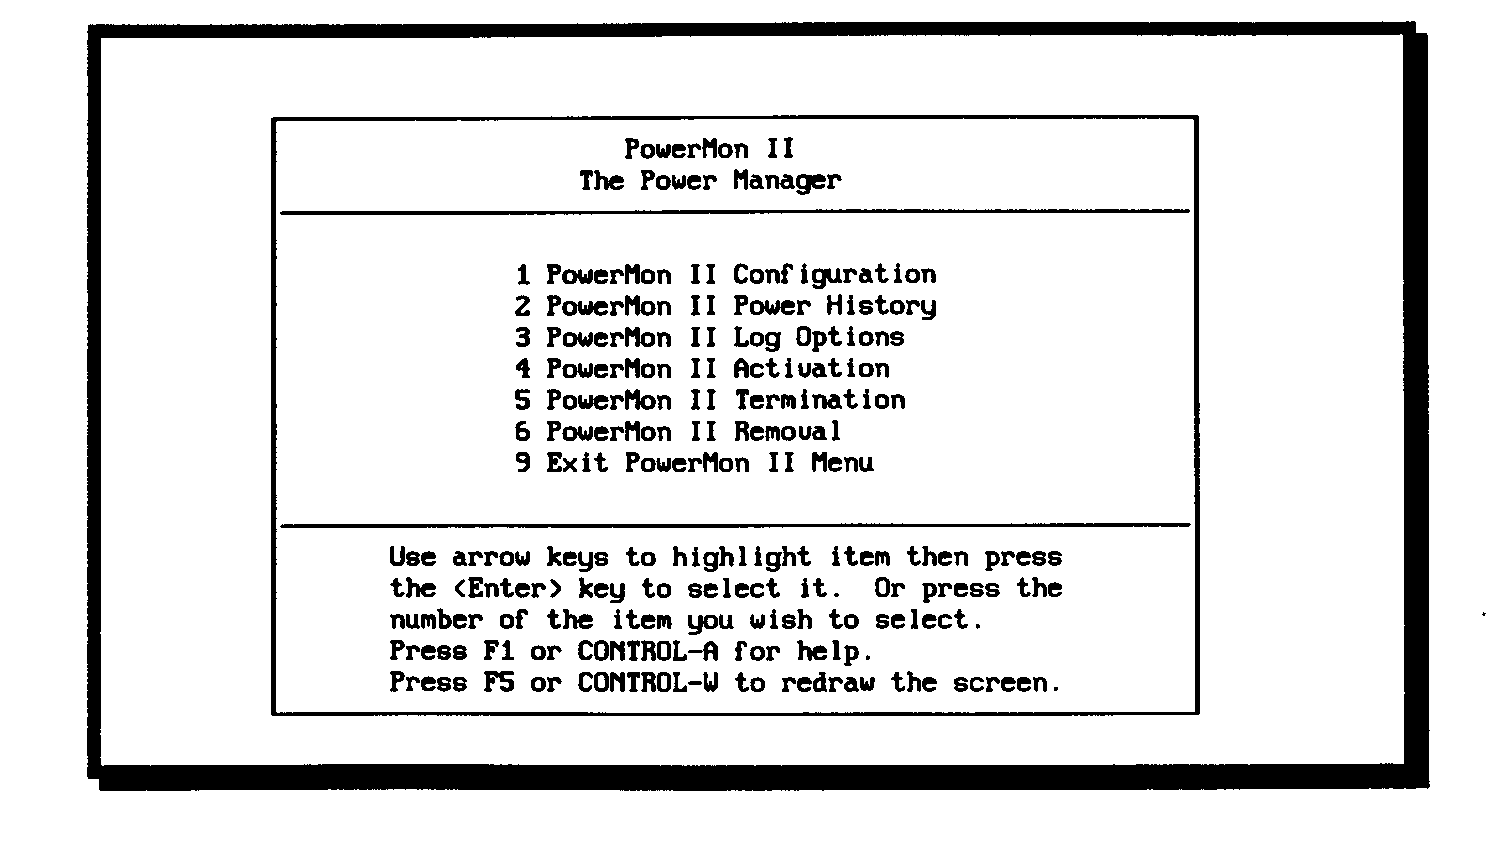
10.6 Select configuration and the following screen will appear
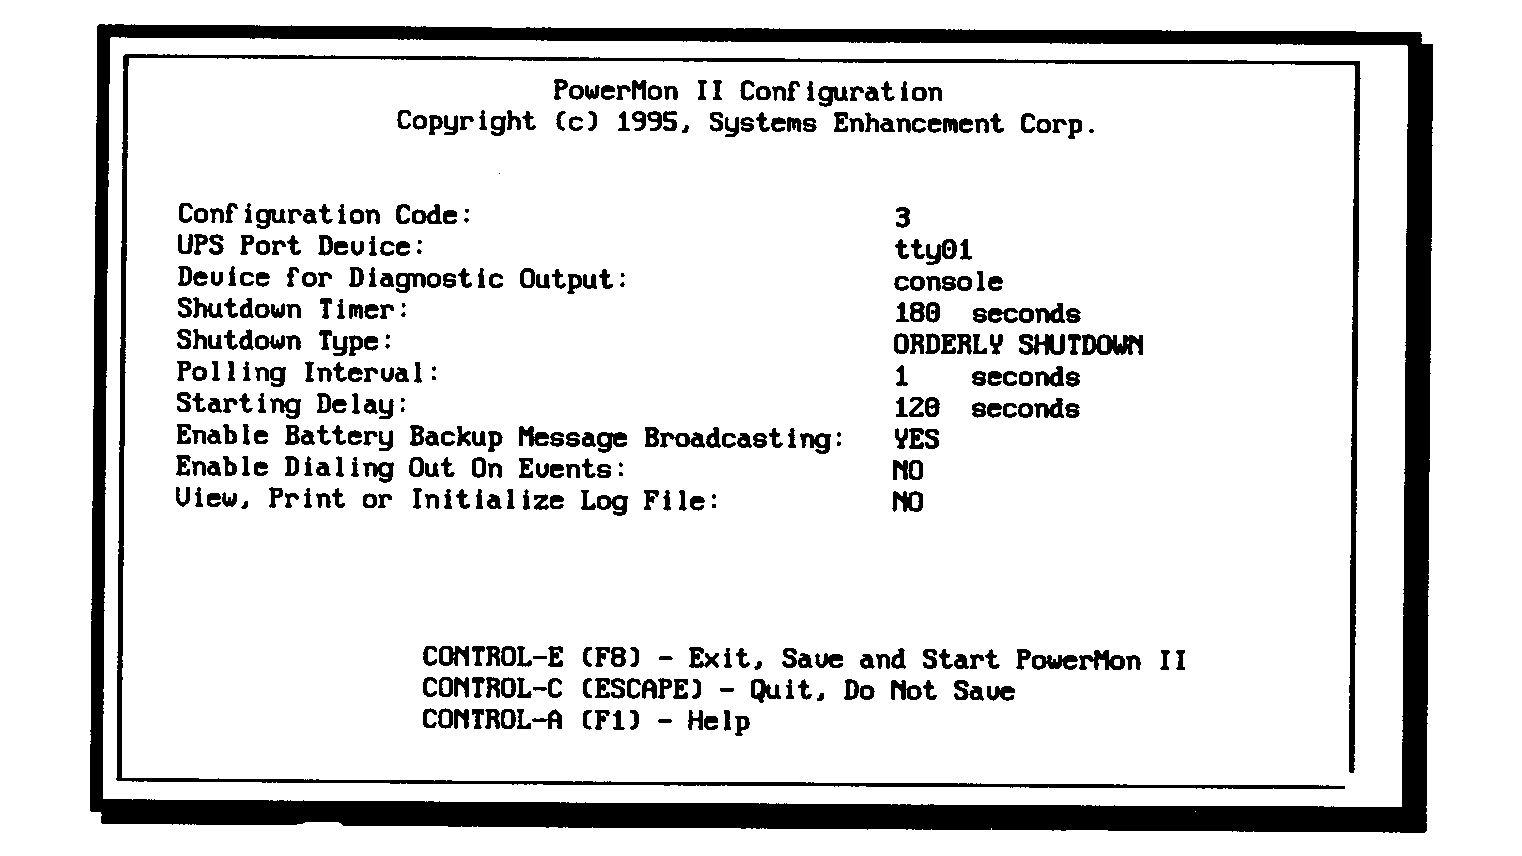
10.7 Check all entries are correct
10.8 When they are, press F8 to exit, Save and Start Power Mon II.
This will start the Power Mon II.
10.9 Select 9 Exit Powermon II menu
11. TO RESET UV PROCESSES
11.1 Enter UV setup
11.2 Select Option 2 Maintain Process Records
11.3 Reset PROCESS and LINE INFORMATION
Select R for Reset
Select * for all
Select U for unconditioned
Select E for exit
11.4 Select 0 for exit from UV set up.
12. TEST POWER FAIL RECOVERY
12.1 Ensure that several screens are logged into an application.
12.2 SHORT MAINS FAILURE
12.2.1 Switch OFF the mains input into the UPS, to simulate a short mains failure.
12.2.2 Check that: the message "ON BACKUP POWER" is broadcast to all
screens, with a time
when the system
will shutdown.
12.2.3 Restore the power to the UPS before this time
12.2.4 Ensure message POWER RESTORED. Is displayed and that everything continues
as it was
before the mains
failure.
12.3 LONG MAINS FAILURE
12.3.1 Switch OFF the mains input into the UPS, to simulate a long mains failure.
12.3.2 Check that the message "ON BACK UP POWER " is broadcast to all
screens with a time when the system will
shutdown. After this
time, on the system console, it should show it transferring memory slices, then after this
the
statement,
"SHUTTING OFF UPS".
12.3.3 The system and the UPS will NOT Shut Off; but after the last message the
screen will paint a
dot every few seconds,
and slowly fill up the screen with these dots. This will continue until either the power
is
restored or the UPS
battery runs out of power.
12.3.4 For test purposes, wait two minutes then restore the mains power to the UPS.
12.3.5 Ensure that the system runs up correctly that the messages are displayed
on the console
showing memory slices being
restored. And that the screens return to the point they were
before the "Mains
Failure". You may have to press <CR>.
12.4 Testing Complete
13. REMOVAL POWER MON II
13.1 Log to root
13.2 Enter pkgrm Ñ PMII
13.3 Do you want to remove this package Y
13.4 Do you wish to automatically rebuild the kernel after the UPS driver has been removed Y
13.5 At # prompt reboot the system, Enter shutdown y Ñ -g0 Ñ -i6
14. LATEST SETTINGS ***
For S20 systems the Shutdown Timer should be set to 480 secs.