Starting the Switch Administrator
Dell™ PowerConnect™ 3324/3348 User's Guide
Starting the Switch Administrator
Using the Switch Administrator Buttons
The Dell™ PowerConnect™ 3324/3348 Dell OpenManage™ Switch Administrator can be accessed from any PC with a web browser. To start the Switch Administrator:
PowerConnect 3324/3348 Password Page
 |
NOTE: The PowerConnect 3324/3348 can be configured without a password being entered. Passwords are both case sensitive and alpha-numeric. |
The Switch Administrator home page contains the following views:
PowerConnect 3324/3348 Web Management Interface
The PowerConnect 3324/3348 Interface Components Table lists the interface components with their corresponding numbers:
|
Component |
Name |
|---|---|
Tree View. The Tree View contains a list of the different device features. For more information about the Tree View, see "Tree View". | |
Device View. The Device View provides information about device ports, table information, and feature components. For more information about the Device View, see "Device View". | |
Component List. The Component List contains a list of the feature components. For more information about using the components list, see "Component List". | |
Information Buttons. The Information buttons provide access to PowerConnect device information and Dell Services. For more information about Information buttons, see "Using the Switch Administrator Buttons". |
The Tree View contains a list of the different features that can be configured including Switching features, Ports, Spanning Tree, VLANs, Class of Service, Link Aggregation (LAG), Multicast Support, and Statistics.
The branches in the Tree View can be expanded to view all the components under a specific feature or retracted to hide the feature's components.
The following section describes the different aspects of the Device View. The device provides information about the PowerConnect 3324/3348 switch. The Device View contains the following components:
The Switch Administrator home page displays a Component List that contains the feature's menu options. To display the Component's features:
The Switch Administrator home page contains a graphical representation of the PowerConnect 3324/3348 front panel.
The port coloring indicates whether a specific port is currently active. Ports are reflected in the following colors:
|
Component |
Name |
|---|---|
|
NOTE: The LEDs are not reflected in the PowerConnect 3324/3348 front panel in the Switch Administrator. LED status can only be established by viewing the actual device. For more information about LED definitions, see "LED Definitions". |
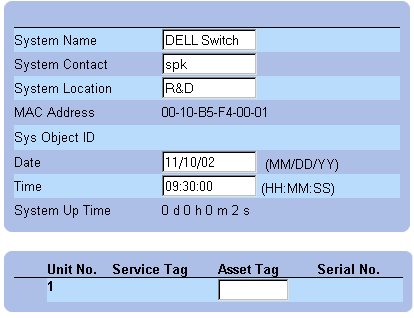
The Work Desk in the Device View provides a work area that contains device tables, general device information, and configurable device parameters. The figure below displays an example of a table that may display, if selected:
Example of Work Desk Information
This section contains information about the different Dell OpenManage Switch Administrator buttons provided by the interface. The Switch Administrator provides the following buttons:
The Switch Administrator home page contains the following information buttons:
|
Button |
Description |
|---|---|
Opens the Dell Support Page. The Dell Technical Support Page URL is www.support.dell.com | |
The Support page contains information for accessing Dell's technical support page.
|
NOTE: Depending on the type of technical support required, a user name and password may be required. |
The Online Help page contains information to assist with configuring and managing the switch.
|
NOTE: Each screen contains a brief Help page. To access the Help, click Help on the Switch Administrator page. |
The About button opens the About page. The About page contain the device name, the software release number, and Dell copyright information.To access the About page:
The Switch Administrator management buttons allow network managers to easily configure PowerConnect from remote locations. The Switch Administrator contains the following management buttons:
|
Button |
Description |
| |
| |
| |
| |
| |
| |
| |
| |
| |
| |
| |
| |
| |
| |
| |
| |
| Prints the Network Management System page and/or table information. |
| |
| |
| |
|
This section contains an introduction to the Command Line Interface (CLI).
The CLI is divided into command modes. Each command mode has a specific command set. Entering a question mark ? at the system prompt (console prompt) displays a list of commands available for that particular command mode.
In each mode, a specific command is used to navigate from one command mode to another. The standards to access the modes are as follows:
During the CLI session initialization, the CLI mode is the User EXEC Mode. Only a limited subset of commands are available in the User EXEC Mode. This level is reserved for tasks that do not change the device configuration and is used to access configuration sub-systems such as the CLI. To enter the next level, the Privileged EXEC Mode, a password is required.
The Privileged EXEC Mode provides access to the device general configuration. For specific global configurations within the device, enter the next level, which is the Global Configuration Mode. A password is not required.
The Global Configuration Mode manages the device configuration on a global level. For specific configurations enter the next level, which is the Interface Configuration Mode. A password is not required.
The Interface Configuration Mode configures the device at the physical interface level. Interface commands that require subcommands have another level, which is the Subinterface Configuration Mode. A password is not required.
After the logging on to the device, the User EXEC command mode is enabled. The user EXEC commands connect to remote devices, change terminal settings on a temporary basis, perform basic tests, and list system information.
To list the user EXEC commands enter the command ?.
The user-level prompt consists of the host name followed by the angle bracket (>).
console>
|
NOTE: The default host name is console unless it has been modified during initial configuration. |
This mode ensures that the Privileged access is password protected to prevent unauthorized use. Passwords are displayed on the screen as ***** and are case sensitive.
To access and list the Privileged EXEC Mode commands:
console#
To return from Privileged EXEC Mode to User EXEC Mode use:
The following example illustrates how to access privileged EXEC mode and return to the User EXEC mode:
console>enable
Enter Password: ******
console#
console#disable
console>
The exit command is used to move back from any mode to a previous level mode, for example, from Interface Configuration Mode to Global Configuration Mode, and from Global Configuration Mode to Privileged EXEC Mode.
Global Configuration commands apply to system features, rather than a specific protocol or interface. The Privileged EXEC Mode command configure is used to enter the Global Configuration Mode.
To access and list the Global Configuration Mode commands:
console(config)#
To return from Global Configuration Mode to Privileged EXEC Mode, use one of the following commands:
The following example illustrates how to access Global Configuration Mode and return to the Privileged EXEC Mode:
console#
console#configure
console(config)#exit
console#
Interface configuration commands modify specific IP interface including bridge-group, description, and so on. The Interface Configuration Modes are:
PowerConnect 3324/3348 can be managed over a direct connection to the console port or via a Telnet connection. PowerConnect 3324/3348 is managed by typing command keywords and parameters at the command prompt. Using the CLI is similar to entering commands on a UNIX system.
If access is via a Telnet connection, ensure the device has an IP address defined and that the workstation used to access the device is connected to the device prior to using CLI commands.
For more information about configuring an initial IP Address, see "Initial Configuration".
To log off the current user and log on a new user, type the login command in the Privileged EXEC command mode.
|
NOTE: Telnet sessions are automatically disconnected after remaining idle for a user-defined time period. |
Telnet is a terminal emulation TCP/IP protocol. ASCII terminals can be virtually connected to the local device through a TCP/IP protocol network. Telnet is an alternative to a local login terminal where a remote login is required.
PowerConnect 3324/3348 supports up to four simultaneous Telnet sessions. All CLI commands can be used over a telnet session.