Back to Contents Page
Basic Troubleshooting: Dell™ PowerEdge™ 350 Systems
Service Manual
This section describes basic troubleshooting procedures that can
help you diagnose a Dell PowerEdge 350 system problem. These procedures can often reveal
the source of a problem or indicate the correct starting point for servicing the system.
For a brief explanation of how to load and start the system diagnostics, see "Running
the Dell Diagnostics" in the system Installation and Troubleshooting Guide.
Dell recommends that you perform the following procedures in the order presented.
 |
NOTE: The
PowerEdge 350 system is a "headless" system that operates without keyboard,
monitor, or mouse. While it is possible to connect these peripherals to the system, it is
generally not necessary unless troubleshooting the system. |
When you first contact a user who has a problem, ask the user to
describe the problem and the conditions under which it occurs. After the user
describes the problem, perform the following steps:
- Ask the user to back up any data on the hard-disk drive if the
system’s condition permits.
- Ask the user to try to duplicate the problem by repeating the
operations he or she was performing at the time the problem occurred.
Can the user duplicate the problem?
Yes. Proceed to step 3.
No. Proceed to "External
Visual Inspection."
- Observe the user to determine if he or she is making an error, such
as typing an incorrect key combination or entering a command incorrectly.
Is the problem a result of user error?
Yes. Instruct the user in the proper procedure or direct the user to the
appropriate user documentation for the correct procedure.
No. Proceed to "External
Visual Inspection."
Improperly set switches and controls and loose or improperly
connected cables are the most likely source of problems for the system, monitor, or other
peripherals (such as a keyboard, mouse, or other external equipment). A quick check of
all the switches, controls, and cable connections can easily solve these problems.
Figure 1 shows the back-panel connections on the system. Figure 2 shows the front-panel controls and
indicators on the system.
Figure 1. Back-Panel Features
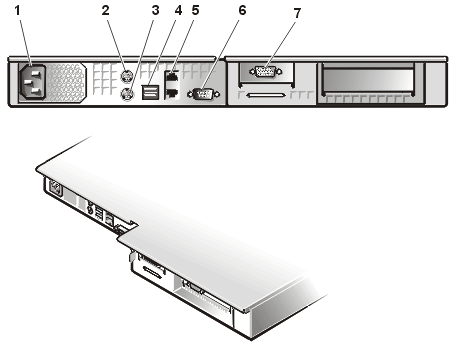 |
1 |
AC power receptacle |
2 |
Mouse connector |
3 |
Keyboard connector |
4 |
USB connectors (2) |
5 |
NIC connectors (2) |
6 |
Serial port 1 |
7 |
Video monitor |
|
|
|
Figure 2. Front-Panel
Features
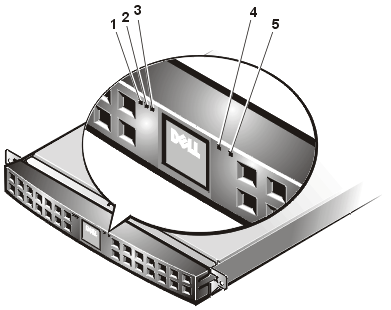 |
1
|
Power indicator |
2
|
System fault
indicator |
3
|
Hard-disk drive
activity indicator |
4
|
LAN 1
activity/link indicator |
5
|
LAN 2
activity/link indicator |
|
The external visual inspection consists of a quick inspection of the
exterior of the system, the monitor, the keyboard, any peripherals, and cables. While
performing the visual inspection, make any necessary corrections. To perform the external
visual inspection, perform the following steps:
- Turn off the system, the monitor, and all peripherals.
- Verify that all power cables are properly connected to the system,
the monitor and peripherals, and their power sources.
- Verify that the keyboard and mouse interface cables are firmly
attached to the proper connectors on the back of the system.
For a PS/2-compatible mouse, the keyboard and mouse interface cable connectors are
identical except for their labels.
For a serial mouse, the mouse interface cable must be firmly attached to one of the serial
port connectors, and its captive screws must be secure enough to ensure a firm connection.
- Verify that network cables (if present) are properly attached.
- Verify that any devices attached to the serial port connectors are
properly connected.
Each of the serial port interface cables must be firmly attached to an appropriate
connector on the back of the system as well as to the interface connector on the device.
The captive screws that secure these connectors at each end of the interface cable must be
secure enough to ensure a firm connection.
- Verify that the video interface cable is firmly attached to the video
connector on the back of the system or the video expansion card (if installed), and also
to the connector on the back of the monitor. For proper connection of the video
monitor, see the documentation for the monitor.
- Inspect all external monitor controls for any obvious damage or
improper settings. For proper settings of the video monitor controls, see the
documentation for the monitor.
- Inspect the keyboard to ensure that no keys are sticking. If
one or more keys are sticking, it may be necessary to replace the keyboard.
- Inspect the exterior of the system, including all controls and
indicators, and all user-accessible data storage devices for any signs of physical damage.
Does the inspection reveal any problems?
Yes. Proceed to the appropriate procedure in "Removing
and Replacing Parts."
No. Proceed to "Observing the
Boot Routine."
After you have performed an external visual inspection as described
in "External Visual Inspection" boot the system and, while the boot routine is
running, observe the system for any indications of problems.
|
NOTE: Most of the steps in this procedure require observation
of system functions and indications, some of which can occur simultaneously. It may be
necessary to reboot the system several times to complete all of these steps. |
To perform the following procedure, you need the diagnostics CD
provided with your PowerEdge software. If your CD is not available, you can download the
diagnostics program to a diskette from the Dell Web site at http://support.dell.com.
To observe problem indications during the boot routine, perform the
following steps:
- If the system is off, turn on all peripherals and the system.
- Insert the diagnostics CD into the CD-ROM drive (or the
diskette containing the diagnostics program) and reboot the system.
- Watch the <Num Lock>, <Caps Lock>, and <Scroll
Lock> indicators on the upper-right corner of the keyboard.
After all three indicators flash momentarily, and following a long pause (approximately
30 seconds), the Num Lock indicator should light up and remain on (unless the Num
Lock option is set to Off in the System
Setup program).
Do these indicators flash on and off within approximately 10 seconds after the boot
routine starts?
Yes. Proceed to step 3.
No. Replace the system power supply.
- During the boot routine, observe the system for any of the following
indications:
- Post beep codes — A beep code is a series of beeps that
indicates an error condition. See "Post Beep
Codes."
- System error messages — These messages can indicate problems or
provide status information. If a system error message appears, see "System Messages."
- Diskette-drive and hard-disk drive access indicators — These
indicators light up in response to data being transferred to or from the drives. If either
of these indicators fails to light up during the boot routine, troubleshoot the diskette
drive or hard-disk drive subsystem, as appropriate.
- Observe the monitor screen for the Diagnostics menu.
Does the Diagnostics menu appear?
Yes. See "Running the Dell
Diagnostics."
No. Proceed to step 5.
- Insert another copy of the diagnostics CD or diskette into the
appropriate drive, and reboot the system.
Does the Diagnostics menu appear?
Yes. See "Running the Dell
Diagnostics."
No. Proceed to "Internal
Visual Inspection."
| NOTICE: Before you proceed with the internal
visual inspection described in this section, ensure that the user has saved all open files
and exited all open application programs, if possible. |
A simple visual inspection of a system’s interior hardware can
often lead to the source of a problem, such as a loose expansion card, cable connector, or
mounting screw. When you perform the visual inspection, see "System Features" to locate components referenced
in the inspection procedure.
To perform the internal visual inspection, perform the following
steps:
- Turn off the system, including any attached peripherals, and
disconnect all the AC power cables from electrical outlets.
 |
CAUTION: Before beginning to work inside the
system, disconnect the power supply from the power source and the power supply cables from
the power supply. |
- Remove the system cover as described in "System Cover."
|
CAUTION: The microprocessor and heat sink
assembly can get extremely hot during system operations. Be sure that they have had
sufficient time to cool before touching them. |
|
CAUTION: When handling the microprocessor and
heat-sink assembly, take care to avoid sharp edges on the heat sink. |
- Verify that the chip sets, memory modules, expansion cards, and
microprocessor and heat-sink assembly are fully seated in their sockets or connectors.
- To ensure that the chip sets are fully seated in their sockets, press
firmly on the top of each chip.
- To remove and reseat a microprocessor and heat sink assembly, perform
the steps described in "Microprocessor."
- To remove and reseat a memory module, perform the steps described in
"DIMMs."
- If you need to remove and reseat an expansion card, remove the card
as described in "Expansion Cards," and
carefully reinsert the card in its connector until fully seated.
- Verify that all jumpers are set correctly.
For information about jumper settings, see "System Board Jumpers."
- Check all cable connectors inside the system to verify that they are
firmly attached to their appropriate connectors.
- Replace the system cover.
- Reconnect the system and any attached peripherals to their power
sources, and turn them on.
Does the problem appear to be resolved?
Yes. No further steps are necessary.
No. Proceed to "Getting Help."
| |
NOTE:
You must connect a keyboard and monitor to run the Dell Diagnostics. |
You must run the Dell Diagnostics from a set of diskettes
that you create from the Dell OpenManage Server Assistant CD.
To run the Dell Diagnostics from the diskettes, perform the
following steps:
Create a set of diagnostics diskettes using the Dell
OpenManage Server Assistant CD.
To create diagnostic diskettes from the Dell OpenManage
Server Assistant CD, select Create Diskettes from the Dell OpenManage Server
Assistant menu and then continue down the menu hierarchy by selecting the following
categories: PowerEdge 350, Diskette Set, System Utilities, Server
Diagnostics. Create five Server Diagnostics diskettes.
Boot the system from the first diagnostics diskette.
If the system fails to boot, see "Getting Help,"
for instructions on obtaining technical assistance.
When you start the diagnostics a message is displayed
telling you that the diagnostics are loading. The Diagnostics menu appears. The
menu allows you to run all or specific diagnostic tests or to exit the Dell Diagnostics.
| |
NOTE:
Before you read the rest of this section,
you might want to start the Dell Diagnostics so that you can see it on your monitor
screen. |
For a quick check of the system,
select Test All Devices and then select Quick Tests. This option runs only
the device tests that do not require user interaction and that do not take a long time to
run. Dell recommends that you choose this option first to increase the chance of tracing
the source of the problem quickly. For a complete check of the system, select Test All
Devices and then select Extended Tests. To check a particular area of the
system, choose Advanced Testing.
See "Running Dell Diagnostics" in the system Installation
and Troubleshooting Guide for specific information about the Dell Diagnostics.
If none of the troubleshooting procedures in this section or the
tests in the Dell Diagnostics reveals the source of the problem or leads to the proper
troubleshooting steps for determining the source of the problem, see the Support
pages at http://support.dell.com or call Dell for technical assistance.
For instructions on contacting Dell, see "Getting Help" in the Installation
and Troubleshooting Guide.
Back to Contents Page