 Safety First—For You and Your System
Dell™ PowerVault™ 715N Systems Installation and Troubleshooting Guide
Safety First—For You and Your System
Checking Specific System Problems
Removing and Replacing the Front Bezel
Removing and Replacing the System Cover
Troubleshooting a Damaged System
Troubleshooting the System Battery
Troubleshooting the Power Supply
Troubleshooting the Cooling Fan
Troubleshooting an Expansion Card
Troubleshooting the System Board
If your system is not working as expected, begin troubleshooting using the procedures in this section. This section guides you through initial checks and procedures that can solve basic system problems and provides troubleshooting procedures for components inside the system. Before you start any of the procedures in this section, perform the following steps:
 |
NOTE: To perform the troubleshooting tasks, you can use the console redirection function on the serial port (COM1). See the System Administrator's Guide for more information about console redirection. |
The procedures in this guide require that you remove the cover and work inside the system. While working inside the system, do not attempt to service the system except as explained in this guide and elsewhere in Dell documentation. Always follow the instructions closely. Make sure to review all of the procedures in "Safety Instructions" in your System Information document.
Working inside the system is safe—if you observe the following precautions.

|
CAUTION: The power supplies in this system produce high voltages and energy hazards, which can cause bodily harm. Only trained service technicians are authorized to remove the system cover and access any of the components inside the system. |
|
|
CAUTION: See "Protecting Against Electrostatic Discharge" in the Safety Instructions in your System Information document before performing any procedure that requires you to open the cover. |
Improperly set switches, controls, and loose or improperly connected cables are the most likely source of problems for the system or any peripherals. A quick check of all the switches, controls, and cable connections can easily solve these problems. See your User's Guide for the back-panel features and connectors.
If the system is not receiving power, plug it into another electrical outlet. If it still is not receiving power, try another PDU.
Looking at and listening to the system is important in determining the source of a problem. Look and listen during the system's startup routine for the indication described in Table 4-1.
|
Look and Listen for: |
Action |
|---|---|
An error message | |
The hard drive activity indicators | See "Troubleshooting Hard Drives." |
A series of beeps | |
An unfamiliar constant scraping or grinding sound when you access a hard drive | See "Getting Help" for information about obtaining technical assistance from Dell. |
Removing the front bezel provides access to the hard drives. To remove the bezel, push the levers on the outside inward and pull the bezel away from the system (see Figure 4-1).
Figure 4-1. Removing the Front Bezel
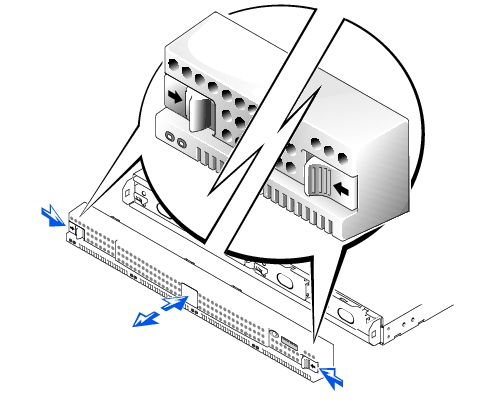
To replace the bezel, push the levers inward and push the bezel onto the front of the system.
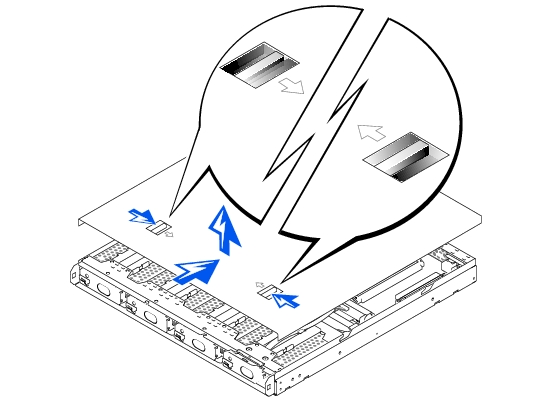
The system is enclosed by a front bezel and a cover. To upgrade or troubleshoot the system, remove the system cover to gain access to internal components.
Figure 4-2. Removing the System Cover
This section provides troubleshooting procedures for equipment that connects directly to the I/O panel of the system. Before you perform any of the procedures, see "External Connections."
|
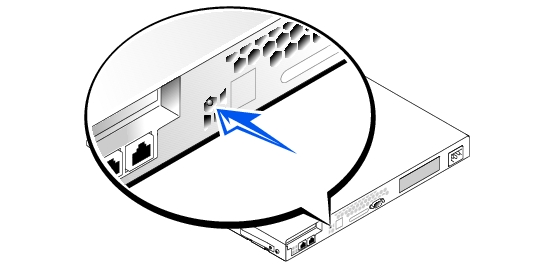
NOTE: The system does not turn on until you release the console redirection reset button. |
Figure 4-3. Console Redirection Reset Button
If the problem is resolved, the interface cable must be replaced. See "Getting Help" for information about obtaining technical assistance.
|
NOTE: Parts of this procedure require you to use the console redirection function on the serial port. See your Administrator's Guide for information about connecting to the system through console redirection. |
|
NOTE: The system takes approximately 5 minutes to fully boot. Ensure that the system has had adequate time to boot before performing any troubleshooting procedures. |
See "Using the BIOS Setup Utility" in the User's Guide for instructions.
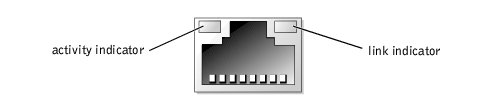
The green link indicator shows that the adapter is connected to a valid link partner. The amber activity indicator lights if the system sends or receives network data.
In Figure 4-5, the system cover and front bezel are removed to provide an interior view of the system.
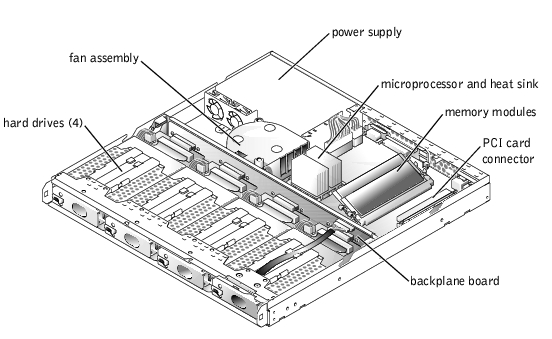
The system board holds the system's control circuitry and other electronic components. Several hardware options such as the microprocessors and memory are installed directly on the system board. The system board can accommodate one PCI expansion card.
The hard drive bays provide space for up to four drives. Power is supplied to the backplane board, the system board, and internal peripherals through a power supply.
If the system does not start up properly, see "Getting Help" for information about obtaining technical assistance.
If the tests did not complete successfully, see "Getting Help" for information about obtaining technical assistance.
|
NOTE: Parts of this procedure require you to use the console redirection function on the serial port. See your System Administrator's Guide for information about connecting to the system through console redirection. |
If the tests did not complete successfully, see "Getting Help" for information about obtaining technical assistance.
See "Replacing the System Battery" in "Installing System Board Options."
|
|
CAUTION: There is a danger of a new battery exploding if it is incorrectly installed. Replace the battery only with the same or equivalent type recommended by the manufacturer. Discard used batteries according to the manufacturer's instructions. |
If the problem is not resolved by replacing the battery, see "Getting Help" for information about obtaining technical assistance.
See "Getting Help" for information about obtaining technical assistance.
See "Removing and Replacing the Fan Assembly" in "Installing System Board Options" for information about removing the fan.
Ensure that the fan connector is firmly seated.
If the problem is resolved, you are finished with this procedure.
If the problem still exists, continue to step 7.
See "Getting Help" for information about obtaining technical assistance.
|
NOTE: Parts of this procedure require you to use the console redirection function on the serial port. See your System Administrator's Guide for information about connecting to the system through console redirection. |
If the problem is resolved, your are finished with this procedure.
If the problem still exists, continue to step 7.
If the tests do not complete successfully, see "Getting Help" for information about obtaining technical assistance.
If the system memory tests still fail, see "Getting Help" for information about obtaining technical assistance.
|
NOTE: Parts of this procedure require you to use the console redirection function on the serial port. See your System Administrator's Guide for information about connecting to the system through console redirection. |
See "Using the BIOS Setup Utility," in the User's Guide for instructions.
|
|
CAUTION: See "Protecting Against Electrostatic Discharge" in the safety instructions in your System Information document. |
See "Using the BIOS Setup Utility," in the User's Guide for instructions.
If the amount of memory installed matches the system memory setting, you are finished with this procedure.
If the amount of memory installed still does not match the system memory setting, continue to the next step.
If the test does not complete successfully, see "Getting Help" for information about obtaining technical assistance.
See "Removing and Replacing the Front Bezel."
See "Removing and Replacing the System Cover."
If the tests do not run successfully, see "Getting Help" for information about obtaining technical assistance.
If the tests do not complete successfully, see "Getting Help" for information about obtaining technical assistance.
|
|
CAUTION: This troubleshooting procedure can destroy data stored on the hard drive. Before you proceed, back up all the files on the hard drive. |
See "Installing Hard Drives" for information about installing hard drives.
See "Getting Help" for information about obtaining technical assistance.